Udoo: Difference between revisions
| Line 391: | Line 391: | ||
For some reason, the x11 is gray screen when I tested it from my Ubuntu 14.04. | For some reason, the x11 is gray screen when I tested it from my Ubuntu 14.04. | ||
</span> | </span> | ||
There are some discussion over [http://ubuntuforums.org/showthread.php?t=1858745 here]. | |||
[[File:UdooThroughVnc.jpg|100px]] | [[File:UdooThroughVnc.jpg|100px]] | ||
Revision as of 08:18, 25 August 2015
Documentation
- Starting manual
- Mechanical Specs
- Schematics
- Pinout explained
More Resource
https://www.facebook.com/udooboard
Community
Benchmark
- https://wiki.archlinux.org/index.php/Benchmarking
- GPU and CPU stress test
- http://www.udoo.org/udoo-supports-full-opengl-hardware-acceleration/
- http://www.udoo.org/forum/udoo-cpu-performance-comparison-t672.html
- http://www.udoo.org/forum/udoo-mx6-overclocked-2ghz-t596.html
Download and create uSD card
Create microSD from image
http://www.udoo.org/getting-started/creating-a-bootable-micro-sd-card-from-image/
sudo umount /dev/sdc*
sudo dd bs=4M if=~/Downloads/udoo_dual_ubuntu1204_v2.0.img of=/dev/sdc # take 15 minutes on a 32GB class 10 uSD card
sudo sync
df -h # find out <sd_label> in /media/<sd_label>
sudo umount /media/<sd_label>
- Follow this post to extend the size of /dev/root to the SD card capacity. Note that the first command is fdisk /dev/mmcblk0 ('f' is lost there). The operations can be done in a live session (i.e. udoo is in action) similar to the Beaglebone case. Another way is to use the Udoo Configuration Tool. However, both methods do not work very well. The first method cannot boot and the second method can only extend up to 15GB. A better way is to use Gparted program (Linux OS) and work on this on another computer. Gparted allows me to fully use 32GB uSD card.
Create microSD from binaries
We first download the binaries from http://www.udoo.org/downloads/#tab2. Then we follow the instruction on elinux.org to download 4 files (file system, U-boot, Kernel and Kernel modules) and then to create the microSD card. This method works for Debian, Ubuntu, Linaro OS.
Create your own Ubuntu FS using Chroot
If we want to create an image based on ubuntu 14.04, we can follow the following posts:
- http://www.udoo.org/forum/ubuntu-lts-t1316-10.html
- http://feilipu.me/2013/11/09/udoo-ubuntu-12-04-guide/
- https://eewiki.net/display/linuxonarm/UDOO (starting from the most basic)
- https://github.com/UDOOboard?tab=repositories
My note of installing Ubuntu 14.04
- the whole process is actually quicker and easier compared to install a SD image
- chroot part seems unnecessary
- htop command shows only 39 MB/874 MB of memory is used (without any gui desktop, see also udoo.org page)
- apt-get install lxde gets lots of errors that eventually making installing lxde desktop impossible for ubuntu 14.04 OS
- gcc version is 4.8.2 for ubuntu 14.04
Compile Android from sources
Back up/Save to microSD card
Suppose my microSD card is on /dev/sdc.
sudo dd bs=1M if=/dev/sdc of=~/Udoo-backup.bin
sudo dd bs=1M if=~/Udoo-backup.bin of=/dev/sdc
u-boot
http://www.linuxjournal.com/content/handy-u-boot-trick
UDOObuntu
For some reason, the system freezes about 25 minutes (shown on htop screen). Maybe it is because the version is beta.
(Update) The 1.1 stable looks better. Froze after 1 day 12 hrs (shown from a terminal running the htop program). Since v1.1 is based on Ubuntu 12.04, the gcc is quite old (v4.6.3).
UDOOBuntu includes several pre-installed utilities such as vnc server (password is 'ubuntu'), Arduino IDE, OpenCV, ssh-server and Lubuntu Software Manager. To connect to UDOOBuntu from another machine,
xtightvncviewer xxx.xxx.x.xxx:5901
Android 4.3 Jelly Bean
Works fine. Installing gapps also works too. Youtube app does not work so don't bother to install it from Google app store.
Debian Wheezy armHF
The <udoo_dual_debian_wheezy_armhf_v1.1.zip> released on 2014-04-07 is based on debian wheezy 7.4. The gcc version is 4.6.3. The web browser is Iceweasel (supports flash although it is too SLOW). Running sudo apt-get update and sudo apt-get install gcc-4.7 will result in an error.
Arduino Programming
- http://www.udoo.org/ProjectsAndTutorials/get-the-arduino-ide-ready-to-program-udoo/
- http://www.elinux.org/UDOO_programming_the_embedded_Arduino_microcontroller
From Udoo itself
I can use dmesg | grep ttymxc3 to double check the device is attached.
Use sudo ln -sf /dev/ttymxc3 /dev/ttyS0 each time we boot the Ubuntu (or add it to the local.rc file to ensure it occurs on each boot) . See the forum discussion.
Simple LED sketch works well.
The Ethernet webServer sketch does not work. Why?
On an External computer
First I unplug J18 jumper, remove microSD card, and connect microUSB to CN6 in UDOO.
Download the official Arduino IDE 1.5.4.
I try to use dmesg | grep cp210x to check the device. The obstacle is the device is not found in Arduino IDE (No device found on ttyUSB0). If I try to follow 'Serial Driver' part to download and run 'make' , I will get an error
Linux_3.x.x_VCP_Driver_Source/cp210x.c:164:12: Error: 'usb_serial_probe' undeclared here (not in a function)
Linux_3.x.x_VCP_Driver_Source/cp210x.c:165:16: Error :  'usb_serial_disconnect' undeclared here (not in a function)
Android
Switch_between_adb_Debug_and_ADK_connection
http://elinux.org/UDOO_Switch_between_adb_Debug_and_ADK_connection
Serial port monitor
http://www.udoo.org/ProjectsAndTutorials/connecting-via-serial-cable/
minicom
On Linux, I can use minicom program to monitor serial port. We can install it by using 'sudo apt-get install minicom'.
Use sudo minicom -s to configure minicom first. Make sure the serial port is correct. For example, use /dev/ttyS0 when we use UDOO and dev/ttyUSB0 when we use external PC. The baud rate is set to 9600 8N1 and that 'Hardware flow control' is set to 'no'. Once we are done with the settings, use 'Save setup as dfl' and minicom will start up with the correct settings next time.
We shall not launch minicom immediately. We shall let Arduino IDE to finish uploading a sketch and then we can launch minicom. We can quit minicom by using Ctrl+A and z and x. If we start minicom before Arduino IDE finishes uploading a sketch, Arduino IDE will not be able to upload successfully; it will show an error 'no device found on /dev/ttyS0'.
See this post where we can use this technique to find out errors in running some system.
The boot process for UDoobuntu v1.1 and Android v4.4.
screen
It seems there is no way to exit minicom (Ctr+A Z not working) once it is used to monitor the boot process. So the screen program is a better choice.
sudo apt-get install screen
sudo screen /dev/ttyUSB0 115200
To exit it and return to console, hit Ctrl+a k and answer 'y'.
The drawback is I cannot scroll back the output directly. There is a trick to run scrollback; see cyberciti.biz. That is, click Ctrl+a [ (left square bracket) first to enter copy mode and then use Ctrl+u to scroll up or Ctrl +d to scroll down.
Note: for whatever reason, the 'screen' program is terminated.
[screen is terminating]
Misc
After installing Udoobuntu
- Take a look at the Lubuntu wikipedia page to see what applications are suitable to use in a system like Udoo. Udoobuntu use LXDE desktop environment as Lubuntu.
- Don't use Chromium browser. It is too heavy (use too several hundred MB memory). NetSurf is light and responsive. Ephphany looks more heavy and its responds are slower.
Use .local domain to access
udoobuntu has pre-installed avahi-daemon, so we can access Udoo by
ssh [email protected]
Disk partition for an Android system
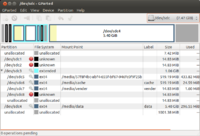
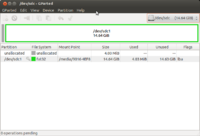
The following image shows the partitions in microSD card with an Android OS (4.2.2?) installed.
and the partitions of a brand new microSD card
Install Gapps in Android
- Jelly bean (v4.2 and v4.3) and Kitkat (v4.4)
- [http://www.teamandroid.com/gapps/ (find a matched gapps from a android version). The file <gapps-jb-20130812-signed.zip> works for jelly bean version (i.e. v4.3 and 4.2).
- http://www.udoo.org/forum/install-google-apps-t327-10.html (original post)
The real sdcX number can be found by using 'df -h' command (my computer already has 2 hard disks, so a USB drive goes to /dev/sdc).
sudo umount /dev/sdc*  # Seems to cause a problem later where /dev/sdc5 does not exist

# Unpack the zip in a local temp directory.
mkdir gapps
sudo unzip gapps-jb-20130812-signed.zip -d gapps
cd gapps

sudo mkdir /mnt/sdc5
df -h # find /media/brb/data1 partition

# Mount partition 5
sudo mount /dev/sdc5 /mnt/sdc5

# See what's in /mnt/sdc5 before the operation (optional)
$ ls /mnt/sdc5
anr       app-lib      dalvik-cache  drm         media     resource-cache  user
app       app-private  data          local       misc      ssh
app-asec  backup       dontpanic     lost+found  property  system

# Rsync everything from the “system” folder in the zip file to the mounted partition.
sudo rsync -avu system/* /mnt/sdc5/

# See what's in /mnt/sdc5 after the operation (optional)
$ ls /mnt/sdc5
addon.d   app-lib       data       framework   media           ssh     usr
anr       app-private   dontpanic  lib         misc            system
app       backup        drm        local       property        tts
app-asec  dalvik-cache  etc        lost+found  resource-cache  user
brb@brb-P45T-A:~/Downloads/gapps$

# Unmount SD, put it in the UDOO, and voilà,
sudo umount /mnt/sdc5
Update:
# Before doing rsync
$ ls /mnt/sdc5
app  bin  build.prop  etc  fonts  framework  lib  lost+found  media  usr  vendor  xbin

$ sudo rsync -avu system/* /mnt/sdc5/
sending incremental file list
addon.d/
addon.d/70-gapps.sh
app/
app/ChromeBookmarksSyncAdapter.apk
app/ConfigUpdater.apk
app/GenieWidget.apk
app/Gmail.apk
app/GmsCore.apk
app/GoogleBackupTransport.apk
app/GoogleCalendarSyncAdapter.apk
app/GoogleContactsSyncAdapter.apk
app/GoogleEars.apk
app/GoogleFeedback.apk
app/GoogleLoginService.apk
app/GooglePartnerSetup.apk
app/GooglePlus.apk
app/GoogleServicesFramework.apk
app/GoogleTTS.apk
app/LatinImeDictionaryPack.apk
app/MediaUploader.apk
app/NetworkLocation.apk
app/Phonesky.apk
app/SetupWizard.apk
app/TalkBack.apk
app/VoiceSearchStub.apk
etc/
etc/g.prop
etc/permissions/
etc/permissions/com.google.android.maps.xml
etc/permissions/com.google.android.media.effects.xml
etc/permissions/com.google.widevine.software.drm.xml
etc/permissions/features.xml
etc/preferred-apps/
etc/preferred-apps/google.xml
framework/
framework/com.google.android.maps.jar
framework/com.google.android.media.effects.jar
framework/com.google.widevine.software.drm.jar
lib/
lib/libAppDataSearch.so
lib/libRSSupport.so
lib/libfilterpack_facedetect.so
lib/libfrsdk.so
lib/libgames_rtmp_jni.so
lib/libgcomm_jni.so
lib/libgoogle_recognizer_jni.so
lib/libgoogle_recognizer_jni_l.so
lib/libgtalk_jni.so
lib/libgtalk_stabilize.so
lib/libpatts_engine_jni_api.so
lib/libplus_jni_v8.so
lib/librs.antblur.so
lib/librs.antblur_constant.so
lib/librs.antblur_drama.so
lib/librs.drama.so
lib/librs.film_base.so
lib/librs.fixedframe.so
lib/librs.grey.so
lib/librs.image_wrapper.so
lib/librs.retrolux.so
lib/librsjni.so
lib/libspeexwrapper.so
lib/libvcdecoder_jni.so
lib/libvorbisencoder.so
lib/libwebp_android.so
tts/
tts/lang_pico/
tts/lang_pico/de-DE_gl0_sg.bin
tts/lang_pico/de-DE_ta.bin
tts/lang_pico/es-ES_ta.bin
tts/lang_pico/es-ES_zl0_sg.bin
tts/lang_pico/fr-FR_nk0_sg.bin
tts/lang_pico/fr-FR_ta.bin
tts/lang_pico/it-IT_cm0_sg.bin
tts/lang_pico/it-IT_ta.bin
usr/
usr/srec/
usr/srec/en-US/
usr/srec/en-US/acoustic_model
usr/srec/en-US/c_fst
usr/srec/en-US/clg
usr/srec/en-US/compile_grammar.config
usr/srec/en-US/contacts.abnf
usr/srec/en-US/dict
usr/srec/en-US/dictation.config
usr/srec/en-US/embed_phone_nn_model
usr/srec/en-US/embed_phone_nn_state_sym
usr/srec/en-US/endpointer_dictation.config
usr/srec/en-US/endpointer_voicesearch.config
usr/srec/en-US/ep_acoustic_model
usr/srec/en-US/g2p_fst
usr/srec/en-US/google_hotword.config
usr/srec/en-US/google_hotword_clg
usr/srec/en-US/google_hotword_logistic
usr/srec/en-US/grammar.config
usr/srec/en-US/hmmsyms
usr/srec/en-US/hotword_symbols
usr/srec/en-US/lintrans_model
usr/srec/en-US/metadata
usr/srec/en-US/norm_fst
usr/srec/en-US/normalizer
usr/srec/en-US/offensive_word_normalizer
usr/srec/en-US/phonelist
usr/srec/en-US/rescoring_lm
usr/srec/en-US/symbols

sent 127,944,934 bytes  received 1,855 bytes  255,893,578.00 bytes/sec
total size is 142,001,100  speedup is 1.11

# After doing rsync
$ ls /mnt/sdc5
addon.d  app  bin  build.prop  etc  fonts  framework  lib  lost+found  media  tts  usr  vendor  xbin
flash video
It is better to not expect (too much) to play any flash videos on an ARM-based linux system. Android is an idea choice to play flash videos on an ARM-based operating system.
http://udoo.org/forum/viewtopic.php?f=17&t=137
sudo apt-get install gnash
sudo apt-get install browser-plugin-gnash
sudo apt-get install firefox
sudo apt-get install gnome-system-tools
Display Size
http://udoo.org/forum/viewtopic.php?f=6&t=119
VNC/remote desktop connection
x11vnc
(tested on UDoobuntu 2 beta1 for Udoo dual) For some reason, tightvnc does not work. The x11vnc method works.
http://www.udoo.org/forum/threads/x11vnc.846/#post-5752
sudo apt-get install x11vnc
x11vnc -storepasswd
enter a login password twice and save
cd .config
mkdir autostart
cd autostart
edit $HOME/.config/autostart/x11vnc.desktop
[Desktop Entry]
Encoding=UTF-8
Type=Application
Name=x11vnc
Comment=
Exec=x11vnc -forever -usepw -httpport 5900
StartupNotify=false
Terminal=false
Hidden=false
save and restart and you should be able to vnc on port 5900
The client needs to run xvncviewer XXX.XXX.XXX.XXX:0 or xvncviewer XXX.XXX.XXX.XXX to connect to UDOO. I have to admit I first use UDOO desktop Network -> x11vnc to play around its GUI dialog. But then after the connection works the first time, I can reboot UDOO and the setting still works.
Note that on my 1920x1080 (16:9) monitor, it seems to better to use the following setup in Udoo in order to get a good screen resolution for the remote desktop. It will get the whole remote desktop on my local monitor w/ good font size.
x11vnc -forever -usepw -httpport 5900 -geometry 1820x1024
For some reason, the vnc connection was disconnected randomly when I tested it from my Ubuntu 14.04.
tightvnc
http://udoo.org/forum/viewtopic.php?f=6&t=110
This tutorial teaches how to add tightvncserver to rc.local file so it is available on booting.
# Install tightvncserver
sudo apt-get install tightvncserver

sudo nano /etc/rc.local
# Add the following line before 'exit 0' line.
vncserver :1 -geometry 800x600 -depth 24
For some reason, the x11 is gray screen when I tested it from my Ubuntu 14.04. There are some discussion over here.
View Ubuntu 12.04 Desktop on Android (Galaxy tab 8.9) by using bVNC Free - Secure VNC Viewer app.
Speed comparison via C program
http://udoo.org/forum/viewtopic.php?f=2&t=470
Clonezilla image of Ubuntu 13.10 with ROS
http://udoo.org/forum/viewtopic.php?f=2&t=147&start=10
Node.js + GPIO
http://udoo.org/forum/viewtopic.php?f=8&t=391
http://udoo.org/forum/viewtopic.php?f=8&t=431 (Installation of Node.js)
Set up Qt
- http://udoo.org/forum/viewtopic.php?f=8&t=247 (OLD post)
- http://www.udoo.org/qt-3d-with-opengl-es-2-0/ (Working)
- http://www.udoo.org/ProjectsAndTutorials/how-to-build-qt5-for-udoo/ build Qt5
Change time zone
sudo dpkg-reconfigure tzdata
more /etc/timezone
# US/Eastern
sudo service cron stop
sudo service cron start


