Udoo: Difference between revisions
| Line 135: | Line 135: | ||
# Unmount SD, put it in the UDOO, and voilà, | # Unmount SD, put it in the UDOO, and voilà, | ||
sudo umount /mnt/sdc5 | sudo umount /mnt/sdc5 | ||
</pre> | |||
Update: | |||
<pre> | |||
# Before doing rsync | |||
$ ls /mnt/sdc5 | |||
app bin build.prop etc fonts framework lib lost+found media usr vendor xbin | |||
# After doing rsync | |||
$ ls /mnt/sdc5 | |||
addon.d app bin build.prop etc fonts framework lib lost+found media tts usr vendor xbin | |||
</pre> | </pre> | ||
Revision as of 10:51, 26 December 2014
Documentation
- Starting manual
- Mechanical Specs
- Schematics
- Pinout explained
More Resource
https://www.facebook.com/udooboard
Community
Download
- SD Image and instruction to burn the image to microSD card; like
sudo umount /dev/sdc5
sudo dd bs=4M if=~/Downloads/udoo_dual_ubuntu1204_v2.0.img of=/dev/sdc
sudo sync
df -h # find out <sd_label> in /media/<sd_label>
sudo umount /media/<sd_label>
Create microSD from image
http://www.udoo.org/getting-started/creating-a-bootable-micro-sd-card-from-image/
Create microSD from binaries
We first download the binaries from http://www.udoo.org/downloads/#tab2. Then we follow the instruction in http://elinux.org/UDOO#Creating_a_bootable_Micro_SD_card_from_binaries to create the microSD card. This method works for Debian, Ubuntu, Linaro OS.
Back up/Save to microSD card
Suppose my microSD card is on /dev/sdc.
sudo dd bs=1M if=/dev/sdc of=~/Udoo-backup.bin
sudo dd bs=1M if=~/Udoo-backup.bin of=/dev/sdc
u-boot
http://www.linuxjournal.com/content/handy-u-boot-trick
UDOObuntu
For some reason, the system freezes about 25 minutes (shown on htop screen).
Android 4.3 Jelly Bean
Debian Wheezy armHF
Arduino Programming
http://www.elinux.org/UDOO_programming_the_embedded_Arduino_microcontroller
From Udoo itself
I can use dmesg | grep ttymxc3 to double check the device is attached.
Use sudo ln -sf /dev/ttymxc3 /dev/ttyS0 each time we boot the Ubuntu (or add it to the local.rc file to ensure it occurs on each boot) . See the forum discussion.
Simple LED sketch works well.
The Ethernet webServer sketch does not work. Why?
On an External computer
First I unplug J18 jumper, remove microSD card, and connect microUSB to CN6 in UDOO.
Download the official Arduino IDE 1.5.4.
I try to use dmesg | grep cp210x to check the device. The obstacle is the device is not found in Arduino IDE (No device found on ttyUSB0). If I try to follow 'Serial Driver' part to download and run 'make' , I will get an error
Linux_3.x.x_VCP_Driver_Source/cp210x.c:164:12: Error: 'usb_serial_probe' undeclared here (not in a function)
Linux_3.x.x_VCP_Driver_Source/cp210x.c:165:16: Error :  'usb_serial_disconnect' undeclared here (not in a function)
Serial port monitor
On Linux, I can use minicom program to monitor serial port. We can install it by using 'sudo apt-get install minicom'.
Use sudo minicom -s to configure minicom first. Make sure the serial port is correct. For example, use /dev/ttyS0 when we use UDOO and dev/ttyUSB0 when we use external PC. The baud rate is set to 9600 8N1 and that 'Hardware flow control' is set to 'no'. Once we are done with the settings, use 'Save setup as dfl' and minicom will start up with the correct settings next time.
We shall not launch minicom immediately. We shall let Arduino IDE to finish uploading a sketch and then we can launch minicom. We can quit minicom by using Ctrl+A and z and x. If we start minicom before Arduino IDE finishes uploading a sketch, Arduino IDE will not be able to upload successfully; it will show an error 'no device found on /dev/ttyS0'.
Misc
Install Ubuntu 12.04 or Android
- http://feilipu.me/2013/11/09/udoo-ubuntu-12-04-guide/
- http://www.elinux.org/UDOO_creating_a_bootable_Micro_SD_card_from_precompiled_image
sudo umount /dev/sdc1
sudo dd bs=1M if=/mnt/ssd/tmp/udoo_dual_android_v1.4.1.img of=/dev/sdc
sudo sync
sudo umount /media/<sd_label>
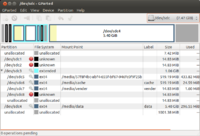
The following image shows the partitions in microSD card with Android OS.
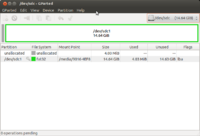
and the partitions of a brand new microSD card
Install Gapps in Android
- http://www.udoo.org/guide-how-to-install-gapps-on-udoo-running-android/
- [http://www.teamandroid.com/gapps/ (find a matched gapps from a android version). The file <gapps-jb-20130812-signed.zip> works for jelly bean version (v4.3 and 4.2).
- http://www.udoo.org/forum/install-google-apps-t327-10.html (original post)
The real sdcX number can be found by using 'df -h' command (my computer already has 2 hard disks, so a USB drive goes to /dev/sdc).
sudo umount /dev/sdc*

# Unpack the zip in a local temp directory.
mkdir gapps
sudo unzip gapps-jb-20130812-signed.zip -d gapps
cd gapps

sudo mkdir /mnt/sdc5
df -h # find /media/brb/data1 partition

# Mount partition 5
sudo mount /dev/sdc5 /mnt/sdc5

# See what's in /mnt/sdc5 before the operation (optional)
$ ls /mnt/sdc5
anr       app-lib      dalvik-cache  drm         media     resource-cache  user
app       app-private  data          local       misc      ssh
app-asec  backup       dontpanic     lost+found  property  system

# Rsync everything from the “system” folder in the zip file to the mounted partition.
sudo rsync -avu system/* /mnt/sdc5/

# See what's in /mnt/sdc5 after the operation (optional)
$ ls /mnt/sdc5
addon.d   app-lib       data       framework   media           ssh     usr
anr       app-private   dontpanic  lib         misc            system
app       backup        drm        local       property        tts
app-asec  dalvik-cache  etc        lost+found  resource-cache  user
brb@brb-P45T-A:~/Downloads/gapps$

# Unmount SD, put it in the UDOO, and voilà,
sudo umount /mnt/sdc5
Update:
# Before doing rsync
$ ls /mnt/sdc5
app  bin  build.prop  etc  fonts  framework  lib  lost+found  media  usr  vendor  xbin
# After doing rsync
$ ls /mnt/sdc5
addon.d  app  bin  build.prop  etc  fonts  framework  lib  lost+found  media  tts  usr  vendor  xbin
flash video
http://udoo.org/forum/viewtopic.php?f=17&t=137
sudo apt-get install gnash
sudo apt-get install browser-plugin-gnash
sudo apt-get install firefox
sudo apt-get install gnome-system-tools
Display Size
http://udoo.org/forum/viewtopic.php?f=6&t=119
VNC
http://udoo.org/forum/viewtopic.php?f=6&t=110
This tutorial teaches how to add tightvncserver to rc.local file so it is available on booting.
# Install tightvncserver
sudo apt-get install tightvncserver

sudo nano /etc/rc.local
# Add the following line before 'exit 0' line.
vncserver :1 -geometry 800x600 -depth 24
View Ubuntu 12.04 Desktop on Android (Galaxy tab 8.9) by using bVNC Free - Secure VNC Viewer app.
Look at the boot process via USB to serial interface
Check out this tutorial.
Speed comparison via C program
http://udoo.org/forum/viewtopic.php?f=2&t=470
Clonezilla image of Ubuntu 13.10 with ROS
http://udoo.org/forum/viewtopic.php?f=2&t=147&start=10
Node.js + GPIO
http://udoo.org/forum/viewtopic.php?f=8&t=391
http://udoo.org/forum/viewtopic.php?f=8&t=431 (Installation of Node.js)
Set up Qt
- http://udoo.org/forum/viewtopic.php?f=8&t=247 (OLD post)
- http://www.udoo.org/qt-3d-with-opengl-es-2-0/ (Working)
- http://www.udoo.org/ProjectsAndTutorials/how-to-build-qt5-for-udoo/ build Qt5
Change time zone
sudo dpkg-reconfigure tzdata
more /etc/timezone
# US/Eastern
sudo service cron stop
sudo service cron start


