Github
Git
- Github & Git Foundations Training from youtube.
- git/github guide a minimal tutorial from Karl Broman
- Some examples of projects hosted in github: RHadloop, shiny, Qt.
- https://help.github.com/articles/fork-a-repo
- http://www.atlassian.com/git/tutorial/undoing-changes
- Git reference (5 pages of summary) and Pro Git book
- Distributed Version Control with Git (nice tutorial including Github, BitBucket. )
- Cheat sheet
- https://www.kernel.org/pub/software/scm/git/docs/everyday.html
- http://haacked.com/archive/2012/05/21/introducing-github-for-windows.aspx
- Delete a repository
- git push will ask username/password if we have not logged in (eg use linux machine).
- Under Windows, we need to provide username/password when we install Git program provided by Github. Even that, when we use powershell program to commit codes to github, the username was not yet shown on the github website. We need to use git config --global user.name "Your Name" to fix it.
- When I commit (git commit) a directory containing resource file, it shows warning: LF will be replaced by CRLF in xxxx.qrc.
- Password cache
- github tutorial (for statistician)
- git add -A
git config --global credential.helper cache
My example of working on a new repository called 'network'.
- Follow https://help.github.com/articles/create-a-repo to create a new repository. For convenience, I also check the button to create README file.
- Click 'GitHub' icon on Windows Desktop. Look at the LHS and click on the word 'github'. Click 'clone' button (This can be accomplished by git clone https://github.com/arraytools/network.git). The new repository will appear under C:\Users\USERNAME\Documents\Github\ directory. Now Click 'Git Shell' icon on the Windows Desktop and go to C:\Users\USERNAME\Documents\Github\network directory where 'network' is my repository's name.
git config --global color.ui auto  # colorize the output of git
git init

git add client.c
git add server.c
git add server2.c
git commit -m 'first commit'

git status
# On branch master
# Your branch is ahead of 'origin/master' by 1 commit.

# git remote add origin https://github.com/arraytools/network.git
# git push <remote> <branch>
git push origin master

# If we modify any file, we need to go through git add, git commit and git push 3 commands.

# get commit_id
git log
# get a specific version
git checkout commit_id

# after an examination, we want to get the latest version
git pull origin master
# If you do not want to merge the upstream changes wit your local repository, run git fetch to
# fetch the changes and then git merge to merge the changes.
# git pull is just a combination of fetch and merge.

# To rename a file
git mv originafile newfile
git commit -m "rename orginalfile"
git push

# To remove a file
rm myfile
git add . -A
git commit -m "remove a file"
git push

# Revert to origin's master branch's version of file
# http://stackoverflow.com/questions/1817766/revert-to-origins-master-branchs-version-of-file
# 1. Assuming you did not commit the file, or add it to the index, then:
git checkout filename
# 2. Assuming you added it to the index, but did not commit it, then:
git reset HEAD filename
git checkout filename
Check the https://github.com/arraytools/network. The commit goes to the repository!
In summary: add and commit are local operations, push, pull and fetch are operations that interact with a remote.
If we want to checkout a specific commit on a new computer, we can use (here we use Qt repository as an example)
git clone https://xxxxxx/xxxxxx/Qt.git
cd Qt
git log --oneline
git checkout SHA1  (7 digits obtained from git log --oneline commandis enough)
After that we can run
# move HEAD to origin
git checkout origin/master

# Visualize using text mode
git log --graph --oneline --date-order --decorate --color --all
Using GUI client: gitg
sudo apt-get install gitg
To switch among different branch (eg. github project page is located in gh-pages branch of a repository),
git checkout gh-pages
git checkout master
To avoid being asking the username each time when you use 'git push', you can modify the .git/config file of your local repository. This file contains a section called 'remote' with an entry called 'url'. The 'url' entry should contains the https link of repository you're talking about. When you prefix the host url with your username, git shouldn't be asking for your username anymore. Here's an example: url = https://[email protected]
GUI version of Git software
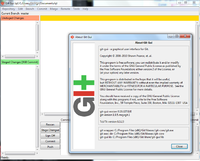
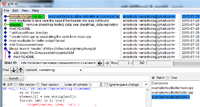
- http://git-scm.com/download. The Windows version contain 'Git Bash', 'Git CMD', and 'Git GUI'. The 'Git GUI' software (based on Tcl/Tk) works pretty cool. It can 'Rescan' the project, compare the changed filefs and visualize the master's history too.
Set up a new local/remote repository
mkdir /path/to/your/project
cd /path/to/your/project
git init
git remote add origin https://[email protected]/arraytools/REPOSITORYNAME.git
# git remote add origin ssh://[email protected]/home/git/REPOSITORYNAME.git
# git clone             ssh://[email protected]/home/git/REPOSITORYNAME.git

git config --global user.name "YOUR NAME"
git config --global user.email "YOUR EMAIL ADDRESS"

echo "arraytools" >> contributors.txt
git add contributors.txt
git commit -m 'Initial commit with contributors'
git push -u origin master
Already has a git repository on my computer
cd /path/to/my/repo
git remote add origin https://[email protected]/arraytools/REPOSITORYNAME.git
git push -u origin --all # pushes up the repo and its refs for the first time
git push -u origin --tags # pushes up any tags
'master' and 'origin'
- master is a branch name. You can use git branch to find out all branches. The current branch has a asterisk in the command line output and has a bold font in the gitk program.
- origin is a repository name. You are free to create a new one and delete origin especially in situation that you are working with multiple remotes.
https://lostechies.com/joshuaflanagan/2010/09/03/use-gitk-to-understand-git/
Setup editor
See man git-commit.
git config --global core.editor "nano"
# OR
export GIT_EDITOR=nano
# OR for other programs to use too
export EDITOR=nano
.gitignore file
git help gitignore
# or
man gitignore
A leading slash indicates that the ignore entry is only to be valid with respect to the directory in which the .gitignore file resides. Specifying *.o would ignore all .o files in this directory and all subdirs, while /*.o would just ignore them in that dir, while again, /foo/*.o would only ignore them in /foo/*.o.
branch - not the same as in CVS
https://lostechies.com/joshuaflanagan/2010/09/03/use-gitk-to-understand-git/
Gitk shows all of the commits as a single straight line. In git, a branch is a label for a commit. The label moves to new commits as they are created. When you create a git branch, you are not changing anything in the structure of the repository or the source tree. You are just creating a new label.
Below are some info borrowed from Pro Git.
Create a new branch
git branch testing
git log --oneline --decorate
Pay attention to the keywords 'HEAD', 'master' and 'testing' in this case.
Switch branches
git checkout testing
nano test.rb
git commit -a -m 'made a change'
git checkout master
nano test.rb
git commit -a -m 'made other changes'
git log --oneline --decorate --graph --all
Basic merging
git checkout -b iss53
# shorthand for
# git branch iss53
# git checkout iss53

nano index.html
git commit -a -m 'added a new footer [issue 53]'
git checkout master

git checkout -b hotfix
nano index.html
git commit -a -m 'fixed the broken email address'

git checkout master
git merge hotfix
git branch -d hotfix

git checkout iss53
nano index.html
git commit -a -m 'finished the new footer [issue 53]'
Basic Merging:
git checkout master
git merge iss53
Basic merge conflicts:
git merge iss53
git status # Look at the standard conflict-resolution markers to the top of files

git mergetool
git status
Branch management
git branch
git branch -v          # see the last commit on each branch
git branch --merged    # Filter the list to branches that you have merged into the branch you're currently on
git branch --no-merged # See the branches that contain work you haven't yet merged in
git branch -d testing
Branch workflows
NA
Remote branches
Remote references are references (pointers) in your remote repositories, including branches, tags, and so on.
Pushing:
git ls-remote (remoteName)
git remote show (remoteName)

git push origin serverfix   # serverfix is a branch name
Do not type your password every time: you can set up a credential cache. The simplest is to keep it in memory for a few minutes, which you can set up by running
git config --global credential.helper cache
One collaborator fetches from the server. They will get a reference to where the server's version of serverfix is under the remote branch origin/serverfix:
git fetch origin
git checkout -b serverfix origin/serverfix
Tracking Branches:
git checkout --track origin/serverfix

git checkout -b sf origin/serverfix

git branch -u origin/serverfix
Pulling:
git pull
# Equivalent to
# git fetch; git merge
Deleting Remote Branches:
git push origin --delete serverfix
Rebasing
discard unstaged changes in git
For a specific file use:
git checkout path/to/file/to/revert
For all unstaged files use:
git checkout -- .
Make sure to include the period at the end.
git merge
See an example of merging a temporary branch with the master branch in the local repository.
This is another example. It teaches how to make sure my master branch is in synch with the central repository on github (which I refer to using the remote “origin”) before I merge my changes into master.
git rebase
https://lostechies.com/joshuaflanagan/2010/09/03/use-gitk-to-understand-git-merge-and-rebase/
The simple git merge method can make the history very complicated; see and the following cons.
- Branching paths in the history can be unnecessarily complicated
- The extra merge commit.
- Your branch is now no longer a private, local concern. Everyone now knows that you worked in an issue123 branch. Why should they care?
git rebase can be used to avoid these issues.
The good approach (as in that example) is
git checkout issue123
git rebase master
git checkout master
git merge issue123
git branch -d issue123
git push origin master
Rename a repository
- Go to github.com, open the project and click Settings button on the left-bottom corner. Change the repository name on top.
- On local machine, rename the directory. Go to the directory. Issue
git remote -v
to get the ULR for the current working copy. Suppose the url is [email protected]:someuser/someproject.git. Now issue the following command to change to the new repository
git remote set-url origin [email protected]:someuser/newprojectname.git
Create a git server (command line only)
Follow the instruction on git-scm.com. It works. I tested it by
- create a git account (called 'git') on my host machine.
- sudo to create a directory under /opt/git/project.git. Change the owner to 'git'. Cd to the directory and initialize it.
- Create two virtual machines (vb1 and vb2). Creating a username 'david' on vb1 and a user name 'joseph' on vb2.
- Create ssh key for both 'david' and 'joseph'. Ssh to copy their ssh keys to git account.
- Create a new directory on vb1 and initialize it. Run git commands to commit & push files to the server (no password is needed). Note that when we use 'git commit', git will ask to create a username and email by first running 'git config' command.
- Switch to vb2 and run git clone (no password is needed). The user can modify the code and commit & push files to the server.
- Run 'git log' to check if each user's name/email are shown on the log.
Create a git server (github like w/ web interface)
If we like to create a github-like web interface, check out GitLab.
Below is my note
- https://about.gitlab.com/downloads/ contains steps of setting up Gitlab.
- By default, the domain name you have entered in setting up gitlab will be the URL you will use to access gitlab.
- Use the recommended method to install gitlab. Nginx will be installed as an http server.
- The root username and password is root and 5iveL!fe.
- When new users are created by root, we can put a faked email there (eg [email protected]). The root account can create password for the user.
- User's password is used to access GitLab web interface only. It is not used for pushing commits.
- After a new user is created, log out of root account and log in using the new user account. Click 'Profile setting' icon and then select SSH > Add SSH key. Copy your <id_rsa.pub> content there. To create your ssh key, use the command line "ssh-keygen -t rsa". The <id_rsa.pub> is located under ~/.ssh directory. The title should be auto populated. If ssh key is added successfully to gitLab, we won't get a pop-up asking password when we run 'git push'.
- A new project should be created by users (not root). If I create a project by root, I keep getting a permission issue when I run 'git push'.
- The username will affect path to all personal projects; e.g. [email protected]:newuser/test2.git.
gitk - graphical tool to display history
- http://lostechies.com/joshuaflanagan/2010/09/03/use-gitk-to-understand-git/
- Other GUI tools http://git-scm.com/download/gui/linux
sudo apt-get update; sudo apt-get install gitk
git clone [email protected]:joshuaflanagan/gitk-demo.git

cd gitk-demo
gitk --all
Git Tips
git difftool & meld
git difftool FILENAME -y will launch 'meld' (if it has been installed before) to compare the file between revisions by using custom tools. It has to be run before we call git add. This is quite convenient since you can double check before running git commit. The '-y' argument is used to launch a diff tool without a prompt. See the documentation here.
Monitor/find files that have been changed since last pull
git branch
git fetch origin/master    # or git fetch on Windows
git diff --name-only origin/master

git log                    # local
git log origin/master      # remote repository

$ git status
On branch master
Your branch is behind 'origin/master' by 2 commits, and can be fast-forwarded.
  (use "git pull" to update your local branch)

nothing to commit, working directory clean
We can also use the gitk to view the log. The following is a screenshot from Window's git gui (Windows Start > Git > Git Gui. Then Repository > Visualize All Branch History). As you can see the local repository (master w/ green circle) is 2 commits behind the remote repository (remotes/origin/master w/ blue circle).
Pull and overwrite local files
If we want to run git pull and also overwrite possibly changed local file, we use (see stackoverflow)
git fetch --all
git reset --hard origin/master
Your branch is ahead by X commits after running git pull
git status shows Your branch is Ahead by X commits after running git pull. See this post. The solution is to run git fetch after git pull.
Import from CVS
- http://git-scm.com/docs/gitcvs-migration
- http://stackoverflow.com/questions/20869710/migrate-from-cvs-to-git-without-losing-history (see also comments after the suggestion using git-cvsimport)
sudo apt-get install git-cvs  # cvsimport command
tar xzvf tmp.tar.gz
cd DirectoryName

# The next command requires a connection to the CVS server even we have a copy of CVS in the local pc
git cvsimport -C ~/Downloads/tmp ModuleName # SLOW & give up
General resources
- https://www.atlassian.com/git/tutorial/remote-repositories
- http://www.sbf5.com/~cduan/technical/git/git-4.shtml
- http://www.acquia.com/blog/getting-started-collaborative-development-git
- http://documentup.com/skwp/git-workflows-book
- http://www.eqqon.com/index.php/Collaborative_Github_Workflow
Host web site
- Using GitHub Pages To Host Your Website using a Custom Domain. The IP address information for Github is changed to new ones.
Some Examples
Jekyll
Install Jekyll
on Ubuntu 14.04 I use (the second command will take a while to start),
sudo apt-get install ruby1.9.1-dev
sudo gem install jekyll
Example 1
cd /tmp
jekyll new MyNewSite
# It will create a new folder 'MyNewSite' with about.md, _config.yml, css (folder),
#    _includes (folder), index.html, _layouts (folder), _posts (folder) and _sass (folder).
cd MyNewSite
jekyll serve --watch
# It'll say the Server Address: http://127.0.0.1:4000/
# We can open a browser to see a template of html page created by '''jekyll new''' command.
hexo
Hexo is a fast, simple and powerful blog framework. You write posts in Markdown (or other languages) and Hexo generates static files with a beautiful theme in seconds.
Example
Sphinx
Examples
Markdown
- Editor/viewer on Ubuntu. See this discussion. Retext
- Multiple platforms.
- Haroopad free, not opensource
- Windows:
- Markdownpad nonfree.
- Texts notfree
- Python solution. Grip
- Online StackEdit


