Beaglebone: Difference between revisions
| (100 intermediate revisions by the same user not shown) | |||
| Line 1: | Line 1: | ||
[http://beagleboard.org/Products/BeagleBone%20Black Official website] | [http://beagleboard.org/Products/BeagleBone%20Black Official website] | ||
= Basic = | |||
[[File:BeagleboneCup.jpg|200px]] [[File:Beaglebone-specs.png|200px]] | [[File:BeagleboneCup.jpg|200px]] [[File:Beaglebone-specs.png|200px]] | ||
== elinux == | |||
* Official wiki for [http://elinux.org/BeagleBone Beaglebone] and [http://www.elinux.org/Beagleboard:BeagleBoneBlack Beaglebone Black]. | * Official wiki for [http://elinux.org/BeagleBone Beaglebone] and [http://www.elinux.org/Beagleboard:BeagleBoneBlack Beaglebone Black]. | ||
* [http://www.elinux.org/Beagleboard:BeagleBone_Black_FAQ FAQ] | * [http://www.elinux.org/Beagleboard:BeagleBone_Black_FAQ FAQ] | ||
| Line 11: | Line 11: | ||
* [http://www.elinux.org/Beagleboard:BeagleBone_Black_Accessories Accessories] | * [http://www.elinux.org/Beagleboard:BeagleBone_Black_Accessories Accessories] | ||
== Books == | |||
http://elinux.org/Beagleboard:BeagleBoneBlack#Books | |||
* [http://www.amazon.com/Exploring-BeagleBone-Techniques-Building-Embedded/ Exploring Beaglebone: Tools and Techniques for Building with Embedded Linux] by Derek Molloy (highly recommended!) The book's website is on [http://exploringbeaglebone.com/ here]. | * [http://www.amazon.com/Exploring-BeagleBone-Techniques-Building-Embedded/ Exploring Beaglebone: Tools and Techniques for Building with Embedded Linux] by Derek Molloy (highly recommended!) The book's website is on [http://exploringbeaglebone.com/ here]. | ||
* [https://www.packtpub.com/hardware-and-creative/learning-beaglebone Learning BeagleBone] by Hunyue Yau. | |||
* [https://www.packtpub.com/hardware-and-creative/android-beaglebone-black Android for the BeagleBone Black] | |||
* [http://www.amazon.com/Bad-Bone-Electronics-Beaglebone-BeagleBone/dp/1627051376/ref=sr_1_5?ie=UTF8&qid=1381007264&sr=8-5&keywords=beaglebone+black Bad to the Bone: Crafting Electronics Systems with Beaglebone and BeagleBone Black] | * [http://www.amazon.com/Bad-Bone-Electronics-Beaglebone-BeagleBone/dp/1627051376/ref=sr_1_5?ie=UTF8&qid=1381007264&sr=8-5&keywords=beaglebone+black Bad to the Bone: Crafting Electronics Systems with Beaglebone and BeagleBone Black] | ||
* [http://shop.oreilly.com/product/0636920028116.do Getting Started with BeagleBone: Linux-Powered Electronic Projects With Python and JavaScript] Chapter 4: blinking leds. Chapter 5: Python pin control (GPIO, Analog input, Analog output). Chapter 6: Putting Python projects Online. | * [http://shop.oreilly.com/product/0636920028116.do Getting Started with BeagleBone: Linux-Powered Electronic Projects With Python and JavaScript] Chapter 4: blinking leds. Chapter 5: Python pin control (GPIO, Analog input, Analog output). Chapter 6: Putting Python projects Online. | ||
| Line 19: | Line 23: | ||
* Programming the BeagleBone Black: Getting Started with JavaScript and BoneScript by Simon Monk. | * Programming the BeagleBone Black: Getting Started with JavaScript and BoneScript by Simon Monk. | ||
== Blog, Resource == | |||
* [https://en.wikipedia.org/wiki/ARM_architecture ARM architecture] from wikipedia. | * [https://en.wikipedia.org/wiki/ARM_architecture ARM architecture] from wikipedia. | ||
* Downloading images and instruction from [http://www.armhf.com/index.php/boards/beaglebone-black/ www.armhf.com] | * Downloading images and instruction from [http://www.armhf.com/index.php/boards/beaglebone-black/ www.armhf.com] | ||
| Line 41: | Line 45: | ||
[[File:BlackUSR.png|100px]] | [[File:BlackUSR.png|100px]] | ||
=== Derek Molloy === | |||
A series of [https://www.youtube.com/watch?v=z6b4zlh0IrE&list=PLF4A1A7E09E5E260A Youtube] videos to introduce Beaglebone. The source code of Video #9 can be downloaded from original [http://derekmolloy.ie/beaglebone/ website]. | A series of [https://www.youtube.com/watch?v=z6b4zlh0IrE&list=PLF4A1A7E09E5E260A Youtube] videos to introduce Beaglebone. The source code of Video #9 can be downloaded from original [http://derekmolloy.ie/beaglebone/ website]. | ||
* Video #1 introduction to beaglebone | * Video #1 introduction to beaglebone | ||
| Line 57: | Line 61: | ||
* Video #13 Windows USB network | * Video #13 Windows USB network | ||
* Video #14 JRE, Eclipse | * Video #14 JRE, Eclipse | ||
=== Paul McWhorter === | |||
https://www.youtube.com/watch?v=UMEUo6Wm6u4&list=PLGs0VKk2DiYyThNvj6VyDFmOnQ8ncXk8b 17 Lessons. | |||
=== Google Group === | |||
https://groups.google.com/forum/#!forum/beagleboard | https://groups.google.com/forum/#!forum/beagleboard | ||
== Linux, u-boot, kernel and kernel module sources == | |||
* http://beagleboard.org/linux | * http://beagleboard.org/linux | ||
* https://eewiki.net/display/linuxonarm/BeagleBone+Black | * https://eewiki.net/display/linuxonarm/BeagleBone+Black | ||
| Line 71: | Line 77: | ||
* http://blog.logikonlabs.com/how-to-create-a-custom-microsd-card-image-for-the-beaglebone-black/ | * http://blog.logikonlabs.com/how-to-create-a-custom-microsd-card-image-for-the-beaglebone-black/ | ||
=== Debian | == Booting == | ||
<strike>It seems the device can remember what was used to boot last time. </strike> The information on [https://stackoverflow.com/a/33063108 Fix the boot order/eMMC on a Beagle Bone Black] does not hold now (2019-07-31) on my BBB. | |||
=== From microSD: one time solution === | |||
To boot from microSD card, I have to hold on the [http://beagleboard.org/static/images/black_hardware_details.png boot button] close to microSD card (S2 button). Recall there are 3 buttons on BBB (Power, reset and S2). | |||
=== From microSD: permanently === | |||
[https://www.erdahl.io/2016/12/beaglebone-black-booting-from-sd-by.html?m=1 BeagleBone Black: booting from SD by default] | |||
== Debian == | |||
Download from http://beagleboard.org/latest-images. Username: debian. Password: temppwd. This distribution contains graphical desktop environment. | Download from http://beagleboard.org/latest-images. Username: debian. Password: temppwd. This distribution contains graphical desktop environment. | ||
| Line 85: | Line 100: | ||
7.4 | 7.4 | ||
</pre> | </pre> | ||
=== microSD version === | |||
(2019-08-05) We can use Etcher to write the image "bone-debian-9.5-lxqt-armhf-2018-10-07-4gb.img.xz" to a SD card. The fdisk will show the following. Note that the SD card (30GB) is at /dev/mmcblk0 and the eMMC (2GB) is /dev/mmcblk1. | |||
<pre> | <pre> | ||
sudo fdisk -l | ~$ sudo fdisk -l | ||
[sudo] password for debian: | |||
Disk /dev/mmcblk0: 29.7 GiB, 31914983424 bytes, 62333952 sectors | |||
Units: sectors of 1 * 512 = 512 bytes | |||
Sector size (logical/physical): 512 bytes / 512 bytes | |||
I/O size (minimum/optimal): 512 bytes / 512 bytes | |||
Disklabel type: dos | |||
Disk identifier: 0xef3fa7f6 | |||
Device Boot Start End Sectors Size Id Type | |||
/dev/mmcblk0p1 8192 62333951 62325760 29.7G 83 Linux | |||
Disk /dev/mmcblk1: 1.8 GiB, 1920991232 bytes, 3751936 sectors | |||
Units: sectors of 1 * 512 = 512 bytes | |||
Sector size (logical/physical): 512 bytes / 512 bytes | |||
I/O size (minimum/optimal): 512 bytes / 512 bytes | |||
Disklabel type: dos | |||
Disk identifier: 0x00000000 | |||
Device Boot Start End Sectors Size Id Type | |||
/dev/mmcblk1p1 * 2048 198655 196608 96M e W95 FAT16 (LBA) | |||
/dev/mmcblk1p2 198656 3751935 3553280 1.7G 83 Linux | |||
Disk /dev/mmcblk1boot1: 1 MiB, 1048576 bytes, 2048 sectors | |||
Units: sectors of 1 * 512 = 512 bytes | |||
Sector size (logical/physical): 512 bytes / 512 bytes | |||
I/O size (minimum/optimal): 512 bytes / 512 bytes | |||
Disk /dev/mmcblk1boot0: 1 MiB, 1048576 bytes, 2048 sectors | |||
Units: sectors of 1 * 512 = 512 bytes | |||
Sector size (logical/physical): 512 bytes / 512 bytes | |||
I/O size (minimum/optimal): 512 bytes / 512 bytes | |||
</pre> | </pre> | ||
The partition table from gparted looks like | The partition table from gparted looks like (old but similar to new) | ||
[[File:MicroSD BBB.png|200px]] | [[File:MicroSD BBB.png|200px]] | ||
| Line 128: | Line 153: | ||
</pre> | </pre> | ||
==== emmc version | === Permanent boot from SD card === | ||
One option is to erase eMMC (2GB is too small). Follow Step 2.01 - 2.20 by using the '''fdisk''' utility to delete the disk '''/dev/mmcblk1''' in [https://e2e.ti.com/support/legacy_forums/embedded/linux/f/354/t/398780?Script-to-Erase-Emmc-independently-Beagle-Bone-Black Script to Erase Emmc independently. Beagle Bone Black]. | |||
Probably this guide [https://www.howtogeek.com/106873/how-to-use-fdisk-to-manage-partitions-on-linux/ How to Use Fdisk to Manage Partitions on Linux] is simpler since we just need to delete the disk and there is no need to create partitions. | |||
=== emmc version === | |||
<pre> | <pre> | ||
sudo dd bs=1M if=BBB-eMMC-flasher-debian-7.4-2014-03-04-2gb.img of=/dev/sdc | sudo dd bs=1M if=BBB-eMMC-flasher-debian-7.4-2014-03-04-2gb.img of=/dev/sdc | ||
| Line 134: | Line 164: | ||
</pre> | </pre> | ||
=== Doing more in LXDE (outdated) === | |||
(2019-08-05) The current desktop is LXQt. | |||
* [http://wiki.lxde.org/en/How_to_take_screenshots how to take a screenshot in lxde] | * [http://wiki.lxde.org/en/How_to_take_screenshots how to take a screenshot in lxde] | ||
* [http://mygeekopinions.blogspot.com/2011/08/how-to-install-gpicview-in-ubuntu-1104.html how to view an image in lxde] | * [http://mygeekopinions.blogspot.com/2011/08/how-to-install-gpicview-in-ubuntu-1104.html how to view an image in lxde] | ||
* Reduce/increase number of desktops/workspaces. Use Preferences > openbox configuration manager > Desktop. | |||
=== | === Launch a terminal in LXDE by the keyboard shortcut Ctrl+Alt+t === | ||
Check out [http://superuser.com/questions/807047/how-to-add-a-shortcut-key-to-the-terminal-in-lxde this] and [http://unix.stackexchange.com/questions/189232/enable-altctrlt-to-open-a-terminal-in-lxde this] posts. In summary, | |||
Add the following lines to the <keyboard> section, | |||
<pre> | |||
<!-- Launch LXTerminal with Ctrl+Alt+t--> | |||
<keybind key="C-A-t"> | |||
<action name="Execute"> | |||
<command>lxterminal</command> | |||
</action> | |||
</keybind> | |||
</pre> | |||
to ''~/.config/openbox/lxde-rc.xml''. Then reboot. | |||
Problem: if I type ''ifconfig'', it will show ''bash: ifconfig: command not found''. However, if I click on the terminal icon on the desktop, there is no this problem:( | |||
=== | === Virtual keyboard === | ||
On my small lcd screen (480x272), matchbox is better than florence. | |||
==== | ==== matchbox ==== | ||
* | * https://github.com/Xlab/matchbox-keyboard | ||
<syntaxhighlight lang='bash'> | |||
sudo apt-get install matchbox-keyboard | |||
</syntaxhighlight> | |||
The matchbox keyboard can only be launched via command line '''matchbox-keyboard'''. It is not in Accessories nor Universal Access. | |||
==== florence ==== | |||
< | <syntaxhighlight lang='bash'> | ||
sudo apt-get update | |||
sudo apt-get install florence | |||
</syntaxhighlight> | |||
The florence keyboard can be accessed by LXDE Menu -> Universal Access -> Florence Virtual Keyboard. | |||
The keyboard can be resized, make a change of color, et al. See | |||
* http://florence.sourceforge.net/english.html | |||
* http://xmodulo.com/onscreen-virtual-keyboard-linux.html | |||
* https://www.maketecheasier.com/setup-virtual-keyboard-linux/ | |||
=== Maximize the terminal screen all the time === | |||
Modify the file ''~/.config/openbox/lxde-rc.xml'' by adding (in the block of <applications>) | |||
<pre> | <pre> | ||
<application name="lxterminal"> | |||
<maximized>true</maximized> | |||
</application> | |||
</pre> | </pre> | ||
Then reboot or ran '''openbox --reconfigure''' after making the change. It works. | |||
=== Change/Shorten the prompt === | |||
When I use the hdmi cape, the screen is too small so it makes to change/shorten the default prompt. The simplest setting is to use | |||
<pre>PS1='$ ' </pre> | |||
We can add a color and the current path (Not the full path) by using '''PS1='\[\e[1;33m\]\W\$ \[\e[0m\]' ''' | |||
But if I want to change the setting permanently, I modify '''~/.bashrc''' file and change two lines about PS1 by removing @\h, @u, and \w characters. | |||
<pre> | <pre> | ||
[if [ "$color_prompt" = yes ]; then | |||
PS1='${debian_chroot:+($debian_chroot)}\[\033[01;32m\]\[\033[00m\]:\[\033[01;34m\]\[\033[00m\]\$ ' | |||
else | |||
PS1='${debian_chroot:+($debian_chroot)}\$ ' | |||
fi | |||
</pre> | </pre> | ||
See [http://askubuntu.com/questions/145618/how-can-i-shorten-my-command-line-bash-prompt this post]. | |||
=== | === Root terminal === | ||
* To enable the root account, type '''sudo passwd root''' | |||
* To disable root access, type '''sudo passwd -l root''' | |||
=== Conky === | |||
sudo apt install conky-all | |||
I modify the configuration file /etc/conky/conky.conf to | |||
* Reduce the font size (conky.config: font) | |||
* Move the panel up (conky.config: gap_y) | |||
* Update interval (conky.config: update_interval) | |||
* Reorganize the elements, especially to show network IPs (conky.text) | |||
* This assume eth0 is connected. Check [https://askubuntu.com/a/673616 How can I get IP address showing from using Conky]. | |||
<pre> | <pre> | ||
conky.config = { | |||
alignment = 'top_left', | |||
background = false, | |||
border_width = 1, | |||
cpu_avg_samples = 2, | |||
default_color = 'white', | |||
default_outline_color = 'white', | |||
default_shade_color = 'white', | |||
draw_borders = false, | |||
draw_graph_borders = true, | |||
draw_outline = false, | |||
draw_shades = false, | |||
use_xft = true, | |||
font = 'DejaVu Sans Mono:size=10', | |||
gap_x = 5, | |||
gap_y = 10, | |||
minimum_height = 5, | |||
minimum_width = 5, | |||
net_avg_samples = 2, | |||
no_buffers = true, | |||
out_to_console = false, | |||
out_to_stderr = false, | |||
extra_newline = false, | |||
own_window = true, | |||
own_window_class = 'Conky', | |||
own_window_type = 'desktop', | |||
stippled_borders = 0, | |||
update_interval = 9.0, | |||
uppercase = false, | |||
use_spacer = 'none', | |||
show_graph_scale = false, | |||
show_graph_range = false | |||
} | |||
conky.text = [[ | |||
${color grey}Uptime:$color $uptime | |||
${color grey}RAM Usage:$color $mem/$memmax - $memperc% ${membar 4} | |||
${color grey}Swap Usage:$color $swap/$swapmax - $swapperc% ${swapbar 4} | |||
${color grey}CPU Usage:$color $cpu% ${cpubar 4} | |||
${color grey}File systems: | |||
/ $color${fs_used /}/${fs_size /} ${fs_bar 6 /} | |||
${color grey}Networking: | |||
Up:$color ${upspeed eth0} ${color grey} - Down:$color ${downspeed eth0} | |||
${addr eth0} | |||
${addr usb0} | |||
$hr | |||
${color grey}Name PID CPU% MEM% | |||
${color lightgrey} ${top name 1} ${top pid 1} ${top cpu 1} ${top mem 1} | |||
${color lightgrey} ${top name 2} ${top pid 2} ${top cpu 2} ${top mem 2} | |||
${color lightgrey} ${top name 2} ${top pid 3} ${top cpu 3} ${top mem 3} | |||
]] | |||
</pre> | </pre> | ||
For Autostart, I need to increase the pause time from 5 seconds to 30 seconds since LXQt is really slow to fully show up on BBB. See [https://wiki.archlinux.org/index.php/Conky#Autostart Arch linux wiki]. | |||
* Create ~/.conkyrc file | |||
* Create ~/.config/autostart/conky.desktop file with a content | |||
<pre> | <pre> | ||
[Desktop Entry] | |||
Type=Application | |||
Name=conky | |||
Exec=conky --daemonize --pause=30 | |||
StartupNotify=false | |||
Terminal=false | |||
</pre> | </pre> | ||
< | === Backup === | ||
The microSD card shows | |||
* device partition: /dev/sdd1 | |||
* Mounted on /media/brb/rootfs | |||
I back up the partition by | |||
<syntaxhighlight lang='bash'> | |||
sudo dd if=/dev/sdd of=bbb_debian9.img status=progress | |||
</syntaxhighlight> | |||
... | |||
Restore it by | |||
<syntaxhighlight lang='bash'> | |||
sudo unmount /dev/sdd1 | |||
sudo dd bs=4M if=bbb_debian9.img of=/dev/sdd status=progress | |||
</syntaxhighlight> | |||
Note that though my data is only 3GB, it still back up the whole SD card (30GB in my case). My writing speed is about 20MB/s. So it will take 30 minutes (3000/20/60) to finish the backup. | |||
If we want to compress the image we can try ("-c" means --stdout) | |||
<syntaxhighlight lang='bash'> | |||
/ | sudo dd if=/dev/sdd | gzip -c > bbb_debian9.img.gz | ||
sudo gunzip -c bbb_debian9.img.gz | dd of=/dev/sdd bs=4M | |||
</syntaxhighlight> | |||
This approach take the same amount of time to create the image but the image it created is much smaller (8.8G vs 30G). | |||
Reference: | |||
* [https://thepi.io/how-to-back-up-your-raspberry-pi/ How to back up your Raspberry Pi] | |||
/ | * [https://www.linux.com/learn/full-metal-backup-using-dd-command Full Metal Backup Using the dd Command] | ||
== Ubuntu/Debian == | |||
* Hold the S2 button & power on BBB. 1st and 3rd LEDs blink. | |||
=== eMMC version (info was outdated now) === | |||
* Image (~70MB) download http://www.armhf.com/index.php/download/ and [http://www.armhf.com/index.php/getting-started-with-ubuntu-img-file/ how to write the image to microSD card , boot from microSD and then the internal eMMC] under Ubuntu/Debian. | |||
# wget the image | |||
# Use '''sudo su''' instead su to have full root permission. Use xz command to write the image to microSD | |||
# Insert microSD to BBB and holding the button (closest to microSD) while applying power on BBB | |||
# To copy the image to eMMC, use wget again to get the image file. Use '''sudo su''' instead su to have full root permission. Then use xz command again to write the image to eMMC. | |||
# Remove microSD and reboot BBB. If we keep microSD in BBB, it will boot from microSD. MicroSD has the advantage that we can extend the space while eMMC cannot. | |||
* Kernel is 3.8. | |||
* The image contains a miniminal Ubuntu system. It only takes 276 MB when I use ''df -h'' command to check. So it does not come with a full desktop. | |||
* Defautl username=ubuntu, password=ubuntu | |||
* http://robotic-controls.com/learn/beaglebone/beaglebone-black-ubuntu | |||
* If I try to install xubuntu-desktop, it requires 421MB data to download and 1.2GB space to install. So it is not feasible since the /dev/mmcblk0p2 partition has only 1.8GB space. Fortunately, the solution in [http://circuitco.com/support/index.php?title=Expanding_File_System_Partition_On_A_microSD here] works well. | |||
* Unfortunately, I got an error when I issue 'startx'. | |||
<pre> | |||
Fatal server error: | |||
AddScreen/ScreenInit failed for driver 0 | |||
Please check the log file at "/var/log/Xorg.0.log" for additional informaiton. | |||
</pre> | </pre> | ||
After I reboot, things looks better. I can get a login GUI. However, the system is very slow and I can not see mouse on the desktop. | |||
* http://fleshandmachines.wordpress.com/2013/09/08/beaglebone-black-debian-and-x11/#more-1250 is another instruction teaching how to install Debian and lxde desktop (Lubuntu used '''starlxde''' and if we install xface such as xubuntu we should use '''sudo startxfce4'''). It also shows how to access debian from remote connection. | |||
=== microSD version (with LXDE desktop environment) and expanding the file system === | |||
PS. Even the emmc version contains LXDE environment. Download from http://beagleboard.org/latest-images | |||
If we boot into microSD (using ssh [email protected]) and follow the [http://elinux.org/Beagleboard:Expanding_File_System_Partition_On_A_microSD this] or [https://elinux.org/Beagleboard:BeagleBoneBlack_Debian#Expanding_File_System_Partition_On_A_microSD this] to expand the microSD file system, we can make use whole space in uSD. It involves two commands: one is '''fdisk''' (extend the partition) and the other is '''resize2fs''' (extend the file system). | |||
Below is what I see on my 32GB microSD card. I am using Debian 9.5 2018-10-07 4GB SD LXQT from the [https://beagleboard.org/latest-images last images] web page. | |||
<pre> | |||
debian@beaglebone:~$ df -h | |||
Filesystem Size Used Avail Use% Mounted on | |||
udev 215M 0 215M 0% /dev | |||
tmpfs 49M 5.5M 43M 12% /run | |||
/dev/mmcblk0p1 30G 2.9G 26G 11% / | |||
tmpfs 242M 0 242M 0% /dev/shm | |||
tmpfs 5.0M 0 5.0M 0% /run/lock | |||
tmpfs 242M 0 242M 0% /sys/fs/cgroup | |||
tmpfs 49M 4.0K 49M 1% /run/user/1000</pre> | |||
To find out the Debian version, use '''cat /etc/os-release'''. | |||
=== | === Console version === | ||
Following the instruction on [http://robotic-controls.com/learn/beaglebone/beaglebone-black-ubuntu robotic-controls.com], we can install the console version of Ubuntu on BBB. The image I download is Ubuntu 13.10 https://rcn-ee.net/deb/rootfs/saucy/ubuntu-13.10-console-armhf-2013-11-15.tar.xz. | |||
This | This image has some features like 192.168.7.2 access automatically just like Angstrom distribution (I don't know how to get this to work on eMMC version of Ubuntu image). That means I can just connect to BBB without using ethernet under Ubuntu OS. | ||
Installation script (uSD is mounted on /dev/sdc in my case) | |||
<pre> | <pre> | ||
wget https://rcn-ee.net/deb/rootfs/saucy/ubuntu-13.10-console-armhf-2013-11-15.tar.xz | |||
tar xJf ubuntu-13.10-console-armhf-2013-11-15.tar.xz | |||
cd ubuntu-13.10-console-armhf-2013-11-15 | |||
sudo ./setup_sdcard.sh --mmc /dev/sdc --uboot bone | |||
</pre> | </pre> | ||
The username/password is ubuntu/temppwd. | |||
Below is what I get in HOST os | |||
<pre> | <pre> | ||
brb@brb-P45T-A:~/ubuntu-13.10-console-armhf-2013-11-15$ ifconfig | |||
... | |||
eth2 Link encap:Ethernet HWaddr 90:59:af:63:df:45 | |||
inet addr:192.168.7.1 Bcast:192.168.7.3 Mask:255.255.255.252 | |||
inet6 addr: fe80::9259:afff:fe63:df45/64 Scope:Link | |||
UP BROADCAST RUNNING MULTICAST MTU:1500 Metric:1 | |||
RX packets:9 errors:0 dropped:0 overruns:0 frame:0 | |||
TX packets:47 errors:0 dropped:0 overruns:0 carrier:0 | |||
collisions:0 txqueuelen:1000 | |||
RX bytes:1010 (1.0 KB) TX bytes:11690 (11.6 KB) | |||
... | |||
</pre> | </pre> | ||
and what I get inside BBB | |||
<pre> | <pre> | ||
ubuntu@arm:~$ ifconfig | |||
eth0 Link encap:Ethernet HWaddr 90:59:af:63:df:43 | |||
UP BROADCAST MULTICAST MTU:1500 Metric:1 | |||
RX packets:0 errors:0 dropped:0 overruns:0 frame:0 | |||
TX packets:0 errors:0 dropped:0 overruns:0 carrier:0 | |||
collisions:0 txqueuelen:1000 | |||
RX bytes:0 (0.0 B) TX bytes:0 (0.0 B) | |||
Interrupt:56 | |||
... | |||
usb0 Link encap:Ethernet HWaddr c6:18:a5:e4:60:71 | |||
inet addr:192.168.7.2 Bcast:192.168.7.3 Mask:255.255.255.252 | |||
inet6 addr: fe80::c418:a5ff:fee4:6071/64 Scope:Link | |||
UP BROADCAST RUNNING MULTICAST MTU:1500 Metric:1 | |||
RX packets:178 errors:0 dropped:0 overruns:0 frame:0 | |||
TX packets:100 errors:0 dropped:0 overruns:0 carrier:0 | |||
collisions:0 txqueuelen:1000 | |||
RX bytes:22583 (22.5 KB) TX bytes:20013 (20.0 KB) | |||
ubuntu@arm:~$ df -h | |||
Filesystem Size Used Avail Use% Mounted on | |||
/dev/mmcblk0p2 15G 493M 14G 4% / | |||
none 4.0K 0 4.0K 0% /sys/fs/cgroup | |||
udev 247M 4.0K 247M 1% /dev | |||
tmpfs 50M 236K 50M 1% /run | |||
none 5.0M 0 5.0M 0% /run/lock | |||
none 248M 0 248M 0% /run/shm | |||
none 100M 0 100M 0% /run/user | |||
/dev/mmcblk0p1 64M 17M 47M 27% /boot/uboot | |||
</pre> | </pre> | ||
=== | We can make the Ubuntu talk to internet by using the instruction given in [[Beaglebone#internet_access_through_UsbO_adapter|Angstrom]] section (run sudo su first). | ||
=== TTL/Serial (FTDI) cable connection === | |||
The screenshot below shows we can use a ttl serial cable to log into beaglebone in command line mode. The beaglebone is powered by a 5v usb. The tricky part is the J4 pin (RXD) in BBB should be connected to the TXD pin in ttl cable. Similarly, the J5 (TDX) pin in BBB should be connected to the RXD pin 8n ttl cable. The 3.3v p8n in ttl cable is not used at all. | |||
This [http://dave.cheney.net/2013/09/22/two-point-five-ways-to-access-the-serial-console-on-your-beaglebone-black post] from dave.cheney.net asks NOT to connect the 5V pin from TTL to BBB. The Serial port pin settings is given on [http://elinux.org/Beagleboard:BeagleBone_Black_Serial elinux.org] as linked from [http://codechief.wordpress.com/2013/11/11/beaglebone-black-serial-debug-connection/ codechiefl.wordpress.com]. | |||
Check out the beaglebone black system manual (Section 7.5 Serial Header) about the serial debug ports from https://github.com/CircuitCo/BeagleBone-Black/blob/master/BBB_SRM.pdf. | |||
<pre> | <pre> | ||
BBB TTL | |||
========== | |||
J1 GND GND | |||
J4 (RXD) TX | |||
J5 (TXD) RX | |||
</pre> | </pre> | ||
[[File:Ftdi2ttlserialcable.jpg|100px]] | |||
[https://www.dropbox.com/s/f5crzyibja3p3jz/BBB_serial.pdf?dl=0 Here] is the log of the booting process (Debian OS). | |||
See also the [[Udoo#Look_at_the_boot_process_via_USB_to_serial_interface|UDOO example]]. | |||
=== Find out the IP address if we use internet sharing === | |||
If we are using ethernet on BBB, we can find out the IP adress by using the following way. | |||
Download fing deb package from [http://www.overlooksoft.com/download overlooksoft] website. Install it by double clicking the file in file manager. Issue the following command to find out the IP of beaglebone black (shared computer). The IP of my 2nd ethernet adapter (eth1) is 10.42.0.1. | |||
<pre> | <pre> | ||
sudo fing -n 10.42.0.1/24 | |||
</pre> | |||
=== Wifi setup command line using '''iwconfig''' === | |||
* A USB wifi adapter can be found | |||
<syntaxhighlight lang='bash'> | |||
lsusb | |||
</syntaxhighlight> | |||
* If the USB wifi device is detected, we want to know if it can be found on '''ifconfig''' command. To show the wifi interface name, use | |||
<syntaxhighlight lang='bash'> | |||
iwconfig | |||
</syntaxhighlight> | |||
The wifi adapter can be '''wlan0''' or '''wlan1'''. | |||
* Some of my adapters | |||
** TP-LINK shows it is Atheros AR9271 802.11n. | |||
** The EdiMax is EW-7811Un 802.11n. | |||
** Rosewill RNX-EasyN1 is RT2870/RT3070 | |||
* [https://learn.adafruit.com/setting-up-wifi-with-beaglebone-black?view=all Setting up WiFi with BeagleBone Black] from adafruit. The important messages are | |||
** Use a usb-extension (even an unpowered hub) | |||
** modify /etc/network/interfaces file to uncomment wlan0 interface & enter correct sssid/password | |||
** sudo ifup wlan0 | |||
** To make the wlan0 up at the boot time, I have to change the line '''auto wlan0''' to '''allow-hotplug wlan0''' like [http://raspberrypi.stackexchange.com/questions/3200/wifi-bring-wlan0-up-on-boot this post on Raspberry Pi]. Note that I am using a HDMI cape on my BBB. | |||
My '''/etc/network/interfaces' looks like | |||
<pre> | <pre> | ||
auto lo | |||
iface lo inet loopback | |||
allow-hotplug wlan0 | |||
wpa-ssid "YOURSSID" | |||
wpa-psk "YOURPASSWORD | |||
iface usb0 inet static | |||
address 192.168.7.2 | |||
netmask 255.255.255.0 | |||
network 192.168.7.0 | |||
gateway 192.168.7.1 | |||
</pre> | |||
* https://wiki.debian.org/WiFi/HowToUse#Command_Line | |||
* http://embeddedprogrammer.blogspot.com/2013/01/beaglebone-using-usb-wifi-dongle-to.html (it is worthy to mention the tutorial uses USB emulated serial connection ONCE all required software are installed. Similar tech was also used in [http://elinux.org/RPi_Serial_Connection Raspberry Pi]). The [http://learn.adafruit.com/downloads/pdf/ssh-to-beaglebone-black-over-usb.pdf Adafruit] website also teaches us how to use the USB cable provided by BBB to do an ad-hoc SSH connection. However, the BBB differ from BB by several factors, including removal of USB-to-serial interface; see [http://elinux.org/BeagleBone#BeagleBone_Black_.28differences.29 here] | |||
= | <syntaxhighlight lang='bash'> | ||
dmesg | grep rtl8192 | |||
ifconfig wlan0 | |||
sudo apt-get install wireless-tools | |||
iwconfig | |||
sudo nano /etc/network/interface | |||
# Made appropriate change on /etc/network/interface | |||
sudo ifup wlan0 // not needed if we have enable wlan0 at boot. | |||
// sudo ifconfig wlan0 up | |||
sudo iwlist wlan0 scanning | |||
ping www.google.com | |||
</syntaxhighlight> | |||
where the file /etc/network/interface should be like | |||
<pre> | |||
auto wlan0 | |||
iface wlan0 inet dhcp | |||
wpa-ssid mynetworkname | |||
wpa-psk mysecretpassphrase | |||
</pre> | |||
=== | === wifi setup with '''wicd-curses''' (TUI/text user interface) === | ||
If we don't know the ssid or the connection is done through 'I Agree' method in a webpage, the command line way is not useful. However, with '''wicd-curses''' program, we can still connect to a wireless network. This works when I tested it on my work place wifi network. | |||
* http://www.raspyfi.com/wi-fi-on-raspberry-pi-a-simple-guide/ | |||
* http:// | * http://inspire.logicsupply.com/2014/07/beaglebone-wifi-installation.html | ||
* https://blog.bartbania.com/raspberry_pi/easy-wireless-configuration-for-raspberry-pi/ (wicdcli, wicd-curses, rcconf packages) | |||
<syntaxhighlight lang='bash'> | |||
</ | # Remove ethernet. Connect to BBB by ssh debian@beaglebone.local using USB cable | ||
lsusb | |||
ifconfig -a | |||
sudo apt-get update | |||
sudo apt-get install wicd-curses | |||
sudo wicd-curses | |||
# Shift+P to add wlan0 to wireless network. Press F10 to save it. Press Shift+R to refresh. | |||
</syntaxhighlight> | |||
=== Take a screenshot === | |||
Use the '''scrot''' program. | |||
<syntaxhighlight lang='bash'> | |||
sudo apt-get install scrot | |||
scrot -d 5 screenshot.png # delay 5 seconds | |||
</syntaxhighlight> | |||
=== | === apt source === | ||
On my Debian 7.5/wheezy (lsb_release -a), the /etc/apt/sources.list shows | |||
<pre> | <pre> | ||
deb http://ftp.us.debian.org/debian/ wheezy main contrib non-free | |||
deb http://ftp.us/debian.org/debian/ wheezy-updates main contrib non-free | |||
deb http://security.debian.org/ wheezy/updates main contrib non-free | |||
deb [arch=armhf] http://debian.beagleboard.org/packages wheezy-bbb main | |||
</pre> | </pre> | ||
== Angstrom == | |||
* Remove uSD card before power on BBB. 4 LEDs lit up. | |||
* Download Angstrom image from http://beagleboard.org/latest-images | |||
* I pick 2GB eMMC version for Beaglebone Black | |||
* https://s3.amazonaws.com/angstrom/demo/beaglebone/BBB-eMMC-flasher-2013.06.20.img.xz | |||
* There is a version dated 2013.09.12 at http://downloads.angstrom-distribution.org/demo/beaglebone/ as the instruction from http://www.height8.com/info/devel/hardware/beagleboneblack/macupdateangstrom | |||
<pre> | |||
# Umount the uSD card | |||
mount # find /dev/sdc1 | |||
sudo diskfutil unmount /dev/sdc1 | |||
ls *.xz | |||
# Copy img file to microSD card. Took about 15-30 minutes. | |||
# Method 1. | |||
tar -xJf BBB-eMMC-flasher-2013.06.20.img.xz | |||
sudo dd bs=1m if=~/Downloads/BBB-eMMC-flasher-2013.06.20.img of=/dev/sdc | |||
sudo sync | |||
# Method 2. | |||
xz -cd BBB-eMMC-flasher-2013.06.20.img.xz > /dev/sdc | |||
</pre> | |||
Remove the microSD card and insert it fully into BBB uSD card slot. | |||
To flash the BBB: Hold down the 'user boot' button (closes to uSD card slot) and power on BBB until the 4 LED's light up for a few seconds. | |||
It will take 30-45 minutes to flash the image onto the eMMC. Once it's done, the 4 LED's will all stay lit up at the same time. You can then power down your BBB, remove uSD and power up BBB. | |||
The username is root. There is not password. We can access it by ssh [email protected]. | |||
If we type '''ifconfig''' in Angstrom, we find the connection is through '''usb0''' adapter. | |||
<pre> | <pre> | ||
root@beaglebone:~# ifconfig | |||
eth0 Link encap:Ethernet HWaddr 90:59:AF:63:DF:43 | |||
UP BROADCAST MULTICAST MTU:1500 Metric:1 | |||
RX packets:0 errors:0 dropped:0 overruns:0 frame:0 | |||
TX packets:0 errors:0 dropped:0 overruns:0 carrier:0 | |||
collisions:0 txqueuelen:1000 | |||
RX bytes:0 (0.0 B) TX bytes:0 (0.0 B) | |||
Interrupt:56 | |||
lo Link encap:Local Loopback | |||
inet addr:127.0.0.1 Mask:255.0.0.0 | |||
inet6 addr: ::1/128 Scope:Host | |||
UP LOOPBACK RUNNING MTU:65536 Metric:1 | |||
RX packets:12 errors:0 dropped:0 overruns:0 frame:0 | |||
TX packets:12 errors:0 dropped:0 overruns:0 carrier:0 | |||
collisions:0 txqueuelen:0 | |||
RX bytes:760 (760.0 B) TX bytes:760 (760.0 B) | |||
usb0 Link encap:Ethernet HWaddr 86:27:86:2D:45:5C | |||
inet addr:192.168.7.2 Bcast:192.168.7.3 Mask:255.255.255.252 | |||
UP BROADCAST RUNNING MULTICAST MTU:1500 Metric:1 | |||
RX packets:2765 errors:0 dropped:0 overruns:0 frame:0 | |||
TX packets:5003 errors:0 dropped:0 overruns:0 carrier:0 | |||
collisions:0 txqueuelen:1000 | |||
RX bytes:179578 (175.3 KiB) TX bytes:7067277 (6.7 MiB) | |||
</pre> | |||
=== eMMC version === | |||
It contains two partitions. | |||
<pre> | <pre> | ||
fat16 BEAGLE_Bone 70.57MB | |||
ext4 eMMC-Flasher 3.33GB | |||
</pre> | </pre> | ||
One BEAGLE_Bone partition, it contains 4 files. <ID.txt>, <MLO>, <u-boot.img>, and <uEnv.txt>. | |||
<ID.txt> shows the eMMC flasher date (such as 2013.09.04). <MLI> and <u-boot.img> are binary files. <uEnv.txt> has only one line. | |||
On eMMC-Flasher partition, it contains a regular Linux system (/bin, /boot, ...) and one file <eeprom.dump>. | |||
=== Web server === | |||
http://stackoverflow.com/questions/10818459/where-is-the-web-server-root-directory-on-angstrom-linux-beagleboard-beaglebo | |||
=== Google coder === | |||
http://www.adafruit.com/blog/2013/09/17/run-google-coder-on-your-beaglebone-black/ | |||
=== VNC === | |||
* http://digitaldiner.blogspot.com/2013/05/quick-hint-for-beaglebone-black-user.html | |||
<pre> | <pre> | ||
opkg update | |||
opkg install x11vnc | |||
x11vnc -bg -o %HOME/.x11vnc.log.%VNCDISPLAY -auth /var/run/gdm/auth-for-gdm*/database -display :0 -forever | |||
</pre> | </pre> | ||
To start VNC server at bootup and shutdown, check out | |||
* | * https://lists.fedoraproject.org/pipermail/devel/2011-July/154611.html | ||
* https://wiki.archlinux.org/index.php/Vncserver | |||
* | |||
=== Package download === | |||
http://www.gigamegablog.com/2012/01/29/beaglebone-linux-101-configuring-angstrom-linux/ | |||
<pre> | <pre> | ||
opkg update | |||
opkg install XXXX | |||
opkg list | grep "gfortran" | |||
</pre> | </pre> | ||
However, at least for BBB case, I cannot find gfortran package so I cannot install R. See discussions below | |||
* http://unix.stackexchange.com/questions/78676/opkg-cant-find-apache | |||
The [http://www.angstrom-distribution.org/repo/ angstrom linux package browser] is the place we can see if packages for BBB Cortex-A8. According to [https://en.wikipedia.org/wiki/ARM_architecture Wikipedia] the Cortex-A8 has armv7a architecture. [http://en.wikipedia.org/wiki/ARM_Cortex-A7_MPCore Cortex-A7] (eg [http://liliputing.com/2014/04/pcduino3-is-a-77-android-ubuntu-single-board-pc-with-arduino-support.html pcDuino3]) is a smaller, faster, and more power-efficient successor to the Cortex-A8. | |||
On ubuntu, we can use '''ldconfig -v''' command to show the installed libraries and their versions. See [http://www.linuxquestions.org/questions/linux-newbie-8/bash-command-to-list-installed-libraries-and-version-numbers-654413/ here]. If we like to manually add libraries to ubuntu/debian, we can check the tip [http://blog.andrewbeacock.com/2007/10/how-to-add-shared-libraries-to-linuxs.html here]. | |||
== XBMC == | |||
Forget about XBMC on BeagleBone Black. It has many pros over PI except the GPU that XBMC is heavily realies on, even for the interface. | |||
[http://stackoverflow.com/questions/31422762/does-beaglebone-black-support-gpu-hardware-acceleration BBB does have any hardware codec acceleration]. | |||
See | |||
* http://forum.kodi.tv/showthread.php?tid=194863 | |||
* http://forum.kodi.tv/showthread.php?tid=216480 | |||
* http://forum.kodi.tv/showthread.php?tid=194863 | |||
== beaglebone.local and Avahi/Bonjour/Zeroconf == | |||
(2019-08-01) We can ssh to BBB running Debian by '''ssh debian@beaglebone.local''' and the default pw is ''temppwd''. | |||
Instead of typing an IP address, we can use [email protected] to access BBB running on Angstrom OS. The implementation is done by [http://en.wikipedia.org/wiki/Avahi_%28software%29 Avahi Daemon/Bonjour/ZeroConf/Multicast]. | |||
We can manually install avahi-daemon in ubuntu-armhf by | |||
<pre> | <pre> | ||
sudo apt-get update | |||
sudo apt-get install avahi-daemon | |||
</pre> | |||
After that, we should be able to ssh [email protected] instead of using IP. '''PS''': not stable. | |||
<pre> | |||
brb@brb-P45T-A:~$ ssh [email protected] | |||
ssh: connect to host ubuntu-armhf.local port 22: Connection refused | |||
</pre> | |||
The real IP address can be found by '''ping HOSTNAME.local''' (Updated: use '''ps -ef | grep avahi''' to find out the exact hostname used in .local domain because at least one of my Ubuntu machines does not use its hostname exactly) | |||
For the Angstrom OS with beaglebone, I found the IP number is in 192.168.7.2 (same as in the [http://beagleboard.org/Getting%20Started Getting Start] page) by using ping command. | |||
<pre> | <pre> | ||
$ | brb@brb-P45T-A:/etc/init$ ping beaglebone.local | ||
PING beaglebone.local (192.168.7.2) 56(84) bytes of data. | |||
brb@brb-P45T-A:/etc/init$ ifconfig | |||
(skip) | |||
eth2 Link encap:Ethernet HWaddr 90:59:af:63:df:45 | |||
inet addr:192.168.7.1 Bcast:192.168.7.3 Mask:255.255.255.252 | |||
</pre> | |||
The same method can be applied to [[Raspberry#Assign_.local_domain_to_Raspberry_Pi|Raspberry Pi]] or [https://help.ubuntu.com/community/HowToZeroconf Ubuntu]. In fact, avahi-daemon is installed by default. We can use '''ps -ef | grep avahi''' to check it. | |||
== Internet over Ethernet == | |||
Suppose the host machine has a USB ethernet adapter/cable. We can share the internet from the host to BBB. | |||
The host's USB-ethernet adapter has an IP 10.42.0.1 and it is configured as shared instead of DHCP. | |||
The BBB will have eth0: 10.42.0.50 and usb0: 192.168.7.2. | |||
We can use ssh [email protected] to access it. The BBB will have internet access. | |||
<pre> | |||
echo "nameserver 8.8.8.8" > /etc/resolv.conf | |||
</pre> | </pre> | ||
== Network over USB == | |||
We can use a USB cable to connect to BBB from a Windows/Linux/Mac computer. This is a very unique feature in BBB. Not even Raspberry Pi has this feature. | |||
* http://beagleboard.org/static/beaglebone/latest/README.htm | |||
http:// | * http://www.linux-usb.org/gadget/ Ethernet over USB | ||
* http://joshuawise.com/horndis USB tethering | |||
* https://www.raspberrypi.org/forums/viewtopic.php?f=29&t=82998&p=586681&hilit=usbnet#p586681 | |||
See the next section to know how to use this feature to get an internet access for BBB so it does not need to plug in an ethernet cable or a WIFI adapter. | |||
== | == Internet over USB == | ||
* http://shallowsky.com/blog/hardware/talking-to-beaglebone.html | |||
* http://www.circuidipity.com/getting-started-with-beaglebone-black.html | |||
* http://robotic-controls.com/learn/beaglebone/beaglebone-internet-over-usb-only | |||
* http://cylonjs.com/documentation/platforms/beaglebone/ | |||
* https://www.youtube.com/watch?v=fzRVVtGNfj8&list=PLF4A1A7E09E5E260A&noredirect=1 Host is Windows 7. | |||
= | On BBB, run | ||
<syntaxhighlight lang='bash'> | |||
sudo su | |||
/sbin/route add default gw 192.168.7.1 | |||
echo "nameserver 8.8.8.8" >> /etc/resolv.conf | |||
netstat -rn | |||
</syntaxhighlight> | |||
Note it is convenient to save the first 2 lines in a script file (eg 'networkusb') and chmod +x it. Then when we want to use USB to connect to internet, we just use sudo su ~/networkusb. | |||
It is perfectly fine to have multiple lines of nameserver. | |||
([http://www.tldp.org/HOWTO/IP-Masquerade-HOWTO/ipmasq-background2.1.html IP Masquerade]/Share the internet connection + [http://www.ducea.com/2006/08/01/how-to-enable-ip-forwarding-in-linux/ IP forward]) | |||
[http:// | |||
The above procedure of setting gateway is temporary. We can also permanently change the gateway setting by editing '''/etc/network/interfaces''' file (https://help.ubuntu.com/12.04/serverguide/network-configuration.html) | |||
<pre> | <pre> | ||
auto lo | |||
iface lo inet loopback | |||
auto usb0 | |||
iface usb0 inet static | |||
address 192.168.7.2 | |||
netmask 255.255.255.0 | |||
network 192.168.7.0 | |||
gateway 192.168.7.1 | |||
</pre> | </pre> | ||
Then run | |||
<pre> | <pre> | ||
sudo service networking restart | |||
</pre> | </pre> | ||
On host, run (<span style="color: red">wlan0</span> is my host internet adapter, <span style="color: red">eth1</span> is the BBB USB connection on my host) | |||
<pre> | <pre> | ||
sudo iptables --table nat --append POSTROUTING --out-interface wlan0 -j MASQUERADE | |||
sudo iptables --append FORWARD --in-interface eth1 -j ACCEPT | |||
echo 1 | sudo tee /proc/sys/net/ipv4/ip_forward > /dev/null | |||
# | sudo iptables -t nat -L | ||
# | </pre> | ||
# | NOTE: | ||
# The ip-forward statement can be alternatively enabled by un-commenting a suitable line in '''/etc/sysctl.conf''' file (same [https://learn.adafruit.com/setting-up-a-raspberry-pi-as-a-wifi-access-point/install-software method] was used by Adafruit) | |||
# We can save the first 2 lines in a script file (eg. 00-firewall) and put it in the '''/etc/network/if-up.d''' directory. Don't forget to run chmod 755 on this file. Any script in this directory will be executed as soon as your network interfaces come up. See the instruction from [https://www.debian-administration.org/article/23/Setting_up_a_simple_Debian_gateway debian-administration.org]. | |||
# See also the [https://learn.adafruit.com/setting-up-a-raspberry-pi-as-a-wifi-access-point/install-software method] provided from Adafruit by just modifying '''/etc/network/interfaces''' file. | |||
And the following is the output of running iptables -t nat -L before running the masquerade & ip forward. | |||
<pre> | |||
$ sudo iptables -t nat -L | |||
[sudo] password for brb: | |||
Chain PREROUTING (policy ACCEPT) | |||
target prot opt source destination | |||
Chain INPUT (policy ACCEPT) | |||
target prot opt source destination | |||
Chain OUTPUT (policy ACCEPT) | |||
target prot opt source destination | |||
Chain POSTROUTING (policy ACCEPT) | |||
target prot opt source destination | |||
</pre> | |||
and the following is after I run the masquerade and ip forward: | |||
<pre> | |||
$ sudo iptables -t nat -L | |||
Chain PREROUTING (policy ACCEPT) | |||
target prot opt source destination | |||
Chain INPUT (policy ACCEPT) | |||
target prot opt source destination | |||
Chain OUTPUT (policy ACCEPT) | |||
target prot opt source destination | |||
Chain POSTROUTING (policy ACCEPT) | |||
target prot opt source destination | |||
MASQUERADE all -- anywhere anywhere | |||
</pre> | |||
. / | Now everything should be done. Now we can ping www.google.com in BBB to see if the connection works. This is tested on my home ubuntu host machine running 12.04 & 14.04. We can use the last command to show nat table on host machine; See [http://www.cyberciti.biz/faq/howto-iptables-show-nat-rules/ here]. | ||
=== Angstrom === | |||
http://beaglebone.cameon.net/home/internet-over-usb | |||
=== ArchLinux === | |||
This post on [http://archlinuxarm.org/forum/viewtopic.php?f=28&t=5504 Archlinux] discusses how to get the usb network adapter that is built into the mini-usb power connector working under Arch. | |||
=== Ubuntu === | |||
How to share internet over USB on BBB? http://askubuntu.com/questions/380810/internet-over-usb-on-beaglebone-black | |||
== microHDMI to VGA cable == | |||
http://circuitco.com/support/index.php?title=BeagleBone_Black_Accessories | |||
Question: How to create EDIT? My NEC monitor supports only 1024 x 768. | |||
[http://circuitco.com/support/index.php?title=BeagleBoneBlack_HDMI Beagleboneblack HDMI] page from circuitco.com. | |||
[http:// | |||
=== | == Remote desktop connection == | ||
=== From Linux === | |||
See [[Raspberry#Connection_to_Raspberry_Pi_with_tightvnc]] | |||
<pre> | <pre> | ||
# Server side | |||
sudo apt-get install tightvncserver | |||
tightvncserver # set up the password, e.g. same password as the debian user | |||
vncserver # this step may not be necessary | |||
vncserver –kill :1 # kill the current vncserver | |||
vncserver -geometry 480x272 # Simulate using the 4D 4.3" LCD cape; see the screenshot below. | |||
# Client side | |||
xtightvncviewer 10.42.0.50:1 | |||
# or xtightvncviewer 192.168.7.2:1 if we use usb0 | |||
# or xtightvncviewer beaglebone.local:1 if we use usb0 | |||
</pre> | </pre> | ||
[[File:BBB vnc.png|200px]] | |||
To start tightvncserver automatically at start, follow the instruction at [http://superuser.com/questions/147109/automatically-start-vnc-server-on-startup here] to create a new script file under /etc/init.d/ directory and run '''update-rc.d''' on the new script. | |||
<pre> | <pre> | ||
debian@beaglebone:~$ sudo nano /etc/init.d/vncserver | |||
[sudo] password for debian: | |||
debian@beaglebone:~$ sudo chmod +x /etc/init.d/vncserver | |||
debian@beaglebone:~$ sudo update-rc.d vncserver defaults | |||
</pre> | update-rc.d: using dependency based boot sequencing | ||
update-rc.d: warning: default start runlevel arguments (2 3 4 5) do not match vncserver Default-Start values (S) | |||
update-rc.d: warning: default stop runlevel arguments (0 1 6) do not match vncserver Default-Stop values (0 6) | |||
insserv: Script vncserver is broken: incomplete LSB comment. | |||
insserv: missing `Required-Stop:' entry: please add even if empty. | |||
debian@beaglebone:~$ sudo reboot | |||
</pre> | |||
Despite the warning, it still works. It make a copy of this vncserver file below. Something we may want to change for different scenario is the '''USER''' and '''GEOMETRY''' parameters. | |||
<pre> | |||
#!/bin/sh -e | |||
### BEGIN INIT INFO | |||
# Provides: vncserver | |||
# Required-Start: networking | |||
# Default-Start: S | |||
# Default-Stop: 0 6 | |||
### END INIT INFO | |||
= | # PATH="$PATH:/usr/X11R6/bin/" | ||
# The Username:Group that will run VNC | |||
export USER="debian" | |||
#${RUNAS} | |||
= | # The display that VNC will use | ||
DISPLAY="1" | |||
# Color depth (between 8 and 32) | |||
DEPTH="16" | |||
# The Desktop geometry to use. | |||
#GEOMETRY="<WIDTH>x<HEIGHT>" | |||
< | #GEOMETRY="800x600" | ||
GEOMETRY="1024x768" | |||
< | #GEOMETRY="1280x1024" | ||
# The name that the VNC Desktop will have. | |||
NAME="my-vnc-server" | |||
= | OPTIONS="-name ${NAME} -depth ${DEPTH} -geometry ${GEOMETRY} :${DISPLAY}" | ||
. /lib/lsb/init-functions | |||
case "$1" in | |||
start) | |||
log_action_begin_msg "Starting vncserver for user '${USER}' on localhost:${DISPLAY}" | |||
su ${USER} -c "/usr/bin/vncserver ${OPTIONS}" | |||
;; | |||
stop) | |||
log_action_begin_msg "Stoping vncserver for user '${USER}' on localhost:${DISPLAY}" | |||
su ${USER} -c "/usr/bin/vncserver -kill :${DISPLAY}" | |||
;; | |||
restart) | |||
$0 stop | |||
$0 start | |||
;; | |||
esac | |||
exit 0 | |||
</pre> | </pre> | ||
=== From Windows === | |||
[http://mobaxterm.mobatek.net/ MobaXterm]. | |||
[https://www.raspberrypi-spy.co.uk/2018/12/remote-access-pi-using-mobaxterm/ Remote Access to a Raspberry Pi using MobaXterm] | |||
== | == My Observation about angstrom distribution == | ||
When I use the image BBB-eMMC-flasher-2013.06.20.img to put it on the microSD card with win32DiskImager, I see (from plugging SD in Ubuntu) the microSD card has 2 partitions | |||
<pre> | |||
eMMC-Flasher -ext4 | |||
BEAGLE_BONE - vfat | |||
</pre> | |||
where eMMC-Flasher contains an ubuntu data and BEAGLE_BONE contains only 4 files. | |||
<pre> | <pre> | ||
ID.txt - just one line | |||
MLO - 98K binary | |||
u-boot.img - 371K binary | |||
uEnv.txt - just one line | |||
</pre> | </pre> | ||
Flashing is done by pressing the 'Boot' button while connecting the power. It took 1 hour in my case when I flashed BBB-eMMC-flasher-2013.06.20.img. | |||
However, once the microSD is flashed to eMMC, the 'eMMC-Flasher' partition will be gone and 'BEAGLE_BONE' partition is changed to include 3 new folders- App, Docs and Drivers AND some new files - START.htm, autorun.inf, README.md. | |||
== Android OS == | |||
* http://icculus.org/~hendersa/android/ | |||
* [http://www.udoo.org/infographic-udoo-and-the-others-a-close-comparison/ Comparison] of several SoC from Udoo.org. | |||
* http://downloads.ti.com/sitara_android/esd/TI_Android_DevKit/TI_Android_JB_4_2_2_DevKit_4_1_1/index_FDS.html | |||
== BBB vs Raspberry Pi == | |||
* [http://beagleboard.org/blog/2015-02-05-raspberry-pi-2/ How does BBB compare to Raspberry Pi 2] | |||
* http://makezine.com/magazine/how-to-choose-the-right-platform-raspberry-pi-or-beaglebone-black/ | |||
* http://www.doctormonk.com/2013/07/raspberry-pi-vs-beaglebone-black.html | |||
== Beaglebone 101 == | |||
Angstrom includes a web server running on BBB. The web address is http://192.168.7.2 | |||
I have created screenshots in Google drive http://goo.gl/o03iex | |||
== Fix date/time == | |||
See [http://codeghar.wordpress.com/2007/12/06/manage-time-in-ubuntu-through-command-line/ here]. Run the following to change the country and time zone. | |||
<pre> | <pre> | ||
sudo | sudo dpkg-reconfigure tzdata | ||
</pre> | </pre> | ||
Then run | |||
<pre> | <pre> | ||
sudo | sudo ntpdate pool.ntp.org | ||
</pre> | </pre> | ||
For one time fix (for example, we want to avoid an error from running 'make'), we can use | |||
<pre> | <pre> | ||
sudo | sudo date -s "2 Apr 2014 19:00:00" | ||
</pre> | </pre> | ||
== Increase sudo timeout == | |||
http://ubuntuforums.org/showthread.php?t=183418 | |||
<pre> | <pre> | ||
sudo visudo | |||
# Add the following line for 10 minutes. Use -1 for infinity. | |||
# Modify USER_NAME for your own. | |||
Defaults:USER_NAME timestamp_timeout=10 | |||
</pre> | </pre> | ||
== Run Graphical App on remote computer == | |||
Suppose we have a Qt app we want to launch from a local computer and show the GUI on BBB. We can | |||
# Run '''xhost +''' as a user on BBB | |||
# Run '''export DISPLAY=:0.0''' then our own graphical application from the local computer. | |||
To run xhost command at boot (The xhost command needs an active X server to run, it can run at the login screen e.g. when lightdm loads), we can follow the instruction [http://askubuntu.com/questions/115675/xhost-setting-at-boot here] | |||
== Run Graphical App as root on local computer == | |||
This is related to the question: Make X11 program work in an ssh sudo session | |||
* http://joelinoff.com/blog/?p=729 | |||
* http://jianmingli.com/wp/?p=724 | |||
One way that works is to run '''ssh -X [email protected]''' first (it seems not necessary to use '''ssh -Y''' option). Then | |||
<pre> | <pre> | ||
sudo XAUTHORITY=/home/debian/.Xauthority /home/debian/Downloads/servo/servo | |||
</pre> | </pre> | ||
Then my GUI app located in /home/debian/Downloads/servo/servo will be launched as root shown in my local machine. | |||
If the GUI app is not run by root, we don't need to bother the xauthroity. We can just run the app. | |||
== | == Use microSD as ext storage == | ||
It is possible. See the idea in [https://groups.google.com/forum/#!topic/beagleboard/MKApMsH3Q7M here]. | |||
== Playing music using command line tools == | |||
Install ALSA libraries first (these may be installed already). ALSA stands for Advanced Linux Sound Architecture. | |||
<pre> | |||
sudo apt-get install alsa-base alsa-utils | |||
sudo apt-get install libasound2-dev | |||
</pre> | |||
# [https://www.packtpub.com/hardware-and-creative/beaglebone-robotic-projects Beaglebone Robotic Project]: Chapter 3. | |||
# http://www.binarytides.com/play-music-console-ubuntu/ | |||
# http://infinetix.com/project/distributed-audio-beagle-bone-black/ | |||
# http://andicelabs.com/2014/03/usb-audio-beaglebone/ | |||
* mpg123 - Yes, there are keyboard shortcuts. Use '-C' argument. For example, use ":" for fast? forward. | |||
<pre> | <pre> | ||
sudo apt-get install mpg123 | |||
</pre> | |||
/ | * sox - using about 50% of CPU. no keyboard shortcut | ||
<pre> | |||
sudo apt-get install sox libsox-fmt-all | |||
</pre> | |||
* vlc - using about 50% of CPU and has a complete keyboard shortcuts. For example, a/z for volume and left/right arrow for fast backward/forward (seek -/+ 1%). Space for pause and s for stop. -/+ key to slow down/accelerate the playing speed for video files. Shift+left arrow to a short backwards jump. See also the [https://wiki.videolan.org/HotKeys/ hotkey] page (not exactly the same). | |||
<pre> | |||
sudo apt-get install vlc-nox | |||
/ | vlc -I ncurses XXX.mp3 | ||
</pre> | |||
To use [http://www.amazon.com/Syba-SD-CM-UAUD-Adapter-C-Media-Chipset/dp/B001MSS6CS Syba USB audio adapter], we should switch audio output from HDMI to USB adapter. To do that, create a new file called <.asoundrc> with the content | |||
<pre> | |||
pcm.!default sysdefault:Device | |||
// | </pre> | ||
/ | |||
/ | If check the speaker and microphone are not muted, use | ||
. | <pre> | ||
alsamixer | |||
// | </pre> | ||
Use the ''m'' key to unmute the microphone. Make sure your USB sound device is detected, type | |||
<pre> | |||
aplay -l | |||
# OR | |||
cat /proc/asound/cards | |||
</pre> | |||
Now it is time to test the USB audio adapter by using VLC. | |||
= Build R on BBB = | |||
I am using Ubuntu 13.04 image since angstrom linux missing many required packages. | |||
Since the space is limited, instead of using 'sudo apt-get build-dep r-base', I manually install the essential packages: '''build-essential, gfortran, libreadline6-dev, libx11-dev, libxt-dev''' and '''openjdk-7-jre'''. | |||
Filesystem Size Used Avail Use% Mounted on | |||
/dev/mmcblk0p2 1.8G 1. | I am using R 3.0.1. (Update) R 3.1.0 works well too. | ||
none 4.0K 0 4.0K 0% /sys/fs/cgroup | |||
<pre> | |||
ubuntu@ubuntu-armhf:~$ df -h | |||
Filesystem Size Used Avail Use% Mounted on | |||
/dev/mmcblk0p2 1.8G 276M 1.4G 17% / | |||
none 4.0K 0 4.0K 0% /sys/fs/cgroup | |||
devtmpfs 248M 4.0K 248M 1% /dev | devtmpfs 248M 4.0K 248M 1% /dev | ||
none 50M | none 50M 220K 50M 1% /run | ||
none 5.0M 0 5.0M 0% /run/lock | none 5.0M 0 5.0M 0% /run/lock | ||
none 248M 0 248M 0% /run/shm | none 248M 0 248M 0% /run/shm | ||
none 100M 0 100M 0% /run/user | none 100M 0 100M 0% /run/user | ||
/dev/mmcblk0p1 1004K 472K 532K 48% /boot/uboot | /dev/mmcblk0p1 1004K 472K 532K 48% /boot/uboot | ||
sudo apt-get update | |||
sudo apt-get install build-essential gfortran libreadline6-dev libx11-dev libxt-dev | |||
sudo apt-get install openjdk-7-jre | |||
// (optional) need it if we don't want to get an error message at the end of running 'make' | |||
// This require 143MB space. | |||
// The whole process (configure + make) takes at least 2 hours on BBB | |||
http:// | ./configure --enable-R-shlib | ||
make | |||
./ | // make > ~/Rmake.txt 2>&1 | ||
There is still warnings with library/datasets | |||
http://bugs.debian.org/cgi-bin/bugreport.cgi?bug=695411 | |||
It seems this is false alarm. | |||
ubuntu@ubuntu-armhf:~/R-3.0.1$ df -h | |||
Filesystem Size Used Avail Use% Mounted on | |||
/dev/mmcblk0p2 1.8G 1.1G 615M 64% / | |||
none 4.0K 0 4.0K 0% /sys/fs/cgroup | |||
devtmpfs 248M 4.0K 248M 1% /dev | |||
none 50M 224K 50M 1% /run | |||
none 5.0M 0 5.0M 0% /run/lock | |||
none 248M 0 248M 0% /run/shm | |||
none 100M 0 100M 0% /run/user | |||
/dev/mmcblk0p1 1004K 472K 532K 48% /boot/uboot | |||
</pre> | </pre> | ||
== Performance Test | The complete process of running ./configure and make are recorded in | ||
* ./configure [https://dl.dropboxusercontent.com/u/109140222/Rconf_BBB.txt Beaglebone] and [https://dl.dropboxusercontent.com/u/109140222/Rconf_ubuntu.txt x86_64 box] | |||
* make [https://dl.dropboxusercontent.com/u/109140222/Rmake_BBB.txt Beaglebone] and [https://dl.dropboxusercontent.com/u/109140222/Rmake_ubuntu.txt x86_64 box] | |||
== Other configure options == | |||
http://cran.r-project.org/doc/manuals/R-admin.html#Configuration-on-a-Unix_002dalike | |||
<pre> | |||
./configure --disable-byte-compiled-packages --enable-R-shlib | |||
</pre> | |||
= Performance Test = | |||
* http://www.linux.com/learn/docs/727211-beaglebone-black-part-2-linux-performance-tests | * http://www.linux.com/learn/docs/727211-beaglebone-black-part-2-linux-performance-tests | ||
== Problems == | |||
* Sometimes the system does not respond. The desktop is freezed and ssh to log in does not work. I am current using Ubuntu image. | * Sometimes the system does not respond. The desktop is freezed and ssh to log in does not work. I am current using Ubuntu image. | ||
== Benchmark (Raspberry Pi vs BBB vs Edison) using the '''sysbench''' utility == | |||
* http://www.davidhunt.ie/raspberry-pi-beaglebone-black-intel-edison-benchmarked/ | * http://www.davidhunt.ie/raspberry-pi-beaglebone-black-intel-edison-benchmarked/. See also the [[Raspberry#Benchmark|Raspberry Pi]] case. | ||
Note that '''sysbench''' does not benchmark gpu. For more information on '''sysbench''', see the following pages: | |||
* [https://www.howtoforge.com/how-to-benchmark-your-system-cpu-file-io-mysql-with-sysbench This article] on howtoforge.com. | * [https://www.howtoforge.com/how-to-benchmark-your-system-cpu-file-io-mysql-with-sysbench This article] on howtoforge.com. | ||
* [http://wiki.gentoo.org/wiki/Sysbench gentoo.org] | * [http://wiki.gentoo.org/wiki/Sysbench gentoo.org] | ||
<pre> | <pre> | ||
sudo apt-get install sysbench | sudo apt-get install sysbench | ||
sysbench | sysbench --test=cpu run | ||
sysbench | sysbench --test=memory --memory-block-size=1M --memory-total-size=10G run | ||
sysbench | sysbench --test=fileio --file-test-mode=rndwr --file-total-size=16MB prepare | ||
sysbench | sysbench --test=fileio --file-test-mode=rndwr --file-total-size=16MB --max-requests=1000 run | ||
sysbench | sysbench --test=fileio --file-test-mode=rndrd --file-total-size=16MB --max-requests=10000 run | ||
# For the Edison tests, I added ‘-max-threads=2′ | # For the Edison tests, I added ‘-max-threads=2′ | ||
# For the Pi & BBB tests, I added ‘-max-threads=1′ | # For the Pi & BBB tests, I added ‘-max-threads=1′ | ||
</pre> | </pre> | ||
My test result shows the storage random write result from the original post on http://www.davidhunt.ie should be 3.04 seconds instead of 43 seconds. So BBB beats RPi model B in cpu,memory,storage read & write but not in cpu when compared to RPi 2 (see http://www.davidhunt.ie/raspberry-pi-2-benchmarked/). | |||
<pre> | |||
debian@beaglebone:~$ sysbench --test=cpu run | |||
sysbench 0.4.12: multi-threaded system evaluation benchmark | |||
Running the test with following options: | |||
Number of threads: 1 | |||
Doing CPU performance benchmark | |||
Threads started! | |||
Done. | |||
Maximum prime number checked in CPU test: 10000 | |||
Test execution summary: | |||
total time: 260.0903s | |||
total number of events: 10000 | |||
total time taken by event execution: 260.0687 | |||
- | per-request statistics: | ||
min: 25.57ms | |||
avg: 26.01ms | |||
max: 87.97ms | |||
approx. 95 percentile: 26.14ms | |||
Threads fairness: | |||
events (avg/stddev): 10000.0000/0.00 | |||
execution time (avg/stddev): 260.0687/0.00 | |||
debian@beaglebone:~$ sysbench --test=memory --memory-block-size=1M --memory-total-size=10G run | |||
sysbench 0.4.12: multi-threaded system evaluation benchmark | |||
Running the test with following options: | |||
Number of threads: 1 | |||
Doing memory operations speed test | |||
Memory block size: 1024K | |||
Memory transfer size: 2048M | |||
Memory operations type: write | |||
Memory scope type: global | |||
Threads started! | |||
Done. | |||
Operations performed: 2048 ( 1160.85 ops/sec) | |||
./ | |||
2048.00 MB transferred (1160.85 MB/sec) | |||
Test execution summary: | |||
- | total time: 1.7642s | ||
total number of events: 2048 | |||
total time taken by event execution: 1.7564 | |||
per-request statistics: | |||
min: 0.70ms | |||
avg: 0.86ms | |||
max: 8.66ms | |||
approx. 95 percentile: 1.86ms | |||
Threads fairness: | |||
events (avg/stddev): 2048.0000/0.00 | |||
execution time (avg/stddev): 1.7564/0.00 | |||
debian@beaglebone:~$ sysbench --test=fileio --file-test-mode=rndwr --file-total-size=16MB prepare | |||
sysbench 0.4.12: multi-threaded system evaluation benchmark | |||
128 files, 128Kb each, 16Mb total | |||
Creating files for the test... | |||
debian@beaglebone:~$ sysbench --test=fileio --file-test-mode=rndwr --file-total-size=16MB --max-requests=1000 run | |||
sysbench 0.4.12: multi-threaded system evaluation benchmark | |||
Running the test with following options: | |||
Number of threads: 1 | |||
Extra file open flags: 0 | |||
128 files, 128Kb each | |||
16Mb total file size | |||
Block size 16Kb | |||
Number of random requests for random IO: 1000 | |||
Read/Write ratio for combined random IO test: 1.50 | |||
Periodic FSYNC enabled, calling fsync() each 100 requests. | |||
Calling fsync() at the end of test, Enabled. | |||
Using synchronous I/O mode | |||
Doing random write test | |||
Threads started! | |||
Done. | |||
Operations performed: 0 Read, 1000 Write, 1280 Other = 2280 Total | |||
Read 0b Written 15.625Mb Total transferred 15.625Mb (5.1363Mb/sec) | |||
328.72 Requests/sec executed | |||
Test execution summary: | |||
total time: 3.0421s | |||
total number of events: 1000 | |||
total time taken by event execution: 0.2028 | |||
per-request statistics: | |||
min: 0.13ms | |||
avg: 0.20ms | |||
max: 5.65ms | |||
approx. 95 percentile: 0.26ms | |||
Threads fairness: | |||
events (avg/stddev): 1000.0000/0.00 | |||
execution time (avg/stddev): 0.2028/0.00 | |||
debian@beaglebone:~$ sysbench --test=fileio --file-test-mode=rndrd --file-total-size=16MB --max-requests=10000 run | |||
sysbench 0.4.12: multi-threaded system evaluation benchmark | |||
Running the test with following options: | |||
Number of threads: 1 | |||
Extra file open flags: 0 | |||
128 files, 128Kb each | |||
16Mb total file size | |||
Block size 16Kb | |||
Number of random requests for random IO: 10000 | |||
Read/Write ratio for combined random IO test: 1.50 | |||
Periodic FSYNC enabled, calling fsync() each 100 requests. | |||
Calling fsync() at the end of test, Enabled. | |||
Using synchronous I/O mode | |||
Doing random read test | |||
Threads started! | |||
Done. | |||
Operations performed: 10000 Read, 0 Write, 0 Other = 10000 Total | |||
Read 156.25Mb Written 0b Total transferred 156.25Mb (182.72Mb/sec) | |||
11693.80 Requests/sec executed | |||
Test execution summary: | |||
total time: 0.8552s | |||
total number of events: 10000 | |||
total time taken by event execution: 0.7972 | |||
per-request statistics: | |||
min: 0.02ms | |||
avg: 0.08ms | |||
max: 1.82ms | |||
approx. 95 percentile: 0.11ms | |||
Threads fairness: | |||
events (avg/stddev): 10000.0000/0.00 | |||
execution time (avg/stddev): 0.7972/0.00 | |||
</pre> | </pre> | ||
== Sysbench comparison of BBB and Intel(R) Xeon(R) W3690 @ 3.47GHz == | |||
BBB | |||
<pre> | <pre> | ||
debian@beaglebone:~$ sysbench --test=cpu --num-threads=1 --cpu-max-prime=2000 run | |||
sysbench 0.4.12: multi-threaded system evaluation benchmark | |||
Test execution summary: | |||
total time: 29.4288s | |||
debian@beaglebone:~$ sysbench --test=cpu --num-threads=2 --cpu-max-prime=2000 run | |||
Test execution summary: | |||
total time: 29.3096s | |||
</pre> | </pre> | ||
=== | Intel(R) Xeon(R) W3690 @ 3.47GHz (The results shows enabling hyper-threading has no advantage!!) | ||
<pre> | |||
brb@brbweb4:~/Qt$ sysbench --test=cpu --num-threads=1 --cpu-max-prime=2000 run | |||
Test execution summary: | |||
total time: 1.1260s | |||
brb@brbweb4:~/Qt$ sysbench --test=cpu --num-threads=6 --cpu-max-prime=2000 run | |||
Test execution summary: | |||
total time: 0.2691s | |||
brb@brbweb4:~/Qt$ sysbench --test=cpu --num-threads=12 --cpu-max-prime=2000 run | |||
sysbench 0.4.12: multi-threaded system evaluation benchmark | |||
Test execution summary: | |||
total time: 0.3012s | |||
</pre> | |||
== [http://www.phoronix-test-suite.com/ PHORONIX TEST SUITE] == | |||
The software was mentioned in another [http://www.phoronix.com/scan.php?page=article&item=ubuntu_1404_kvmbox&num=1 article] about benchmark on different virtualization software. | |||
= Qt cross compile = | |||
The list below is specific to beaglebone (black) | |||
* http://derekmolloy.ie/beaglebone/qt-with-embedded-linux-on-the-beaglebone/ | |||
* http://www.michaelhleonard.com/cross-compile-for-beaglebone-black/ Install Eclipse and toolchain for cross-compile, Not Qt specific | |||
* http://eewiki.net/display/linuxonarm/BeagleBone+Black Not Qt specific | |||
* Bare Metal Qt 5.2 on BeagleBone Black Ubuntu [http://armsdr.blogspot.com/2014/01/bare-metal-qt-52-on-beaglebone-black.html Part 1] [http://armsdr.blogspot.com/2014/01/bare-metal-qt-52-on-beaglebone-black_10.html Part 2] [http://armsdr.blogspot.com/2014/01/bare-metal-qt-52-on-beaglebone-black_16.html Part 3] | |||
* http://wiki.mentorel.com/doku.php/qt-embedded Not BBB specific, based on Qt 4.8 | |||
/ | * http://www.cloud-rocket.com/2013/07/building-qt-for-beaglebone/ | ||
/ | * http://qt-project.org/doc/qt-4.8/embeddedlinux-support.html and http://qt-project.org/doc/qt-4.8/embeddedlinux-support.html | ||
/ | |||
/ | |||
/ | |||
/ | |||
/ | |||
Other resource related to Raspberry Pi | |||
http:// | * http://qt-project.org/wiki/RaspberryPi | ||
* http://qt-project.org/wiki/RaspberryPi_Beginners_guide | |||
== | <pre> | ||
sudo apt-get install gcc-arm-linux-gnueabi | |||
</pre> | |||
== What's wrong when running a binary created on x86_64 OS == | |||
For the hello world example, I will get an error in BBB if I just scp the binary file from x86_64 OS to BBB. | |||
<pre> | |||
debian@beaglebone:~$ ./a.out | |||
-bash: ./a.out: cannot execute binary file | |||
</pre> | |||
== | == What we should do to compile hello.c == | ||
<pre> | <pre> | ||
arm-linux-gnueabi-gcc -march=armv7-a -mtune=cortex-a8 -mfpu=neon -o hello hello.c | |||
scp hello [email protected]: | |||
</pre> | |||
Then we run hello program in BBB. It should run successfully. | |||
http://www.valvers.com/embedded-linux/beaglebone/step06-cross-compiling | |||
== What we should do to compile hello.cpp == | |||
Note: do not install ''g++-arm-linux-gnueabihf'' package. It will give me the following error when I try to compile a simple cpp program. | |||
<pre> | |||
warning: ld-linux.so.3, needed by /usr/lib/gcc/arm-linux-gnueabihf/4.6/libstdc++.so, not found (try using -rpath or -rpath-link) | |||
</pre> | </pre> | ||
According to the [http://www.valvers.com/embedded-linux/beaglebone/step06-cross-compiling above website] or [http://www.michaelhleonard.com/cross-compile-for-beaglebone-black/ michaelhleonard.com] we shall install the toolchain | |||
<pre> | <pre> | ||
sudo apt-get install gcc-arm-linux-gnueabi | |||
sudo apt-get install g++-arm-linux-gnueabi | |||
</pre> | |||
I can build hello.cpp on my x86_64 host. | |||
<pre> | |||
arm-linux-gnueabi-g++ -march=armv7-a -mtune=cortex-a8 -mfpu=neon -o hellocpp hello.cpp | |||
</pre> | |||
But when I run the hellocpp program, I get the following error | |||
<pre> | |||
debian@beaglebone:~$ ./hellocpp | |||
./hellocpp: error while loading shared libraries: libstdc++.so.6: cannot open shared object file: No such file or directory | |||
</pre> | </pre> | ||
I also try the following. It is a big download but still does not help. | |||
<pre> | <pre> | ||
sudo apt-get install ia32-libs | |||
</pre> | |||
Some people suggested to add the following when compiling your program | |||
<pre> | |||
-static -static-libstdc++ | |||
</pre> | </pre> | ||
The | It works!!! The complete compile command is (-static-libstdc++ is not necessary) | ||
<pre> | <pre> | ||
arm-linux-gnueabi-g++ -march=armv7-a -mtune=cortex-a8 -mfpu=neon -static -o hellocpp hello.cpp | |||
</pre> | </pre> | ||
== Linaro Toolchain == | |||
Although there are different toolchains, we are particularly interested in linaro toolchain. See https://wiki.linaro.org/WorkingGroups/ToolChain/FAQ. | |||
Check out this page http://www.elinux.org/Toolchains for more information about toolchain. | |||
== Some paths == | |||
* arm-linux-gnueabi-gcc, arm-linux-gnueabi-g++, arm-linux-gnueabi-ar,... are located at /usr/bin/. This can be found by typing arm-linux-gnuabi-[TAB] | |||
* ar, objcopy, strip also are located at /usr/arm-linux-gnueabi/bin. | |||
<pre> | <pre> | ||
brb@brb-P45T-A:~/Documents$ arm-linux-gnueabi- | |||
arm-linux-gnueabi-addr2line arm-linux-gnueabi-gprof | |||
arm-linux-gnueabi-ar arm-linux-gnueabi-ld | |||
arm-linux-gnueabi-as arm-linux-gnueabi-ld.bfd | |||
arm-linux-gnueabi-c++filt arm-linux-gnueabi-ld.gold | |||
arm-linux-gnueabi-cpp arm-linux-gnueabi-nm | |||
arm-linux-gnueabi-cpp-4.6 arm-linux-gnueabi-objcopy | |||
arm-linux-gnueabi-elfedit arm-linux-gnueabi-objdump | |||
arm-linux-gnueabi-g++ arm-linux-gnueabi-ranlib | |||
arm-linux-gnueabi-g++-4.6 arm-linux-gnueabi-readelf | |||
arm-linux-gnueabi-gcc arm-linux-gnueabi-size | |||
arm-linux-gnueabi-gcc-4.6 arm-linux-gnueabi-strings | |||
arm-linux-gnueabi-gcov arm-linux-gnueabi-strip | |||
arm-linux-gnueabi-gcov-4.6 | |||
brb@brb-P45T-A:~$ dpkg -L gcc-arm-linux-gnueabi | |||
/. | |||
/usr | |||
/usr/share | |||
/usr/share/doc | |||
/usr/share/man | |||
/usr/share/man/man1 | |||
/usr/bin | |||
/usr/share/doc/gcc-arm-linux-gnueabi | |||
/usr/share/man/man1/arm-linux-gnueabi-gcov.1.gz | |||
/usr/share/man/man1/arm-linux-gnueabi-gcc.1.gz | |||
/usr/bin/arm-linux-gnueabi-gcov | |||
/usr/bin/arm-linux-gnueabi-gcc | |||
brb@brb-P45T-A:~$ ls -l /usr/bin/arm-linux-gnueabi-gcc | |||
lrwxrwxrwx 1 root root 25 Feb 18 2012 /usr/bin/arm-linux-gnueabi-gcc -> arm-linux-gnueabi-gcc-4.6 | |||
brb@brb-P45T-A:~$ locate arm-linux-gnueabi-gcc-4.6 | |||
/usr/bin/arm-linux-gnueabi-gcc-4.6 | |||
/usr/share/man/man1/arm-linux-gnueabi-gcc-4.6.1.gz | |||
</pre> | |||
== Configure Eclipse for cross compile == | |||
http://zombiebabylabs.com/2014/02/hello-beaglebone-world-a-c-primer/ | |||
== GUI not shown up == | |||
http://www.marshut.com/xkshy/beaglebone-black-qt-gui-application.html | |||
== Cross compile Qt == | |||
Some possible options | |||
<pre> | |||
./configure -embedded arm -prefix /usr/local/QtEmbedded-arm -platform linux-g++ \ | |||
-little-endian -xplatform qws/linux-arm-g++ -qt-gfx-linuxfb \ | |||
-qt-gfx-vnc -qt-gfx-multiscreen -qt-mouse-pc -release -shared \ | |||
-no-fast -depths all -D QT_NO_QWS_CURSOR -confirm-license -no-pch | |||
# http://www.cloud-rocket.com/2013/07/building-qt-for-beaglebone/ | |||
# based on qt 4.8.5 | |||
./configure -v -opensource -confirm-license -prefix /opt/qt -embedded arm \ | |||
-platform qws/linux-x86-g++ -xplatform qws/linux-am335x-g++ \ | |||
-depths 16,24,32 -no-mmx -no-3dnow -no-sse -no-sse2 -no-glib -no-cups \ | |||
-no-largefile -no-accessibility -no-openssl -no-gtkstyle -qt-mouse-pc \ | |||
-qt-mouse-linuxtp -qt-mouse-linuxinput -plugin-mouse-linuxtp -plugin-mouse-pc \ | |||
-fast -little-endian -host-big-endian -no-pch -no-sql-ibase -no-sql-mysql \ | |||
-no-sql-odbc -no-sql-psql -no-sql-sqlite -no-sql-sqlite2 -no-webkit \ | |||
-no-qt3support -nomake examples -nomake demos -nomake docs -nomake translations | |||
# http://armsdr.blogspot.com/2014/01/bare-metal-qt-52-on-beaglebone-black_10.html | |||
# Based on qt 5.2.0 | |||
# # qwx is located at mkspecs/qws. What does platform and xplatform do? | |||
./qt-everywhere-opensource-src-5.2.0/configure -v -opensource -confirm-license \ | |||
-prefix /usr/local/qt-5.2 -no-largefile -no-accessibility -qt-zlib \ | |||
-no-gif -qt-libpng -qt-libjpeg -no-nis -no-cups -xplatform linux-linaro-gnueabihf-g++ \ | |||
-device linux-beaglebone-g++ -device-option \ | |||
CROSS_COMPILE=/usr/local/linaro/bin/arm-linux-gnueabihf- | |||
</pre> | </pre> | ||
# qws | |||
* | * http://visualgdb.com/tutorials/beaglebone/qt-embedded/ | ||
QWS is a window server similar to X11 that works independently from it. Unlike X11, QWS windows cannot be forwarded to your Windows machine and will be displayed by your board directly. Before we proceed with starting our application in QWS mode ensure that your board is showing the text terminal and not the X11 session (press Ctrl-Alt-F1 to switch to it): | |||
== Native build Qt on BBB == | |||
The following screenshot demonstrates running qt-4.8.5/examples/painting/basicdrawing/ in BBB. That is, it is possible to compile the Qt directly in beaglebone black without using cross-compile. | |||
[[File:BBB Qt drawing.png|200px]] | |||
For general instruction of building Qt on different platforms, consult to http://qt-project.org/doc/qt-4.8/installation.html. | |||
The way I build Qt is | |||
* http:// | <syntaxhighlight lang='bash'> | ||
mv qt-everywhere-opensource-src-4.8.5 qt-4.8.5 | |||
* | cd qt-4.8.5 | ||
./configure -v -opensource -confirm-license -no-largefile -no-accessibility \ | |||
* | -qt-zlib -no-gif -qt-libpng -qt-libjpeg -no-nis -no-cups -no-pch | ||
make # BBB is single core; o.w. pass -jN where N is the number of threads | |||
sudo make install | |||
</syntaxhighlight> | |||
* configure takes about 1 hour. Not much information is given after running configure. It only said Qt is now configured for building. Just run 'make'. Once everything is built, you must run 'make install'. Qt will be installed into /usr/local/Trolltech/Qt-4.8.5. To reconfigure, run '''make confclean''' and '''configure'''. | |||
* [http://stackoverflow.com/questions/6215408/how-to-shorten-the-qt-make-process How to shorten the Qt make process?] -nomake demos, -nomake examples, -nomake tools, -no-webkit, -no-qt3support, -no-script, -no-scripttools. [http://stackoverflow.com/questions/5587141/recommended-flags-for-a-minimalistic-qt-build Recommended flags for a minimalistic Qt build] is another post where one user suggested not to use '-nomake tools'. | |||
* Running '''make''' will take ~ 20 hours | |||
* Running '''sudo make install''' is quick (~ 5 minutes) | |||
* The std output shows /usr/local/Trolltech/Qt-4.8.5 is created | |||
* If we want to save (a little) time when running '''make''', we can add '''-nomake examples -nomake demos''' to your configure invocations (I don't see these options in Qt 4.8), it works on both windows and linux. It still took ~18 hours when I build Qt 4.8.6. | |||
It is interesting to compare the qt directory under $HOME and /usr/local/Trolltech. Note that even bin directory is copied to /usr/local, the contents inside bin folder are different (not shown here) | |||
<pre> | <pre> | ||
debian@beaglebone:~$ ls qt-4.8.5/ | |||
bin configure imports LICENSE.FDL plugins templates | |||
changes-4.8.5 configure.exe include LICENSE.GPL3 projects.pro tools | |||
config.profiles demos INSTALL LICENSE.LGPL qmake translations | |||
config.status doc LGPL_EXCEPTION.txt Makefile README util | |||
config.tests examples lib mkspecs src | |||
debian@beaglebone:~/qt-4.8.5$ ls /usr/local/Trolltech/Qt-4.8.5/ | |||
bin doc imports lib phrasebooks q3porting.xml translations | |||
demos examples include mkspecs plugins tests | |||
debian@beaglebone:~/qt-4.8.5$ ls /usr/local/Trolltech/Qt-4.8.5/examples/ | |||
animation draganddrop help mainwindows qtestlib threads widgets | |||
debian@beaglebone:~$ | dbus effects helper multimedia README tools xml | ||
declarative examples-manifest.xml ipc network richtext touch xmlpatterns | |||
designer examples.pro itemviews opengl script tutorials | |||
desktop gestures layouts painting sql uitools | |||
dialogs graphicsview linguist qtconcurrent statemachine webkit | |||
debian@beaglebone:~/qt-4.8.5$ | |||
</pre> | </pre> | ||
The final step is to change PATH environment variable by '''nano ~/.profile''' | |||
<syntaxhighlight lang='bash'> | |||
export PATH=/usr/local/Trolltech/Qt-4.8.5/bin:$PATH | |||
</syntaxhighlight> | |||
Logout and login again to see if '''qmake''' is available OR type '''. $HOME/.profile''' to source the profile file. | |||
We can write a simple Qt code to test. See [[Qt#Simple_Test|here]] for the code and how to use command line to compile the code. | |||
It is also interesting to see the gcc version on BBB (v4.6.3) | |||
<syntaxhighlight lang='bash'> | |||
debian@beaglebone:~$ gcc -v | |||
= | Using built-in specs. | ||
COLLECT_GCC=gcc | |||
COLLECT_LTO_WRAPPER=/usr/lib/gcc/arm-linux-gnueabihf/4.6/lto-wrapper | |||
Target: arm-linux-gnueabihf | |||
... | |||
Thread model: posix | |||
gcc version 4.6.3 (Debian 4.6.3-14) | |||
debian@beaglebone:~$ ls /usr/bin/arm* | |||
/usr/bin/arm-linux-gnueabihf-cpp /usr/bin/arm-linux-gnueabihf-gcc-4.6 | |||
/usr/bin/arm-linux-gnueabihf-cpp-4.6 /usr/bin/arm-linux-gnueabihf-gfortran | |||
/usr/bin/arm-linux-gnueabihf-g++ /usr/bin/arm-linux-gnueabihf-gfortran-4.6 | |||
/usr/bin/arm-linux-gnueabihf-g++-4.6 /usr/bin/arm-linux-gnueabihf-run | |||
/usr/bin/arm-linux-gnueabihf-gcc | |||
</syntaxhighlight> | |||
== Qt Creator == | |||
To download the binary version, use | |||
<syntaxhighlight lang='bash'> | |||
sudo apt-get update | |||
sudo apt-get install qtcreator | |||
</syntaxhighlight> | |||
This will install Qt Creator 2.5.0 (built on Aug 8 2012 as shown on 'About Qt Creator'). Since my LCD Cape only supports 480x272, I only see a small part of Qt Creator on my tiny screen even I maximize the app. | |||
Note that the current version of Qt Creator 3.5.1 requires Qt 5.4.0. In order to use Qt 4.8.x, we can grab an old version of Qt. One version I can find is 2.5.2 which is available on http://download.qt.io/archive/qtcreator/2.5/. | |||
To build it (assume qmake is in the PATH) | |||
<syntaxhighlight lang='bash'> | |||
</ | tar xzvf qt-creator-2.5.2-src.tar.gz | ||
cd qt-creator-2.5.2-src | |||
qmake qtcreator.pro | |||
make | |||
</syntaxhighlight> | |||
This will take a very long time and a lot of space. ''Not worthy to compile from source!'' | |||
== | == Qt examples == | ||
Some great examples to try include | |||
* examples/animation/appchooser | |||
* examples/animation/states | |||
* examples/dialogs/extension | |||
* examples/dialogs/licensewizard | |||
* examples/effects/lighting | |||
* examples/effects/blurpicker | |||
* examples/graphicsview/weatheranchorlayout | |||
* | * examples/graphicsview/elasticnodes | ||
* | * examples/graphicsview/diagramscene (a working app for drawing diagrams) | ||
* examples/help/simpletextviewer (including image on help) | |||
* examples/help/ipc/ (networking) | |||
* | * examples/itemviews/chart (when a cell is selected, the corresponding text from another item list will be highlighted) | ||
* | * examples/itemviews/dirview | ||
* examples/itemviews/frozencolumn | |||
* examples/itemviews/pixelator | |||
* examples/itemviews/puzzle (Game) | |||
* examples/layouts/dynamiclayouts (widgets location changed at real time) | |||
* examples/network/bearermonitor (show all networks in a tree on lhs and status on rhs) | |||
* examples/network/fortunateclient | |||
* examples/network/http (download from an address) | |||
* examples/network/loopback (with progress bar for sent and receved packets) | |||
* examples/network/qftp (show contents in the textEdit. Cool!) | |||
* examples/network/securesocketclient (allow input) | |||
* examples/opengl (seems not working) | |||
* examples/painting/concentriccircles (for fun) | |||
* examples/painting/basicdrawing (basic test) | |||
* examples/painting/painterpaths (fill gradient on different shapes or letters) | |||
* examples/qtconcurrent/wordcount (becomes a background job running) | |||
* examples/richtext/calendar | |||
* examples/richtext/orderform | |||
* examples/script/helloscript (not sure about what 'script' means) | |||
* | * examples/statemachine/trafficlight | ||
* | * examples/statemachine/twowaybutton (very simple) | ||
* | * examples/statemachine/rogue (text game. How does it do it) | ||
* | * examples/statemachine/pingpong (nothing show up on BBB) | ||
* examples/threads/waitconditions (nothing show up on BBB) | |||
* examples/tools/inputpanel (auto pop up input panel from an empty box) | |||
* examples/tools/settingeditor | |||
* examples/uitools/textfinder (can highlight text) | |||
* examples/widgets/styles (use an image as background) | |||
* examples/widgets/stylesheet (no image was used) | |||
* examples/widgets/softkeys (no binary) | |||
* examples/widgets/digitclock (simple) | |||
* examples/widgets/calculator (classical) | |||
* examples/widgets/charactermap (magnifier on mouse-over character) | |||
* examples/widgets/codeeditor (highlight current line) | |||
* examples/widgets/lineedits (contain license key input with format hint) | |||
* examples/widgets/sliders (change widgets location at run time) | |||
* examples/widgets/tablet (manipulate image) | |||
* examples/widgets/tetrix (a game that works) | |||
* examples/widgets/tooltip (tooltip on shapes created at run time) | |||
* examples/xmlpatterns/trafficinfo (not working but background is cool) | |||
* examples/xmlpatterns/schema (specify a background color on a textEdit is effective) | |||
== Python + Qt == | |||
<pre> | <pre> | ||
sudo apt-get install python-qt4 | |||
</pre> | |||
Create Qt application by using examples from http://zetcode.com/gui/pyqt4/ | |||
We can launch the application by one of 3 ways | |||
* Run it directly in BBB and the app is shown on BBB too | |||
* ssh -X [email protected] from host machine and run the app from there. The GUI will be shown on the host machine. | |||
* ssh [email protected] from host machine. Issue '''export DISPLAY=:0.0''' and run the app from there. The GUI is shown on BBB. | |||
= GPIO Projects = | |||
== Use terminal to access GPIO pins == | |||
Google: beaglebone black gpio /sys/class/gpio | |||
* http://derekmolloy.ie/beaglebone/beaglebone-gpio-programming-on-arm-embedded-linux/ | |||
* http://www.armhf.com/using-beaglebone-black-gpios/ | |||
* http://www.linux.com/learn/tutorials/725368-getting-started-with-the-beaglebone-black-a-1ghz-arm-linux-machine-for-45 | |||
* http://www.linux.com/learn/tutorials/765810-beaglebone-black-how-to-get-interrupts-through-linux-gpio | |||
* http://www.chrisshiplet.com/static/bbb_gpio_pinout.png (GPIO pins diagram) | |||
* http://elinux.org/EBC_Exercise_10_Flashing_an_LED | |||
* https://learn.sparkfun.com/tutorials/programming-the-pcduino/all | |||
* http://hertaville.com/2013/04/17/sparkfun-posts-tutorial-on-programming-i2cspiuartgpio-peripherals-under-linux-and-other-topics/ | |||
<pre> | |||
root@beaglebone:/sys/class/gpio# ls -l | |||
total 0 | |||
--w------- 1 root root 4096 Dec 31 1999 export | |||
lrwxrwxrwx 1 root root 0 Dec 31 1999 gpiochip0 -> ../../devices/virtual/gpio/gpiochip0 | |||
lrwxrwxrwx 1 root root 0 Dec 31 1999 gpiochip32 -> ../../devices/virtual/gpio/gpiochip32 | |||
lrwxrwxrwx 1 root root 0 Dec 31 1999 gpiochip64 -> ../../devices/virtual/gpio/gpiochip64 | |||
lrwxrwxrwx 1 root root 0 Dec 31 1999 gpiochip96 -> ../../devices/virtual/gpio/gpiochip96 | |||
--w------- 1 root root 4096 Dec 31 1999 unexport | |||
root@beaglebone:/sys/class/gpio# echo 7 > export | |||
root@beaglebone:/sys/class/gpio/gpio7# cat value | |||
0 | |||
root@beaglebone:/sys/class/gpio/gpio7# cat direction | |||
in | |||
root@beaglebone:/sys/class/gpio/gpio7# echo low > direction | |||
root@beaglebone:/sys/class/gpio/gpio7# cat direction | |||
out | |||
root@beaglebone:/sys/class/gpio/gpio7# echo high > direction | |||
</pre> | |||
The LED lit up now. The 'value' is changed by the 'direction'. | |||
== /sys/class directory == | |||
<pre> | |||
debian@beaglebone:~$ cd /sys/class/ | |||
debian@beaglebone:/sys/class$ ls | |||
arvo graphics lcd pps sound usbmon | |||
backlight hidraw leds pwm spidev vc | |||
bdi hwmon mbox pyra spi_master video4linux | |||
block i2c-adapter mdio_bus rc thermal virtio-ports | |||
bsg i2c-dev mem regulator timed_output vtconsole | |||
dma input misc rtc tty watchdog | |||
drm isku mmc_host savu ubi | |||
dvb kone mtd scsi_device udc | |||
firmware koneplus net scsi_disk uio | |||
gpio kovaplus power_supply scsi_host usbmisc | |||
</pre> | |||
== GPIO interactive map == | |||
http://eskimon.fr/beaglebone-black-gpio-interactive-map. It can toggle available pins (40), HDMI pins (20), emmc2 pins (10), I2C2 pins (2), power related pins (13). | |||
* http://beagleboard.org/Support/bone101 for the Pin layout pictures. | |||
* http://stuffwemade.net/post/beaglebone-pinout with a different format (eg GPIO3_14). | |||
== Onboard LEDs == | |||
* http://www.circuidipity.com/bbb-led.html | |||
<pre> | |||
$ ls /sys/class/leds/ | |||
beaglebone:green:usr0 beaglebone:green:usr1 beaglebone:green:usr2 beaglebone:green:usr3 | |||
## 'trigger' determines what event is monitored | |||
$ ls /sys/class/leds/beaglebone\:green\:usr0/ | |||
brightness device max_brightness power subsystem trigger uevent | |||
$ cat /sys/class/leds/beaglebone\:green\:usr0/trigger | |||
none nand-disk mmc0 mmc1 timer oneshot [heartbeat] backlight gpio cpu0 default-on transient | |||
## stop the heart | |||
# echo none > /sys/class/leds/beaglebone\:green\:usr0/trigger | |||
## turn LED on (no blinking) | |||
# echo none > /sys/class/leds/beaglebone\:green\:usr0/trigger | |||
# echo 1 > /sys/class/leds/beaglebone\:green\:usr0/brightness | |||
## strobe LED (get BeagleBone's heart racing at 20 'beats' per second) | |||
# echo timer > /sys/class/leds/beaglebone\:green\:usr0/trigger | |||
# echo 25 > /sys/class/leds/beaglebone\:green\:usr0/delay_off | |||
# echo 25 > /sys/class/leds/beaglebone\:green\:usr0/delay_on | |||
## *whew* ... restore default heartbeat | |||
# echo heartbeat > /sys/class/leds/beaglebone\:green\:usr0/trigger | |||
</pre> | |||
== Use C/C++ to control LED == | |||
http://inspire.logicsupply.com/2014/07/beaglebone-c-programming-example.html | |||
== 4D LCD Cape (480x272) monitor/display == | |||
It is a cool add-on for BBB. See [http://www.4dsystems.com.au/product/22/125/Beagle_Bone_LCD_Capes/4DCAPE_43/ official web site]. The 4D 4.3” LCD CAPE features a 4.3” TFT LCD 480x272 resolution display. See also [http://elinux.org/4D_4.3_LCD_CAPE elinux.org]. | |||
./ | |||
Tip 1: PLA on LCD should connect to P8 on BBB and PLB on LCD should connect to P9 BBB. | |||
Tip 2: To remove full path from terminal, edit '''~/.bashrc''' to replace "\w" with "\W". See for example [http://askubuntu.com/questions/232086/remove-full-path-from-terminal askubuntu.com]. | |||
Tip 3: More pixels does not always mean good; slower refresh. See the comment on [https://learn.adafruit.com/running-opengl-based-games-and-emulators-on-adafruit-pitft-displays?view=all Running OpenGL-based Games & Emulators on Adafruit PiTFT Displays]. | |||
Tip 4: Possible way to turn off the display: see [http://superuser.com/questions/31726/how-to-disable-the-screen-linux-without-x this] or [http://ubuntuforums.org/archive/index.php/t-1454865.html this] post using '''xset''' or '''vbetool'''. | |||
== Input Gesture by xstroke == | |||
The instruction for Raspberry Pi works on my Debian Wheezy. Unfortunately, it keeps freeze my BBB. | |||
* http://ozzmaker.com/2014/06/17/raspberry-pi-with-stroke-and-gesture-recognition/#more-2202 | |||
* https://learn.adafruit.com/adafruit-pitft-28-inch-resistive-touchscreen-display-raspberry-pi/gesture-input | |||
== Qt + GPIO == | |||
* https://sites.google.com/site/timpicuc/Downhome/beaglebone-black | |||
* http://derekmolloy.ie/beaglebone/qt-with-embedded-linux-on-the-beaglebone/ and https://github.com/derekmolloy/beagleboneQT | |||
== Web Camera == | |||
To use a USB web camera, it is better to have BBB connected to a physical monitor, keyboard and mouse. However, I figure out it is also fine to use ssh with -X option. Make sure we use root to log in. | |||
<pre> | |||
ssh -X [email protected] | |||
</pre> | </pre> | ||
# Run sudo apt-get update and sudo apt-get install guvcview | |||
# shutdown BBB. Connect the USB camera. Start the system. | |||
# Make sure /dev/video0 exists. It this is the case, it means the USB camera is detected. | |||
# Run guvcview command. It should open 2 windows. One is the video and the other one is the setting dialog. | |||
The third way is to use vnc. On BBB, issue '''vncserver'''. On local computer, issue '''xtightvncviewer 192.168.7.2:1'''. Once the desktop appears, open a root terminal window instead of a regular terminal window. Type guvcview. | |||
Compare the speed, it is clear using ssh -X is much ideal than using vnc. When we use vnc, the video keeps refreshing. | |||
When we use ssh -X with video resolution 432x240, the video is quite fast. At the default resolution 640x480, the video does not refresh and not as fast as using low resolution. | |||
== [http://opencv.org/ OpenCV] == | |||
* | * http://docs.opencv.org/doc/tutorials/introduction/linux_install/linux_install.html | ||
* | * [[Raspberry#OpenCV|Raspberry pi]] instruction to install OpenCV 2.4.X. | ||
* | * https://solarianprogrammer.com/2014/04/21/opencv-beaglebone-black-ubuntu/: based on ubuntu | ||
* http://www.javieriparraguirre.net/installing-opencv-debian/: based on debian. If we got the following error | |||
<pre> | |||
Error :: You must put some 'source' URIs in your sources.list | |||
</pre> | |||
we shall nano /etc/apt/sources.list and un-comment the lines containing deb-src. However, it still does not work. That said, the step 0 is not working. | |||
If I replace the first step by the sudo apt-get install opencv and continue from step 2 to the end, it works. But it takes several hours (3-4 hours). | |||
<pre> | <pre> | ||
Step 0: Check "natural" dependencies on Debian | |||
As root: | |||
su | |||
aptitude build-dep libopencv-dev | |||
exit | |||
Step 1: Remove compromised packages | |||
As root: | |||
su | |||
aptitude purge libavcodec-dev libavformat-dev libswscale-dev | |||
aptitude purge libx264-dev x264 | |||
exit | |||
Step 2: Install dependencies | |||
As root: | |||
su | |||
aptitude install autoconf automake build-essential libass-dev libfreetype6-dev libgpac-dev \ | |||
libsdl1.2-dev libtheora-dev libtool libva-dev libvdpau-dev libvorbis-dev \ | |||
libx11-dev libxext-dev libxfixes-dev pkg-config texi2html zlib1g-dev | |||
aptitude install yasm | |||
exit | |||
Step 3: Install x264 | |||
As user: | |||
mkdir ~/ffmpeg_sources | |||
cd ~/ffmpeg_sources | |||
wget http://download.videolan.org/pub/x264/snapshots/last_x264.tar.bz2 | |||
tar xjvf last_x264.tar.bz2 | |||
cd x264-snapshot* | |||
./configure --enable-shared --enable-pic | |||
make | |||
As root: | |||
su | |||
make install | |||
ldconfig -v | |||
exit | |||
Step 4: Install FFmpeg | |||
As user: | |||
cd ~/ffmpeg_sources | |||
wget http://ffmpeg.org/releases/ffmpeg-snapshot.tar.bz2 | |||
tar xjvf ffmpeg-snapshot.tar.bz2 | |||
cd ffmpeg | |||
./configure --extra-libs="-ldl" --enable-gpl --enable-libass --enable-libfreetype \ | |||
--enable-libtheora --enable-libvorbis --enable-libx264 --enable-nonfree \ | |||
--enable-x11grab --enable-shared --enable-pic | |||
make | |||
As root: | |||
su | |||
make install | |||
ldconfig -v | |||
exit | |||
Step 5: Install OpenCV | |||
As user: | |||
mkdir ~/opencv_sources | |||
cd ~/opencv_sources | |||
wget http://kent.dl.sourceforge.net/project/opencvlibrary/opencv-unix/2.4.9/opencv-2.4.9.zip | |||
unzip opencv-2.4.9.zip | |||
cd opencv-2.4.9 | |||
mkdir release | |||
cd release | |||
cmake -D CMAKE_BUILD_TYPE=RELEASE -D CMAKE_INSTALL_PREFIX=/usr/local -D BUILD_NEW_PYTHON_SUPPORT=ON .. | |||
make | |||
As root: | |||
{| class="wikitable sortable collapsible" border="1" style="border-collapse:collapse; text-align:center;" | su | ||
|- | make install | ||
! bgcolor="#00BFFF"|P9 !! bgcolor="lightgreen"| P8 | ldconfig -v | ||
|- | exit | ||
| 14,16,21,22,28,29,31,42 || 13,19,34,36,45,46 | </pre> | ||
|} | |||
* http://docs.opencv.org/trunk/modules/contrib/doc/facerec/ face recognition | |||
* http://www.barrgroup.com/Embedded-Systems/How-To/PWM-Pulse-Width-Modulation | If we use aptitude install libopencv-dev command to install opencv, we only get v2.3.1 (too old). | ||
* http://en.wikipedia.org/wiki/Pulse-width_modulation | |||
== Setting up an IO python library (GPIO, PWM, ADC, I2C, SPI, UART) == | |||
# Period: inverse of frequency | http://learn.adafruit.com/setting-up-io-python-library-on-beaglebone-black | ||
# Frequency: Eg period=1000 mS is about freq 1kHz while period=10 mS is about 100 kHz. If we push the frequency too high, a transient noise on the signals would be observed on the waveforms. | |||
# Duty cycle: the unit is 0 to 1=(100%). What percent of time the signal is in high level. | * [http://beagleboard.org/Support/BoneScript/analogWrite/ PWM]: P8_13, P8_34, P8_36, P8_45, P8_46, P9_14, P9_21, P9_22, P9_29, P9_42. Eg. blink LED, fading LED, servo. | ||
* ADC (analog input): P9_33, P9_35, P9_36, P9_37, P9_38, P9_39, P9_40. Eg. measure light, ultrasonic sensor, accelerometer, joystick, Potentiometer. | |||
* [http://www.gigamegablog.com/2012/11/04/beaglebone-coding-101-i2c/ I2C]: P9_19, PI_20. Eg. temperature/pressure sensors. | |||
* [http://learn.adafruit.com/setting-up-io-python-library-on-beaglebone-black/spi SPI]: P9_17, P9_18, P9_21, P9_22, P9_28, P9_29, P9_30, P9_31. | |||
* [http://learn.adafruit.com/setting-up-io-python-library-on-beaglebone-black/uart UART]: 17 pins. | |||
== Adding a push button == | |||
http://learn.adafruit.com/connecting-a-push-button-to-beaglebone-black | |||
== Measure light == | |||
http://learn.adafruit.com/measuring-light-with-a-beaglebone-black | |||
My example: | |||
<pre> | |||
import Adafruit_BBIO.ADC as ADC | |||
import time | |||
from time import localtime, strftime | |||
sensor_pin = 'P9_40' | |||
ADC.setup() | |||
#print('Reading\t\tVolts') | |||
print time.asctime(time.localtime(time.time())), '\tReading\t\tVolts' | |||
while True: | |||
reading = ADC.read(sensor_pin) | |||
volts = reading * 1.800 | |||
#print('%f\t%f' % (reading, volts)) | |||
#print(strftime("%Y-%m-%d %H:%M:%S", localtime())) | |||
print time.asctime(time.localtime(time.time())), '\t%f\t%f' % (reading, volts) | |||
time.sleep(60) | |||
</pre> | |||
which can be run (and the output was written to a file for logging) | |||
<pre> | |||
sudo python light.py > tmp.txt | |||
</pre> | |||
If we want, we can follow the tutorial in [http://learn.adafruit.com/send-raspberry-pi-data-to-cosm/python-script here] to have the light reading logged on the COMS or send to google docs like [http://learn.adafruit.com/dht-humidity-sensing-on-raspberry-pi-with-gdocs-logging?view=all ]. Alternatively, we can let BBB to send an email to you like [http://learn.adafruit.com/raspberry-pi-e-mail-notifier-using-leds?view=all here]. | |||
== Blinking an LED == | |||
''Do not use a lower value resistor than '''470Ω''' (R=V/I = 3.3/.008 where .008 means 8mA). The outputs can only provide about 4mA and the resistor prevents too much current flowing and potentially damaging the BBB.'' | |||
But on another project ([https://learn.adafruit.com/fading-a-rgb-led-on-beaglebone-black?view=all fading rgb LED]), it mentioned you can use 220Ω to 1KΩ resistors. | |||
Note that we have to run '''sudo su''' before we work on python program for any gpio project. | |||
http://learn.adafruit.com/blinking-an-led-with-beaglebone-black | |||
To install the Adafruit_BBIO python library in Debian, use the following. See https://github.com/adafruit/adafruit-beaglebone-io-python | |||
<pre> | |||
sudo ntpdate pool.ntp.org | |||
sudo apt-get update | |||
sudo apt-get install build-essential python-dev python-pip -y | |||
#easy_install -U distribute //debian only | |||
sudo pip install Adafruit_BBIO | |||
</pre> | |||
The python example to blink LED is | |||
<pre> | |||
import Adafruit_BBIO.GPIO as GPIO | |||
import time | |||
GPIO.setup("P8_10", GPIO.OUT) | |||
while True: | |||
GPIO.output("P8_10", GPIO.HIGH) | |||
time.sleep(0.5) | |||
GPIO.output("P8_10", GPIO.LOW) | |||
time.sleep(0.5) | |||
</pre> | |||
== Fading a RGB LED using PWM == | |||
http://learn.adafruit.com/fading-a-rgb-led-on-beaglebone-black/overview | |||
Note that we don't have to use RGB led. We can just connect a single color led. But to use PWM, we cannot choose any pin we want. For example, p8_10 won't work. Below is a simplified example. Save it as fading.py and run it with '''sudo python fading.py'''. | |||
<pre> | |||
import Adafruit_BBIO.PWM as PWM | |||
import time | |||
red = "P8_13" | |||
PWM.start(red, 0) | |||
def fade(colorA): | |||
for i in range(0, 100): | |||
PWM.set_duty_cycle(colorA, 100-i) | |||
time.sleep(0.05) | |||
for j in range(10): | |||
fade(red) | |||
PWM.stop("P8_13") | |||
PWM.cleanup() | |||
</pre> | |||
The led will fading using the above code. If we change line 7 to | |||
<pre> | |||
PWM.set_duty_cycle(colorA, i) | |||
</pre> | |||
the LED will grow. If we change line 9 to while True:, the process will continue until we hit Ctrl+C. | |||
The duty cycle is the reverse of what you might expect: if you have an LED plugged in, a duty cycle of 0 will be brightest, 100 will be dimmest. | |||
=== PWM pins === | |||
BBB has 8 PWM channels. Each channel has 1 or 2 pins. See http://beagleboard.org/Support/bone101/#headers | |||
[[File:Bbb-pwm.png|200px]] | |||
{| class="wikitable sortable collapsible" border="1" style="border-collapse:collapse; text-align:center;" | |||
|- | |||
! bgcolor="#00BFFF"|P9 !! bgcolor="lightgreen"| P8 | |||
|- | |||
| 14,16,21,22,28,29,31,42 || 13,19,34,36,45,46 | |||
|} | |||
=== Dictionary === | |||
* http://www.barrgroup.com/Embedded-Systems/How-To/PWM-Pulse-Width-Modulation | |||
* http://en.wikipedia.org/wiki/Pulse-width_modulation | |||
# Period: inverse of frequency | |||
# Frequency: Eg period=1000 mS is about freq 1kHz while period=10 mS is about 100 kHz. If we push the frequency too high, a transient noise on the signals would be observed on the waveforms. | |||
# Duty cycle: the unit is 0 to 1=(100%). What percent of time the signal is in high level. | |||
== Controlling a servo motor (PWM) == | |||
* https://briancode.wordpress.com/2015/01/06/working-with-pwm-on-a-beaglebone-black/ (rev C) | |||
* http://learn.adafruit.com/controlling-a-servo-with-a-beaglebone-black (Python) | |||
* http://www.linux.com/learn/tutorials/776799-servo-control-from-the-beaglebone-black (shell) | |||
We can actually try the following simpler approach using '''bonescript''' without bothering a command line. Just open a browser tab and type the address http://beagleboard.org/Support/BoneScript/ServoMotor/. It just works (Angstrom Distribution, running using Bonescript from web)! Make sure to change P9_14 to whatever (eg P8_13) as needed. | |||
The SG90 micro motor operators at 4.0 to 7.2 volts according to [http://www.hobbypartz.com/topromisesg9.html here] although it works when I plug the power to A9 3.3V pin. | |||
For some reason, the Adafruit python code does not work. The servo has a vibration but not turn. Not sure what needs to be changed. | |||
I found we can control the servo using command line. See the [http://stackoverflow.com/questions/18432012/pwm-programming-issue-in-my-bbb post]. Note that for my current Angstrom, I need to use pwm_test_P8_13.15. Also this folder is created only after I run the Bonescript. So the example code is (the pwm_test_P8_13.16 number may change from each run ??) | |||
<pre> | |||
// On my BBB, polarity is inverted by default | |||
echo 0 > /sys/devices/ocp.2/pwm_test_P8_13.16/polarity | |||
echo 20000000 > /sys/devices/ocp.2/pwm_test_P8_13.16/period | |||
echo 500000 > /sys/devices/ocp.2/pwm_test_P8_13.16/duty | |||
echo 1 > /sys/devices/ocp.2/pwm_test_P8_13.16/run | |||
</pre> | |||
Valid pulse width for "Tower Pro sg90" is 500-2400 µs, so valid values for "duty" are 500000-2400000. | |||
The contents of the directory look like | |||
<pre> | |||
root@beaglebone:~# ls -lh /sys/devices/ocp.2/pwm_test_P8_13.14/ | |||
driver duty modalias period polarity power run subsystem uevent | |||
</pre> | |||
A summary of tutorial is on http://forum.beaglefu.com/topic/59-quick-beaglebone-black-pwm-commands/. It is obtained from google: /sys/devices/ocp.2/pwm. As we can see, once the command line works, it is easy to wrap the code in other languages (python, c, et al). The full instruction is | |||
<pre> | |||
echo am33xx_pwm > /sys/devices/bone_capemgr.8/slots | |||
echo bone_pwm_P8_13 > /sys/devices/bone_capemgr.8/slots | |||
echo 20000000 > /sys/devices/ocp.2/pwm_test_P8_13.14/period | |||
echo 0 > /sys/devices/ocp.2/pwm_test_P8_13.14/polarity # seems necessary | |||
echo 2400000 > /sys/devices/ocp.2/pwm_test_P8_13.14/duty # counter-clockwise | |||
echo 500000 > /sys/devices/ocp.2/pwm_test_P8_13.14/duty # clockwise 180 degrees | |||
echo 1 > /sys/devices/ocp.2/pwm_test_P8_13.14/run # start the fun | |||
echo 0 > /sys/devices/ocp.2/pwm_test_P8_13.14/run # stop the fun | |||
</pre> | |||
I found this approach works on both Angstrom and Debian. | |||
[[File:BBBservo.jpg|100px]] | |||
== Controlling stepper motor == | |||
Stepper Motor Driver Board ULN2003 | |||
* http://bwgz57.wordpress.com/2012/04/03/beaglebone-stepping-out/ | |||
* See also [[Arduino#Tutorials|Arduino]] page. | |||
* GPIO and Pin conversion. See http://www.circuidipity.com/bbb-led.html and Derek Molloy's tables for the [https://drive.google.com/file/d/0B0Vs4NfkB_8eQUNId3VnczFZUVE/edit?usp=sharing P8] and [https://drive.google.com/file/d/0B0Vs4NfkB_8eakhIQzNkNG1xRFU/edit?usp=sharing P9] header pins in a pdf format. For example, P8_12 = P8.12 is controlled by GPIO1[12] (see P8's pdf file) = Pin 12 on the 2nd controller = GPIO_44 where 44=(32*1)+12 => /sys/class/gpio/gpio44/. Another example: P8.17 = GPIO0[27] = GPIO_27 where 27=(32*0)+27. | |||
== H-bridge L293D == | |||
[http://myroboticadventure.blogspot.com/2016/06/controlling-motor-with-h-bridge-and.html Controlling a Motor with an H-Bridge and the BeagleBone Black] | |||
See also [[Arduino#Control_DC_motors|Arduino Control DC motors]] page. | |||
== Measuring temperature == | |||
http://learn.adafruit.com/measuring-temperature-with-a-beaglebone-black | |||
== HC-SR04 (5v) sonar sensor == | |||
http://www.youtube.com/watch?v=bssyOCcU_Q4 | |||
== Connect to 5v device == | |||
See 3.2.4 of the book "Bad to the Bone". | |||
* [http://en.wikipedia.org/wiki/Logic_level Logic level] | |||
* [https://www.sparkfun.com/products/8745 BOB-08745 logic level shifter] and [https://www.sparkfun.com/products/11978 BOB-11978] with a tutorial example and a [https://learn.sparkfun.com/tutorials/using-the-logic-level-converter/hookup-examples hook up diagram]. | |||
* http://www.gigamegablog.com/2012/01/22/beaglebone-coding-101-using-the-serial-and-analog-pins/ | |||
== Input voltage & voltage divider == | |||
http://beagleboard.org/Support/BoneScript/accelerometer/ | |||
== PIR motion sensor (ADC) == | |||
http://beagleboard.org/Support/BoneScript/PIRMotionSensor | |||
== Pull-up Resistor == | |||
* [http://beagleboard.org/Support/BoneScript/PIRMotionSensor PIR motion sensor] | |||
* [http://www.adafruit.com/products/757 4-channel I2C-safe Bi-directional Logic Level Converter - BSS138] | |||
== A very simple robot == | |||
http://beaglebone.cameon.net/beaglebone-robotics/1-robot-platform | |||
== I2C == | |||
* https://learn.adafruit.com/setting-up-io-python-library-on-beaglebone-black/i2c | |||
* http://derekmolloy.ie/beaglebone/beaglebone-an-i2c-tutorial-interfacing-to-a-bma180-accelerometer/ | |||
* http://datko.net/2013/11/03/bbb_i2c/ | |||
== Project from Make == | |||
* [http://makezine.com/projects/easily-configure-wi-fi-for-the-beaglebone-black/ Wifi configuration] | |||
* [http://makezine.com/projects/dirty-dish-detector/ Dirty Dish Detector] | |||
* [http://makezine.com/projects/internet-speedometer/ Internet Speedometer] | |||
* [http://makezine.com/projects/tracking-planes-with-rtl-sdr/ Tracking planes with RTL-SDR] | |||
== | == [http://www.hackster.io/beagleboard Hackster.io] == | ||
= Other applications = | |||
https://www.hackster.io/beagleboard/projects | |||
== How to make a BeagleBoard Elastic R Beowulf Cluster in a Briefcase == | |||
http://antipastohw.blogspot.com/2010/09/how-to-make-beagleboard-elastic-r.html | |||
== BeagleSNES == | |||
https://www.hackster.io/hendersa/beaglesnes-the-embedded-beagleboard-snes-emulator-547626 | |||
== Create wireless access point == | |||
https://fleshandmachines.wordpress.com/2012/10/04/wifi-acces-point-on-beaglebone-with-dhcp/ | |||
Unfortunately I got the following error when I followed the instruction from [https://learn.adafruit.com/setting-up-a-raspberry-pi-as-a-wifi-access-point/install-software adafruit]. | |||
<pre> | <pre> | ||
debian@beaglebone:~$ sudo service isc-dhcp-server start | |||
[....] Starting isc-dhcp-server (via systemctl): isc-dhcp-server.serviceJob failed. See system journal and 'systemctl status' for details. | |||
failed! | |||
</pre> | </pre> | ||
Note that after several tries, it works. Some comments | |||
* '''isc-dhcp-server''' is not necessary. Use '''dnsmasq''' instead. In Tiddlybot it uses '''udhcpd''' as a DHCP server. See [[Raspberry#Turn_Raspi_into_a_hotspot_.2F_access_point|creating hotspot]] and [[Raspberry#Tiddlybot|Tiddlybot]]. | |||
[[ | * For '''hostapda.conf''' configuration file, I use ''[https://wireless.wiki.kernel.org/en/users/Documentation/hostapd driver=nl80211]'' for TP-LINK TL-WN72N adapter ('''lsusb''' command shows the usb adapter is Atheros Communications, Inc. [https://wikidevi.com/wiki/Atheros_AR9271 AR9271] 802.11n. We can also use '''dmesg | grep ath9k_htc''' to check. Finally [http://lifehacker.com/how-to-hack-your-own-network-and-beef-up-its-security-w-1649785071 airmon-ng] can show the driver). The wpa_passphrase has to be at least 8 characters. There are some [https://www.raspberrypi.org/forums/viewtopic.php?t=49793&p=452852 discussions] about driver selection. | ||
* For some unknown reason, wlan0 static ip is not working. I need to run sudo service networking restart. Also the 1st line to wlan0 is ''auto wlan0'', not ''allow-hotplug wlan0''. | |||
* Use '''sudo service --status-all''' to make sure hostapd and dnsmasq services are working (+ sign) | |||
* Need to make sure the BBB can forward traffic through ethernet. See the section 'Configure Network Address Translation' from Adafruit website. The trick to auto run the 3 commands does not work?? | |||
* Finally, even though hostapd seems to be running, we need to issue the command '''sudo /usr/sbin/hostapd /etc/hostapd/hostapd.conf''' to make wifi access point available (ps: it is fine to ignore the message ''Failed to update rate sets in kernel module''). Now everything should work. | |||
* | |||
http:// | |||
* | |||
* | |||
* | |||
[https://dantalion.nl/beaglebone-black-wifi-access-point-ap-en/ Beaglebone Black wifi access point (AP)] | |||
== Cluster == | |||
* http://wallfloweropen.com/?project=beaglebone-black-cluster-demo-build | * http://wallfloweropen.com/?project=beaglebone-black-cluster-demo-build | ||
* http://wallfloweropen.com/?project=beaglebone-black-cluster-desktop-build | * http://wallfloweropen.com/?project=beaglebone-black-cluster-desktop-build | ||
Latest revision as of 12:10, 7 March 2020
Basic


elinux
- Official wiki for Beaglebone and Beaglebone Black.
- FAQ
- Wifi configuration
- Rebuild software image
- Accessories
Books
http://elinux.org/Beagleboard:BeagleBoneBlack#Books
- Exploring Beaglebone: Tools and Techniques for Building with Embedded Linux by Derek Molloy (highly recommended!) The book's website is on here.
- Learning BeagleBone by Hunyue Yau.
- Android for the BeagleBone Black
- Bad to the Bone: Crafting Electronics Systems with Beaglebone and BeagleBone Black
- Getting Started with BeagleBone: Linux-Powered Electronic Projects With Python and JavaScript Chapter 4: blinking leds. Chapter 5: Python pin control (GPIO, Analog input, Analog output). Chapter 6: Putting Python projects Online.
- Beaglebone Home Automation. Chapter 2: Input and Output (including Adafruit python library). Chapter 3: Creating the Client and Server Applications (python). Chapter 4: Extending Server Capabilities (defining own beaglebone protocol, Python, light sensor, temperature sensor, transistor). Chapter 5: Motion detect and Camera cape in Python. Chapter 6: Creating Android client. Appendix (Boot time kernel traces, I2C, SPI)
- Beaglebone Robotic Projects (based on BBB). Chapter 2: Programming (python and C++). Chapter 3: Speech Input and Output (microphone & speaker). Chapter 4: See (USB camera). Chapter 5: Wheel movement. Chapter 6: Legged movement. Chapter 7: Avoid obstacles by using sensors. Chapter 8: remote control of your robot (LCD cape, USB keyboard, python). Chapter 9: GPS. Chapter 10: whole system.
- Programming the BeagleBone Black: Getting Started with JavaScript and BoneScript by Simon Monk.
Blog, Resource
- ARM architecture from wikipedia.
- Downloading images and instruction from www.armhf.com
- Adafruit learning which includes flashing eMMC and other stuff.
- logicsupply.com contains tutorial and projects specific to beaglebone black.
- http://eewiki.net/display/linuxonarm/BeagleBone+Black covers a lot about BBB.
- http://hipstercircuits.com/category/beaglebone/
- http://www.circuidipity.com/getting-started-with-beaglebone-black.html
- www.linux.com
- Blog from beaglebone.org
- Beaglebone Google Group
- Bruce Green contains an example of using ULN2003.
- thebrokendesk Introduction to Digital Electronics using the Beaglebone Black: DC motor, I2C, Bluetooth, Motion detector, Sending tweets, ADC, ...
The meaning of LEDs in BBB board
- USR0 is configured at boot to blink in a heartbeat pattern
- USR1 is configured at boot to light during microSD card accesses
- USR2 is configured at boot to light during CPU activity
- USR3 is configured at boot to light during eMMC accesses
![]()
Derek Molloy
A series of Youtube videos to introduce Beaglebone. The source code of Video #9 can be downloaded from original website.
- Video #1 introduction to beaglebone
- Video #2 C/C++ Programming
- Video #3 GPIO programming on ARM
- Video #4 I2C
- Video #5 USB Wifi & Build Kernel
- Video #6 Stepper motor
- Video #7 LCD touchscreen
- Video #8 Qt Creator
- Video #9 Example of Qt; shows an application using GPIO + Qt. Video at 1:55 shows how GPIO pins were used for both LCD and LEDs.
- Video #10 OpenCV
- Video #11 introduction to GPIO
- Video #12 Streaming video
- Video #13 Windows USB network
- Video #14 JRE, Eclipse
Paul McWhorter
https://www.youtube.com/watch?v=UMEUo6Wm6u4&list=PLGs0VKk2DiYyThNvj6VyDFmOnQ8ncXk8b 17 Lessons.
Google Group
https://groups.google.com/forum/#!forum/beagleboard
Linux, u-boot, kernel and kernel module sources
- http://beagleboard.org/linux
- https://eewiki.net/display/linuxonarm/BeagleBone+Black
- http://www.crashcourse.ca/wiki/index.php/U-Boot_on_the_BBB
- http://elinux.org/Beagleboard:BeagleBoneBlack_Rebuilding_Software_Image
- http://elinux.org/Building_BBB_Kernel
- http://wiki.gentoo.org/wiki/BeagleBone_Black (Gentoo Linux)
- http://processors.wiki.ti.com/index.php/Linux_Core_U-Boot_User%27s_Guide
- http://blog.logikonlabs.com/how-to-create-a-custom-microsd-card-image-for-the-beaglebone-black/
Booting
It seems the device can remember what was used to boot last time. The information on Fix the boot order/eMMC on a Beagle Bone Black does not hold now (2019-07-31) on my BBB.
From microSD: one time solution
To boot from microSD card, I have to hold on the boot button close to microSD card (S2 button). Recall there are 3 buttons on BBB (Power, reset and S2).
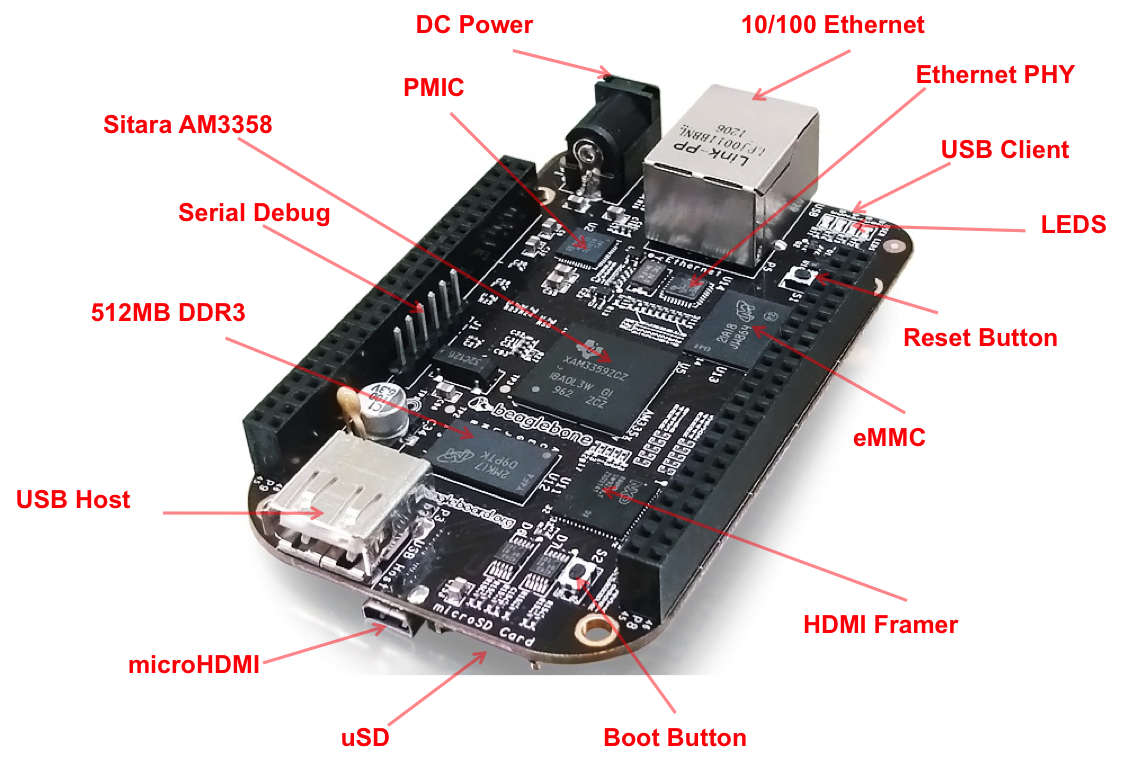
From microSD: permanently
BeagleBone Black: booting from SD by default
Debian
Download from http://beagleboard.org/latest-images. Username: debian. Password: temppwd. This distribution contains graphical desktop environment.
- the source code is hosted in github
- to rebuild the image, follow the instruction at elinux.org
- to install the unstable release, check out elinux.org

The Debian version can be found by (version 7 has a codename wheezy)
debian@beaglebone:~$ cat /etc/debian_version
7.4
microSD version
(2019-08-05) We can use Etcher to write the image "bone-debian-9.5-lxqt-armhf-2018-10-07-4gb.img.xz" to a SD card. The fdisk will show the following. Note that the SD card (30GB) is at /dev/mmcblk0 and the eMMC (2GB) is /dev/mmcblk1.
~$ sudo fdisk -l
[sudo] password for debian:
Disk /dev/mmcblk0: 29.7 GiB, 31914983424 bytes, 62333952 sectors
Units: sectors of 1 * 512 = 512 bytes
Sector size (logical/physical): 512 bytes / 512 bytes
I/O size (minimum/optimal): 512 bytes / 512 bytes
Disklabel type: dos
Disk identifier: 0xef3fa7f6

Device         Boot Start      End  Sectors  Size Id Type
/dev/mmcblk0p1       8192 62333951 62325760 29.7G 83 Linux


Disk /dev/mmcblk1: 1.8 GiB, 1920991232 bytes, 3751936 sectors
Units: sectors of 1 * 512 = 512 bytes
Sector size (logical/physical): 512 bytes / 512 bytes
I/O size (minimum/optimal): 512 bytes / 512 bytes
Disklabel type: dos
Disk identifier: 0x00000000

Device         Boot  Start     End Sectors  Size Id Type
/dev/mmcblk1p1 *      2048  198655  196608   96M  e W95 FAT16 (LBA)
/dev/mmcblk1p2      198656 3751935 3553280  1.7G 83 Linux

Disk /dev/mmcblk1boot1: 1 MiB, 1048576 bytes, 2048 sectors
Units: sectors of 1 * 512 = 512 bytes
Sector size (logical/physical): 512 bytes / 512 bytes
I/O size (minimum/optimal): 512 bytes / 512 bytes

Disk /dev/mmcblk1boot0: 1 MiB, 1048576 bytes, 2048 sectors
Units: sectors of 1 * 512 = 512 bytes
Sector size (logical/physical): 512 bytes / 512 bytes
I/O size (minimum/optimal): 512 bytes / 512 bytes
The partition table from gparted looks like (old but similar to new)

The contents of each partitions look like
brb@brb-P45T-A:~/Downloads$ ls /media/BEAGLE_BONE/
App              debug    dtbs         MLO         scripts    u-boot.img
autorun.inf      Docs     initrd.img   README.htm  SOC.sh     uEnv.txt
BASIC_START.htm  Drivers  LICENSE.txt  README.md   START.htm  zImage
brb@brb-P45T-A:~/Downloads$ ls /media/rootfs/
bin   dev  home  lost+found  mnt  proc  run   selinux  sys  usr
boot  etc  lib   media       opt  root  sbin  srv      tmp  var
Permanent boot from SD card
One option is to erase eMMC (2GB is too small). Follow Step 2.01 - 2.20 by using the fdisk utility to delete the disk /dev/mmcblk1 in Script to Erase Emmc independently. Beagle Bone Black.
Probably this guide How to Use Fdisk to Manage Partitions on Linux is simpler since we just need to delete the disk and there is no need to create partitions.
emmc version
sudo dd bs=1M if=BBB-eMMC-flasher-debian-7.4-2014-03-04-2gb.img of=/dev/sdc
sudo sync
Doing more in LXDE (outdated)
(2019-08-05) The current desktop is LXQt.
- how to take a screenshot in lxde
- how to view an image in lxde
- Reduce/increase number of desktops/workspaces. Use Preferences > openbox configuration manager > Desktop.
Launch a terminal in LXDE by the keyboard shortcut Ctrl+Alt+t
Check out this and this posts. In summary,
Add the following lines to the <keyboard> section,
<!-- Launch LXTerminal with Ctrl+Alt+t-->
    <keybind key="C-A-t">
      <action name="Execute">
        <command>lxterminal</command>
      </action>
    </keybind>
to ~/.config/openbox/lxde-rc.xml. Then reboot.
Problem: if I type ifconfig, it will show bash: ifconfig: command not found. However, if I click on the terminal icon on the desktop, there is no this problem:(
Virtual keyboard
On my small lcd screen (480x272), matchbox is better than florence.
matchbox
sudo apt-get install matchbox-keyboard
The matchbox keyboard can only be launched via command line matchbox-keyboard. It is not in Accessories nor Universal Access.
florence
sudo apt-get update
sudo apt-get install florence
The florence keyboard can be accessed by LXDE Menu -> Universal Access -> Florence Virtual Keyboard.
The keyboard can be resized, make a change of color, et al. See
- http://florence.sourceforge.net/english.html
- http://xmodulo.com/onscreen-virtual-keyboard-linux.html
- https://www.maketecheasier.com/setup-virtual-keyboard-linux/
Maximize the terminal screen all the time
Modify the file ~/.config/openbox/lxde-rc.xml by adding (in the block of <applications>)
  <application name="lxterminal">
    <maximized>true</maximized>
  </application>
Then reboot or ran openbox --reconfigure after making the change. It works.
Change/Shorten the prompt
When I use the hdmi cape, the screen is too small so it makes to change/shorten the default prompt. The simplest setting is to use
PS1='$ '
We can add a color and the current path (Not the full path) by using PS1='\[\e[1;33m\]\W\$ \[\e[0m\]'
But if I want to change the setting permanently, I modify ~/.bashrc file and change two lines about PS1 by removing @\h, @u, and \w characters.
[if [ "$color_prompt" = yes ]; then
    PS1='${debian_chroot:+($debian_chroot)}\[\033[01;32m\]\[\033[00m\]:\[\033[01;34m\]\[\033[00m\]\$ '
else
    PS1='${debian_chroot:+($debian_chroot)}\$ '
fi
See this post.
Root terminal
- To enable the root account, type sudo passwd root
- To disable root access, type sudo passwd -l root
Conky
sudo apt install conky-all
I modify the configuration file /etc/conky/conky.conf to
- Reduce the font size (conky.config: font)
- Move the panel up (conky.config: gap_y)
- Update interval (conky.config: update_interval)
- Reorganize the elements, especially to show network IPs (conky.text)
- This assume eth0 is connected. Check How can I get IP address showing from using Conky.
conky.config = {
    alignment = 'top_left',
    background = false,
    border_width = 1,
    cpu_avg_samples = 2,
	default_color = 'white',
    default_outline_color = 'white',
    default_shade_color = 'white',
    draw_borders = false,
    draw_graph_borders = true,
    draw_outline = false,
    draw_shades = false,
    use_xft = true,
    font = 'DejaVu Sans Mono:size=10',
    gap_x = 5,
    gap_y = 10,
    minimum_height = 5,
	minimum_width = 5,
    net_avg_samples = 2,
    no_buffers = true,
    out_to_console = false,
    out_to_stderr = false,
    extra_newline = false,
    own_window = true,
    own_window_class = 'Conky',
    own_window_type = 'desktop',
    stippled_borders = 0,
    update_interval = 9.0,
    uppercase = false,
    use_spacer = 'none',
    show_graph_scale = false,
    show_graph_range = false
}

conky.text = [[
${color grey}Uptime:$color $uptime
${color grey}RAM Usage:$color $mem/$memmax - $memperc% ${membar 4}
${color grey}Swap Usage:$color $swap/$swapmax - $swapperc% ${swapbar 4}
${color grey}CPU Usage:$color $cpu% ${cpubar 4}
${color grey}File systems:
 / $color${fs_used /}/${fs_size /} ${fs_bar 6 /}
${color grey}Networking:
Up:$color ${upspeed eth0} ${color grey} - Down:$color ${downspeed eth0}
${addr eth0}
${addr usb0}
$hr
${color grey}Name              PID   CPU%   MEM%
${color lightgrey} ${top name 1} ${top pid 1} ${top cpu 1} ${top mem 1}
${color lightgrey} ${top name 2} ${top pid 2} ${top cpu 2} ${top mem 2}
${color lightgrey} ${top name 2} ${top pid 3} ${top cpu 3} ${top mem 3}
]]
For Autostart, I need to increase the pause time from 5 seconds to 30 seconds since LXQt is really slow to fully show up on BBB. See Arch linux wiki.
- Create ~/.conkyrc file
- Create ~/.config/autostart/conky.desktop file with a content
[Desktop Entry]
Type=Application
Name=conky
Exec=conky --daemonize --pause=30
StartupNotify=false
Terminal=false
Backup
The microSD card shows
- device partition: /dev/sdd1
- Mounted on /media/brb/rootfs
I back up the partition by
sudo dd if=/dev/sdd of=bbb_debian9.img status=progress
Restore it by
sudo unmount /dev/sdd1
sudo dd bs=4M if=bbb_debian9.img of=/dev/sdd status=progress
Note that though my data is only 3GB, it still back up the whole SD card (30GB in my case). My writing speed is about 20MB/s. So it will take 30 minutes (3000/20/60) to finish the backup.
If we want to compress the image we can try ("-c" means --stdout)
sudo dd if=/dev/sdd | gzip -c  > bbb_debian9.img.gz
sudo gunzip -c bbb_debian9.img.gz | dd of=/dev/sdd bs=4M
This approach take the same amount of time to create the image but the image it created is much smaller (8.8G vs 30G).
Reference:
Ubuntu/Debian
- Hold the S2 button & power on BBB. 1st and 3rd LEDs blink.
eMMC version (info was outdated now)
- Image (~70MB) download http://www.armhf.com/index.php/download/ and how to write the image to microSD card , boot from microSD and then the internal eMMC under Ubuntu/Debian.
- wget the image
- Use sudo su instead su to have full root permission. Use xz command to write the image to microSD
- Insert microSD to BBB and holding the button (closest to microSD) while applying power on BBB
- To copy the image to eMMC, use wget again to get the image file. Use sudo su instead su to have full root permission. Then use xz command again to write the image to eMMC.
- Remove microSD and reboot BBB. If we keep microSD in BBB, it will boot from microSD. MicroSD has the advantage that we can extend the space while eMMC cannot.
- Kernel is 3.8.
- The image contains a miniminal Ubuntu system. It only takes 276 MB when I use df -h command to check. So it does not come with a full desktop.
- Defautl username=ubuntu, password=ubuntu
- http://robotic-controls.com/learn/beaglebone/beaglebone-black-ubuntu
- If I try to install xubuntu-desktop, it requires 421MB data to download and 1.2GB space to install. So it is not feasible since the /dev/mmcblk0p2 partition has only 1.8GB space. Fortunately, the solution in here works well.
- Unfortunately, I got an error when I issue 'startx'.
Fatal server error:
AddScreen/ScreenInit failed for driver 0

Please check the log file at "/var/log/Xorg.0.log" for additional informaiton.
After I reboot, things looks better. I can get a login GUI. However, the system is very slow and I can not see mouse on the desktop.
- http://fleshandmachines.wordpress.com/2013/09/08/beaglebone-black-debian-and-x11/#more-1250 is another instruction teaching how to install Debian and lxde desktop (Lubuntu used starlxde and if we install xface such as xubuntu we should use sudo startxfce4). It also shows how to access debian from remote connection.
microSD version (with LXDE desktop environment) and expanding the file system
PS. Even the emmc version contains LXDE environment. Download from http://beagleboard.org/latest-images
If we boot into microSD (using ssh [email protected]) and follow the this or this to expand the microSD file system, we can make use whole space in uSD. It involves two commands: one is fdisk (extend the partition) and the other is resize2fs (extend the file system).
Below is what I see on my 32GB microSD card. I am using Debian 9.5 2018-10-07 4GB SD LXQT from the last images web page.
debian@beaglebone:~$ df -h
Filesystem      Size  Used Avail Use% Mounted on
udev            215M     0  215M   0% /dev
tmpfs            49M  5.5M   43M  12% /run
/dev/mmcblk0p1   30G  2.9G   26G  11% /
tmpfs           242M     0  242M   0% /dev/shm
tmpfs           5.0M     0  5.0M   0% /run/lock
tmpfs           242M     0  242M   0% /sys/fs/cgroup
tmpfs            49M  4.0K   49M   1% /run/user/1000
To find out the Debian version, use cat /etc/os-release.
Console version
Following the instruction on robotic-controls.com, we can install the console version of Ubuntu on BBB. The image I download is Ubuntu 13.10 https://rcn-ee.net/deb/rootfs/saucy/ubuntu-13.10-console-armhf-2013-11-15.tar.xz.
This image has some features like 192.168.7.2 access automatically just like Angstrom distribution (I don't know how to get this to work on eMMC version of Ubuntu image). That means I can just connect to BBB without using ethernet under Ubuntu OS.
Installation script (uSD is mounted on /dev/sdc in my case)
wget https://rcn-ee.net/deb/rootfs/saucy/ubuntu-13.10-console-armhf-2013-11-15.tar.xz
tar xJf ubuntu-13.10-console-armhf-2013-11-15.tar.xz
cd ubuntu-13.10-console-armhf-2013-11-15
sudo ./setup_sdcard.sh --mmc /dev/sdc --uboot bone
The username/password is ubuntu/temppwd.
Below is what I get in HOST os
brb@brb-P45T-A:~/ubuntu-13.10-console-armhf-2013-11-15$ ifconfig
...
eth2      Link encap:Ethernet  HWaddr 90:59:af:63:df:45
          inet addr:192.168.7.1  Bcast:192.168.7.3  Mask:255.255.255.252
          inet6 addr: fe80::9259:afff:fe63:df45/64 Scope:Link
          UP BROADCAST RUNNING MULTICAST  MTU:1500  Metric:1
          RX packets:9 errors:0 dropped:0 overruns:0 frame:0
          TX packets:47 errors:0 dropped:0 overruns:0 carrier:0
          collisions:0 txqueuelen:1000
          RX bytes:1010 (1.0 KB)  TX bytes:11690 (11.6 KB)
...
and what I get inside BBB
ubuntu@arm:~$ ifconfig
eth0      Link encap:Ethernet  HWaddr 90:59:af:63:df:43
          UP BROADCAST MULTICAST  MTU:1500  Metric:1
          RX packets:0 errors:0 dropped:0 overruns:0 frame:0
          TX packets:0 errors:0 dropped:0 overruns:0 carrier:0
          collisions:0 txqueuelen:1000
          RX bytes:0 (0.0 B)  TX bytes:0 (0.0 B)
          Interrupt:56
...
usb0      Link encap:Ethernet  HWaddr c6:18:a5:e4:60:71
          inet addr:192.168.7.2  Bcast:192.168.7.3  Mask:255.255.255.252
          inet6 addr: fe80::c418:a5ff:fee4:6071/64 Scope:Link
          UP BROADCAST RUNNING MULTICAST  MTU:1500  Metric:1
          RX packets:178 errors:0 dropped:0 overruns:0 frame:0
          TX packets:100 errors:0 dropped:0 overruns:0 carrier:0
          collisions:0 txqueuelen:1000
          RX bytes:22583 (22.5 KB)  TX bytes:20013 (20.0 KB)
ubuntu@arm:~$ df -h
Filesystem      Size  Used Avail Use% Mounted on
/dev/mmcblk0p2   15G  493M   14G   4% /
none            4.0K     0  4.0K   0% /sys/fs/cgroup
udev            247M  4.0K  247M   1% /dev
tmpfs            50M  236K   50M   1% /run
none            5.0M     0  5.0M   0% /run/lock
none            248M     0  248M   0% /run/shm
none            100M     0  100M   0% /run/user
/dev/mmcblk0p1   64M   17M   47M  27% /boot/uboot
We can make the Ubuntu talk to internet by using the instruction given in Angstrom section (run sudo su first).
TTL/Serial (FTDI) cable connection
The screenshot below shows we can use a ttl serial cable to log into beaglebone in command line mode. The beaglebone is powered by a 5v usb. The tricky part is the J4 pin (RXD) in BBB should be connected to the TXD pin in ttl cable. Similarly, the J5 (TDX) pin in BBB should be connected to the RXD pin 8n ttl cable. The 3.3v p8n in ttl cable is not used at all.
This post from dave.cheney.net asks NOT to connect the 5V pin from TTL to BBB. The Serial port pin settings is given on elinux.org as linked from codechiefl.wordpress.com.
Check out the beaglebone black system manual (Section 7.5 Serial Header) about the serial debug ports from https://github.com/CircuitCo/BeagleBone-Black/blob/master/BBB_SRM.pdf.
   BBB        TTL
  ==========
   J1 GND    GND
   J4 (RXD)  TX
   J5 (TXD)   RX

Here is the log of the booting process (Debian OS).
See also the UDOO example.
Find out the IP address if we use internet sharing
If we are using ethernet on BBB, we can find out the IP adress by using the following way.
Download fing deb package from overlooksoft website. Install it by double clicking the file in file manager. Issue the following command to find out the IP of beaglebone black (shared computer). The IP of my 2nd ethernet adapter (eth1) is 10.42.0.1.
sudo fing -n 10.42.0.1/24
Wifi setup command line using iwconfig
- A USB wifi adapter can be found
lsusb
- If the USB wifi device is detected, we want to know if it can be found on ifconfig command. To show the wifi interface name, use
iwconfig
The wifi adapter can be wlan0 or wlan1.
- Some of my adapters
- TP-LINK shows it is Atheros AR9271 802.11n.
- The EdiMax is EW-7811Un 802.11n.
- Rosewill RNX-EasyN1 is RT2870/RT3070
- Setting up WiFi with BeagleBone Black from adafruit. The important messages are
- Use a usb-extension (even an unpowered hub)
- modify /etc/network/interfaces file to uncomment wlan0 interface & enter correct sssid/password
- sudo ifup wlan0
- To make the wlan0 up at the boot time, I have to change the line auto wlan0 to allow-hotplug wlan0 like this post on Raspberry Pi. Note that I am using a HDMI cape on my BBB.
My /etc/network/interfaces' looks like
auto lo
iface lo inet loopback

allow-hotplug wlan0
  wpa-ssid "YOURSSID"
  wpa-psk "YOURPASSWORD

iface usb0 inet static
  address 192.168.7.2
  netmask 255.255.255.0
  network 192.168.7.0
  gateway 192.168.7.1
- https://wiki.debian.org/WiFi/HowToUse#Command_Line
- http://embeddedprogrammer.blogspot.com/2013/01/beaglebone-using-usb-wifi-dongle-to.html (it is worthy to mention the tutorial uses USB emulated serial connection ONCE all required software are installed. Similar tech was also used in Raspberry Pi). The Adafruit website also teaches us how to use the USB cable provided by BBB to do an ad-hoc SSH connection. However, the BBB differ from BB by several factors, including removal of USB-to-serial interface; see here
dmesg | grep rtl8192
ifconfig wlan0
sudo apt-get install wireless-tools
iwconfig
sudo nano /etc/network/interface
# Made appropriate change on /etc/network/interface
sudo ifup wlan0 // not needed if we have enable wlan0 at boot.
                // sudo ifconfig wlan0 up
sudo iwlist wlan0 scanning
ping www.google.com
where the file /etc/network/interface should be like
auto wlan0
iface wlan0 inet dhcp
    wpa-ssid mynetworkname
    wpa-psk mysecretpassphrase
wifi setup with wicd-curses (TUI/text user interface)
If we don't know the ssid or the connection is done through 'I Agree' method in a webpage, the command line way is not useful. However, with wicd-curses program, we can still connect to a wireless network. This works when I tested it on my work place wifi network.
- http://www.raspyfi.com/wi-fi-on-raspberry-pi-a-simple-guide/
- http://inspire.logicsupply.com/2014/07/beaglebone-wifi-installation.html
- https://blog.bartbania.com/raspberry_pi/easy-wireless-configuration-for-raspberry-pi/ (wicdcli, wicd-curses, rcconf packages)
# Remove ethernet. Connect to BBB by ssh [email protected] using USB cable
lsusb
ifconfig -a
sudo apt-get update
sudo apt-get install wicd-curses
sudo wicd-curses
# Shift+P to add wlan0 to wireless network. Press F10 to save it. Press Shift+R to refresh.
Take a screenshot
Use the scrot program.
sudo apt-get install scrot
scrot -d 5 screenshot.png  # delay 5 seconds
apt source
On my Debian 7.5/wheezy (lsb_release -a), the /etc/apt/sources.list shows
deb http://ftp.us.debian.org/debian/ wheezy main contrib non-free
deb http://ftp.us/debian.org/debian/ wheezy-updates main contrib non-free
deb http://security.debian.org/ wheezy/updates main contrib non-free
deb [arch=armhf] http://debian.beagleboard.org/packages wheezy-bbb main
Angstrom
- Remove uSD card before power on BBB. 4 LEDs lit up.
- Download Angstrom image from http://beagleboard.org/latest-images
- I pick 2GB eMMC version for Beaglebone Black
- https://s3.amazonaws.com/angstrom/demo/beaglebone/BBB-eMMC-flasher-2013.06.20.img.xz
- There is a version dated 2013.09.12 at http://downloads.angstrom-distribution.org/demo/beaglebone/ as the instruction from http://www.height8.com/info/devel/hardware/beagleboneblack/macupdateangstrom
# Umount the uSD card
mount # find /dev/sdc1
sudo diskfutil unmount /dev/sdc1
ls *.xz

# Copy img file to microSD card. Took about 15-30 minutes.
# Method 1.
tar -xJf BBB-eMMC-flasher-2013.06.20.img.xz
sudo dd bs=1m if=~/Downloads/BBB-eMMC-flasher-2013.06.20.img of=/dev/sdc
sudo sync
# Method 2.
xz -cd BBB-eMMC-flasher-2013.06.20.img.xz > /dev/sdc
Remove the microSD card and insert it fully into BBB uSD card slot.
To flash the BBB: Hold down the 'user boot' button (closes to uSD card slot) and power on BBB until the 4 LED's light up for a few seconds. It will take 30-45 minutes to flash the image onto the eMMC. Once it's done, the 4 LED's will all stay lit up at the same time. You can then power down your BBB, remove uSD and power up BBB.
The username is root. There is not password. We can access it by ssh [email protected].
If we type ifconfig in Angstrom, we find the connection is through usb0 adapter.
root@beaglebone:~# ifconfig
eth0      Link encap:Ethernet  HWaddr 90:59:AF:63:DF:43
          UP BROADCAST MULTICAST  MTU:1500  Metric:1
          RX packets:0 errors:0 dropped:0 overruns:0 frame:0
          TX packets:0 errors:0 dropped:0 overruns:0 carrier:0
          collisions:0 txqueuelen:1000
          RX bytes:0 (0.0 B)  TX bytes:0 (0.0 B)
          Interrupt:56

lo        Link encap:Local Loopback
          inet addr:127.0.0.1  Mask:255.0.0.0
          inet6 addr: ::1/128 Scope:Host
          UP LOOPBACK RUNNING  MTU:65536  Metric:1
          RX packets:12 errors:0 dropped:0 overruns:0 frame:0
          TX packets:12 errors:0 dropped:0 overruns:0 carrier:0
          collisions:0 txqueuelen:0
          RX bytes:760 (760.0 B)  TX bytes:760 (760.0 B)

usb0      Link encap:Ethernet  HWaddr 86:27:86:2D:45:5C
          inet addr:192.168.7.2  Bcast:192.168.7.3  Mask:255.255.255.252
          UP BROADCAST RUNNING MULTICAST  MTU:1500  Metric:1
          RX packets:2765 errors:0 dropped:0 overruns:0 frame:0
          TX packets:5003 errors:0 dropped:0 overruns:0 carrier:0
          collisions:0 txqueuelen:1000
          RX bytes:179578 (175.3 KiB)  TX bytes:7067277 (6.7 MiB)
eMMC version
It contains two partitions.
fat16  BEAGLE_Bone    70.57MB
ext4   eMMC-Flasher   3.33GB
One BEAGLE_Bone partition, it contains 4 files. <ID.txt>, <MLO>, <u-boot.img>, and <uEnv.txt>.
<ID.txt> shows the eMMC flasher date (such as 2013.09.04). <MLI> and <u-boot.img> are binary files. <uEnv.txt> has only one line.
On eMMC-Flasher partition, it contains a regular Linux system (/bin, /boot, ...) and one file <eeprom.dump>.
Web server
Google coder
http://www.adafruit.com/blog/2013/09/17/run-google-coder-on-your-beaglebone-black/
VNC
opkg update
opkg install x11vnc

x11vnc -bg -o %HOME/.x11vnc.log.%VNCDISPLAY -auth /var/run/gdm/auth-for-gdm*/database -display :0  -forever
To start VNC server at bootup and shutdown, check out
- https://lists.fedoraproject.org/pipermail/devel/2011-July/154611.html
- https://wiki.archlinux.org/index.php/Vncserver
Package download
http://www.gigamegablog.com/2012/01/29/beaglebone-linux-101-configuring-angstrom-linux/
opkg update
opkg install XXXX
opkg list | grep "gfortran"
However, at least for BBB case, I cannot find gfortran package so I cannot install R. See discussions below
The angstrom linux package browser is the place we can see if packages for BBB Cortex-A8. According to Wikipedia the Cortex-A8 has armv7a architecture. Cortex-A7 (eg pcDuino3) is a smaller, faster, and more power-efficient successor to the Cortex-A8.
On ubuntu, we can use ldconfig -v command to show the installed libraries and their versions. See here. If we like to manually add libraries to ubuntu/debian, we can check the tip here.
XBMC
Forget about XBMC on BeagleBone Black. It has many pros over PI except the GPU that XBMC is heavily realies on, even for the interface.
BBB does have any hardware codec acceleration.
See
beaglebone.local and Avahi/Bonjour/Zeroconf
(2019-08-01) We can ssh to BBB running Debian by ssh [email protected] and the default pw is temppwd.
Instead of typing an IP address, we can use [email protected] to access BBB running on Angstrom OS. The implementation is done by Avahi Daemon/Bonjour/ZeroConf/Multicast.
We can manually install avahi-daemon in ubuntu-armhf by
sudo apt-get update
sudo apt-get install avahi-daemon
After that, we should be able to ssh [email protected] instead of using IP. PS: not stable.
brb@brb-P45T-A:~$ ssh [email protected]
ssh: connect to host ubuntu-armhf.local port 22: Connection refused
The real IP address can be found by ping HOSTNAME.local (Updated: use ps -ef | grep avahi to find out the exact hostname used in .local domain because at least one of my Ubuntu machines does not use its hostname exactly)
For the Angstrom OS with beaglebone, I found the IP number is in 192.168.7.2 (same as in the Getting Start page) by using ping command.
brb@brb-P45T-A:/etc/init$ ping beaglebone.local
PING beaglebone.local (192.168.7.2) 56(84) bytes of data.
brb@brb-P45T-A:/etc/init$ ifconfig
(skip)
eth2      Link encap:Ethernet  HWaddr 90:59:af:63:df:45
          inet addr:192.168.7.1  Bcast:192.168.7.3  Mask:255.255.255.252
The same method can be applied to Raspberry Pi or Ubuntu. In fact, avahi-daemon is installed by default. We can use ps -ef | grep avahi to check it.
Internet over Ethernet
Suppose the host machine has a USB ethernet adapter/cable. We can share the internet from the host to BBB.
The host's USB-ethernet adapter has an IP 10.42.0.1 and it is configured as shared instead of DHCP.
The BBB will have eth0: 10.42.0.50 and usb0: 192.168.7.2.
We can use ssh [email protected] to access it. The BBB will have internet access.
echo "nameserver 8.8.8.8" > /etc/resolv.conf
Network over USB
We can use a USB cable to connect to BBB from a Windows/Linux/Mac computer. This is a very unique feature in BBB. Not even Raspberry Pi has this feature.
- http://beagleboard.org/static/beaglebone/latest/README.htm
- http://www.linux-usb.org/gadget/ Ethernet over USB
- http://joshuawise.com/horndis USB tethering
- https://www.raspberrypi.org/forums/viewtopic.php?f=29&t=82998&p=586681&hilit=usbnet#p586681
See the next section to know how to use this feature to get an internet access for BBB so it does not need to plug in an ethernet cable or a WIFI adapter.
Internet over USB
- http://shallowsky.com/blog/hardware/talking-to-beaglebone.html
- http://www.circuidipity.com/getting-started-with-beaglebone-black.html
- http://robotic-controls.com/learn/beaglebone/beaglebone-internet-over-usb-only
- http://cylonjs.com/documentation/platforms/beaglebone/
- https://www.youtube.com/watch?v=fzRVVtGNfj8&list=PLF4A1A7E09E5E260A&noredirect=1 Host is Windows 7.
On BBB, run
sudo su
/sbin/route add default gw 192.168.7.1
echo "nameserver 8.8.8.8" >> /etc/resolv.conf
netstat -rn
Note it is convenient to save the first 2 lines in a script file (eg 'networkusb') and chmod +x it. Then when we want to use USB to connect to internet, we just use sudo su ~/networkusb.
It is perfectly fine to have multiple lines of nameserver. (IP Masquerade/Share the internet connection + IP forward)
The above procedure of setting gateway is temporary. We can also permanently change the gateway setting by editing /etc/network/interfaces file (https://help.ubuntu.com/12.04/serverguide/network-configuration.html)
auto lo
iface lo inet loopback
auto usb0
iface usb0 inet static
    address 192.168.7.2
    netmask 255.255.255.0
    network 192.168.7.0
    gateway 192.168.7.1
Then run
sudo service networking restart
On host, run (wlan0 is my host internet adapter, eth1 is the BBB USB connection on my host)
sudo iptables --table nat --append POSTROUTING --out-interface wlan0 -j MASQUERADE
sudo iptables --append FORWARD --in-interface eth1 -j ACCEPT
echo 1 | sudo tee /proc/sys/net/ipv4/ip_forward > /dev/null
sudo iptables -t nat -L
NOTE:
- The ip-forward statement can be alternatively enabled by un-commenting a suitable line in /etc/sysctl.conf file (same method was used by Adafruit)
- We can save the first 2 lines in a script file (eg. 00-firewall) and put it in the /etc/network/if-up.d directory. Don't forget to run chmod 755 on this file. Any script in this directory will be executed as soon as your network interfaces come up. See the instruction from debian-administration.org.
- See also the method provided from Adafruit by just modifying /etc/network/interfaces file.
And the following is the output of running iptables -t nat -L before running the masquerade & ip forward.
$ sudo iptables -t nat -L
[sudo] password for brb:
Chain PREROUTING (policy ACCEPT)
target     prot opt source               destination

Chain INPUT (policy ACCEPT)
target     prot opt source               destination

Chain OUTPUT (policy ACCEPT)
target     prot opt source               destination

Chain POSTROUTING (policy ACCEPT)
target     prot opt source               destination
and the following is after I run the masquerade and ip forward:
$ sudo iptables -t nat -L
Chain PREROUTING (policy ACCEPT)
target     prot opt source               destination

Chain INPUT (policy ACCEPT)
target     prot opt source               destination

Chain OUTPUT (policy ACCEPT)
target     prot opt source               destination

Chain POSTROUTING (policy ACCEPT)
target     prot opt source               destination
MASQUERADE  all  --  anywhere             anywhere
Now everything should be done. Now we can ping www.google.com in BBB to see if the connection works. This is tested on my home ubuntu host machine running 12.04 & 14.04. We can use the last command to show nat table on host machine; See here.
Angstrom
http://beaglebone.cameon.net/home/internet-over-usb
ArchLinux
This post on Archlinux discusses how to get the usb network adapter that is built into the mini-usb power connector working under Arch.
Ubuntu
How to share internet over USB on BBB? http://askubuntu.com/questions/380810/internet-over-usb-on-beaglebone-black
microHDMI to VGA cable
http://circuitco.com/support/index.php?title=BeagleBone_Black_Accessories
Question: How to create EDIT? My NEC monitor supports only 1024 x 768.
Beagleboneblack HDMI page from circuitco.com.
Remote desktop connection
From Linux
See Raspberry#Connection_to_Raspberry_Pi_with_tightvnc
# Server side
sudo apt-get install tightvncserver
tightvncserver     # set up the password, e.g. same password as the debian user
vncserver          # this step may not be necessary
vncserver –kill :1 # kill the current vncserver
vncserver -geometry 480x272   # Simulate using the 4D 4.3" LCD cape; see the screenshot below.

# Client side
xtightvncviewer 10.42.0.50:1
# or xtightvncviewer 192.168.7.2:1 if we use usb0
# or xtightvncviewer beaglebone.local:1 if we use usb0

To start tightvncserver automatically at start, follow the instruction at here to create a new script file under /etc/init.d/ directory and run update-rc.d on the new script.
debian@beaglebone:~$ sudo nano /etc/init.d/vncserver
[sudo] password for debian:
debian@beaglebone:~$ sudo chmod +x /etc/init.d/vncserver
debian@beaglebone:~$ sudo update-rc.d vncserver defaults
update-rc.d: using dependency based boot sequencing
update-rc.d: warning: default start runlevel arguments (2 3 4 5) do not match vncserver Default-Start values (S)
update-rc.d: warning: default stop runlevel arguments (0 1 6) do not match vncserver Default-Stop values (0 6)
insserv: Script vncserver is broken: incomplete LSB comment.
insserv: missing `Required-Stop:'  entry: please add even if empty.
debian@beaglebone:~$ sudo reboot
Despite the warning, it still works. It make a copy of this vncserver file below. Something we may want to change for different scenario is the USER and GEOMETRY parameters.
#!/bin/sh -e
### BEGIN INIT INFO
# Provides:          vncserver
# Required-Start:    networking
# Default-Start:     S
# Default-Stop:      0 6
### END INIT INFO

# PATH="$PATH:/usr/X11R6/bin/"

# The Username:Group that will run VNC
export USER="debian"
#${RUNAS}

# The display that VNC will use
DISPLAY="1"

# Color depth (between 8 and 32)
DEPTH="16"

# The Desktop geometry to use.
#GEOMETRY="<WIDTH>x<HEIGHT>"
#GEOMETRY="800x600"
GEOMETRY="1024x768"
#GEOMETRY="1280x1024"

# The name that the VNC Desktop will have.
NAME="my-vnc-server"

OPTIONS="-name ${NAME} -depth ${DEPTH} -geometry ${GEOMETRY} :${DISPLAY}"

. /lib/lsb/init-functions

case "$1" in
start)
log_action_begin_msg "Starting vncserver for user '${USER}' on localhost:${DISPLAY}"
su ${USER} -c "/usr/bin/vncserver ${OPTIONS}"
;;

stop)
log_action_begin_msg "Stoping vncserver for user '${USER}' on localhost:${DISPLAY}"
su ${USER} -c "/usr/bin/vncserver -kill :${DISPLAY}"
;;

restart)
$0 stop
$0 start
;;
esac

exit 0
From Windows
Remote Access to a Raspberry Pi using MobaXterm
My Observation about angstrom distribution
When I use the image BBB-eMMC-flasher-2013.06.20.img to put it on the microSD card with win32DiskImager, I see (from plugging SD in Ubuntu) the microSD card has 2 partitions
eMMC-Flasher  -ext4
BEAGLE_BONE - vfat
where eMMC-Flasher contains an ubuntu data and BEAGLE_BONE contains only 4 files.
ID.txt - just one line
MLO - 98K binary
u-boot.img - 371K binary
uEnv.txt - just one line
Flashing is done by pressing the 'Boot' button while connecting the power. It took 1 hour in my case when I flashed BBB-eMMC-flasher-2013.06.20.img.
However, once the microSD is flashed to eMMC, the 'eMMC-Flasher' partition will be gone and 'BEAGLE_BONE' partition is changed to include 3 new folders- App, Docs and Drivers AND some new files - START.htm, autorun.inf, README.md.
Android OS
- http://icculus.org/~hendersa/android/
- Comparison of several SoC from Udoo.org.
- http://downloads.ti.com/sitara_android/esd/TI_Android_DevKit/TI_Android_JB_4_2_2_DevKit_4_1_1/index_FDS.html
BBB vs Raspberry Pi
- How does BBB compare to Raspberry Pi 2
- http://makezine.com/magazine/how-to-choose-the-right-platform-raspberry-pi-or-beaglebone-black/
- http://www.doctormonk.com/2013/07/raspberry-pi-vs-beaglebone-black.html
Beaglebone 101
Angstrom includes a web server running on BBB. The web address is http://192.168.7.2
I have created screenshots in Google drive http://goo.gl/o03iex
Fix date/time
See here. Run the following to change the country and time zone.
sudo dpkg-reconfigure tzdata
Then run
sudo ntpdate pool.ntp.org
For one time fix (for example, we want to avoid an error from running 'make'), we can use
sudo date -s "2 Apr 2014 19:00:00"
Increase sudo timeout
http://ubuntuforums.org/showthread.php?t=183418
sudo visudo
# Add the following line for 10 minutes. Use -1 for infinity.
# Modify USER_NAME for your own.
Defaults:USER_NAME timestamp_timeout=10
Run Graphical App on remote computer
Suppose we have a Qt app we want to launch from a local computer and show the GUI on BBB. We can
- Run xhost + as a user on BBB
- Run export DISPLAY=:0.0 then our own graphical application from the local computer.
To run xhost command at boot (The xhost command needs an active X server to run, it can run at the login screen e.g. when lightdm loads), we can follow the instruction here
Run Graphical App as root on local computer
This is related to the question: Make X11 program work in an ssh sudo session
One way that works is to run ssh -X [email protected] first (it seems not necessary to use ssh -Y option). Then
sudo XAUTHORITY=/home/debian/.Xauthority /home/debian/Downloads/servo/servo
Then my GUI app located in /home/debian/Downloads/servo/servo will be launched as root shown in my local machine.
If the GUI app is not run by root, we don't need to bother the xauthroity. We can just run the app.
Use microSD as ext storage
It is possible. See the idea in here.
Playing music using command line tools
Install ALSA libraries first (these may be installed already). ALSA stands for Advanced Linux Sound Architecture.
sudo apt-get install alsa-base alsa-utils
sudo apt-get install libasound2-dev
- Beaglebone Robotic Project: Chapter 3.
- http://www.binarytides.com/play-music-console-ubuntu/
- http://infinetix.com/project/distributed-audio-beagle-bone-black/
- http://andicelabs.com/2014/03/usb-audio-beaglebone/
- mpg123 - Yes, there are keyboard shortcuts. Use '-C' argument. For example, use ":" for fast? forward.
sudo apt-get install mpg123
- sox - using about 50% of CPU. no keyboard shortcut
sudo apt-get install sox libsox-fmt-all
- vlc - using about 50% of CPU and has a complete keyboard shortcuts. For example, a/z for volume and left/right arrow for fast backward/forward (seek -/+ 1%). Space for pause and s for stop. -/+ key to slow down/accelerate the playing speed for video files. Shift+left arrow to a short backwards jump. See also the hotkey page (not exactly the same).
sudo apt-get install vlc-nox
vlc -I ncurses XXX.mp3
To use Syba USB audio adapter, we should switch audio output from HDMI to USB adapter. To do that, create a new file called <.asoundrc> with the content
pcm.!default sysdefault:Device
If check the speaker and microphone are not muted, use
alsamixer
Use the m key to unmute the microphone. Make sure your USB sound device is detected, type
aplay -l
# OR
cat /proc/asound/cards
Now it is time to test the USB audio adapter by using VLC.
Build R on BBB
I am using Ubuntu 13.04 image since angstrom linux missing many required packages.
Since the space is limited, instead of using 'sudo apt-get build-dep r-base', I manually install the essential packages: build-essential, gfortran, libreadline6-dev, libx11-dev, libxt-dev and openjdk-7-jre.
I am using R 3.0.1. (Update) R 3.1.0 works well too.
ubuntu@ubuntu-armhf:~$ df -h
Filesystem      Size  Used Avail Use% Mounted on
/dev/mmcblk0p2  1.8G  276M  1.4G  17% /
none            4.0K     0  4.0K   0% /sys/fs/cgroup
devtmpfs        248M  4.0K  248M   1% /dev
none             50M  220K   50M   1% /run
none            5.0M     0  5.0M   0% /run/lock
none            248M     0  248M   0% /run/shm
none            100M     0  100M   0% /run/user
/dev/mmcblk0p1 1004K  472K  532K  48% /boot/uboot

sudo apt-get update
sudo apt-get install build-essential gfortran libreadline6-dev libx11-dev libxt-dev
sudo apt-get install openjdk-7-jre
// (optional) need it if we don't want to get an error message at the end of running 'make'
// This require 143MB space.

// The whole process (configure + make) takes at least 2 hours on BBB
./configure --enable-R-shlib
make
// make > ~/Rmake.txt 2>&1

There is still warnings with library/datasets
http://bugs.debian.org/cgi-bin/bugreport.cgi?bug=695411
It seems this is false alarm.

ubuntu@ubuntu-armhf:~/R-3.0.1$ df -h
Filesystem      Size  Used Avail Use% Mounted on
/dev/mmcblk0p2  1.8G  1.1G  615M  64% /
none            4.0K     0  4.0K   0% /sys/fs/cgroup
devtmpfs        248M  4.0K  248M   1% /dev
none             50M  224K   50M   1% /run
none            5.0M     0  5.0M   0% /run/lock
none            248M     0  248M   0% /run/shm
none            100M     0  100M   0% /run/user
/dev/mmcblk0p1 1004K  472K  532K  48% /boot/uboot
The complete process of running ./configure and make are recorded in
- ./configure Beaglebone and x86_64 box
- make Beaglebone and x86_64 box
Other configure options
http://cran.r-project.org/doc/manuals/R-admin.html#Configuration-on-a-Unix_002dalike
./configure --disable-byte-compiled-packages --enable-R-shlib
Performance Test
Problems
- Sometimes the system does not respond. The desktop is freezed and ssh to log in does not work. I am current using Ubuntu image.
Benchmark (Raspberry Pi vs BBB vs Edison) using the sysbench utility
- http://www.davidhunt.ie/raspberry-pi-beaglebone-black-intel-edison-benchmarked/. See also the Raspberry Pi case.
Note that sysbench does not benchmark gpu. For more information on sysbench, see the following pages:
- This article on howtoforge.com.
- gentoo.org
sudo apt-get install sysbench
sysbench --test=cpu run
sysbench --test=memory --memory-block-size=1M --memory-total-size=10G run
sysbench --test=fileio --file-test-mode=rndwr --file-total-size=16MB prepare
sysbench --test=fileio --file-test-mode=rndwr --file-total-size=16MB --max-requests=1000 run
sysbench --test=fileio --file-test-mode=rndrd --file-total-size=16MB --max-requests=10000 run
# For the Edison tests, I added ‘-max-threads=2′
# For the Pi & BBB tests, I added ‘-max-threads=1′
My test result shows the storage random write result from the original post on http://www.davidhunt.ie should be 3.04 seconds instead of 43 seconds. So BBB beats RPi model B in cpu,memory,storage read & write but not in cpu when compared to RPi 2 (see http://www.davidhunt.ie/raspberry-pi-2-benchmarked/).
debian@beaglebone:~$ sysbench --test=cpu run
sysbench 0.4.12:  multi-threaded system evaluation benchmark

Running the test with following options:
Number of threads: 1

Doing CPU performance benchmark

Threads started!
Done.

Maximum prime number checked in CPU test: 10000


Test execution summary:
    total time:                          260.0903s
    total number of events:              10000
    total time taken by event execution: 260.0687
    per-request statistics:
         min:                                 25.57ms
         avg:                                 26.01ms
         max:                                 87.97ms
         approx.  95 percentile:              26.14ms

Threads fairness:
    events (avg/stddev):           10000.0000/0.00
    execution time (avg/stddev):   260.0687/0.00

debian@beaglebone:~$ sysbench --test=memory --memory-block-size=1M --memory-total-size=10G run
sysbench 0.4.12:  multi-threaded system evaluation benchmark

Running the test with following options:
Number of threads: 1

Doing memory operations speed test
Memory block size: 1024K

Memory transfer size: 2048M

Memory operations type: write
Memory scope type: global
Threads started!
Done.

Operations performed: 2048 ( 1160.85 ops/sec)

2048.00 MB transferred (1160.85 MB/sec)


Test execution summary:
    total time:                          1.7642s
    total number of events:              2048
    total time taken by event execution: 1.7564
    per-request statistics:
         min:                                  0.70ms
         avg:                                  0.86ms
         max:                                  8.66ms
         approx.  95 percentile:               1.86ms

Threads fairness:
    events (avg/stddev):           2048.0000/0.00
    execution time (avg/stddev):   1.7564/0.00

debian@beaglebone:~$ sysbench --test=fileio --file-test-mode=rndwr --file-total-size=16MB prepare
sysbench 0.4.12:  multi-threaded system evaluation benchmark

128 files, 128Kb each, 16Mb total
Creating files for the test...

debian@beaglebone:~$ sysbench --test=fileio --file-test-mode=rndwr --file-total-size=16MB --max-requests=1000 run
sysbench 0.4.12:  multi-threaded system evaluation benchmark

Running the test with following options:
Number of threads: 1

Extra file open flags: 0
128 files, 128Kb each
16Mb total file size
Block size 16Kb
Number of random requests for random IO: 1000
Read/Write ratio for combined random IO test: 1.50
Periodic FSYNC enabled, calling fsync() each 100 requests.
Calling fsync() at the end of test, Enabled.
Using synchronous I/O mode
Doing random write test
Threads started!
Done.

Operations performed:  0 Read, 1000 Write, 1280 Other = 2280 Total
Read 0b  Written 15.625Mb  Total transferred 15.625Mb  (5.1363Mb/sec)
  328.72 Requests/sec executed

Test execution summary:
    total time:                          3.0421s
    total number of events:              1000
    total time taken by event execution: 0.2028
    per-request statistics:
         min:                                  0.13ms
         avg:                                  0.20ms
         max:                                  5.65ms
         approx.  95 percentile:               0.26ms

Threads fairness:
    events (avg/stddev):           1000.0000/0.00
    execution time (avg/stddev):   0.2028/0.00

debian@beaglebone:~$ sysbench --test=fileio --file-test-mode=rndrd --file-total-size=16MB --max-requests=10000 run
sysbench 0.4.12:  multi-threaded system evaluation benchmark

Running the test with following options:
Number of threads: 1

Extra file open flags: 0
128 files, 128Kb each
16Mb total file size
Block size 16Kb
Number of random requests for random IO: 10000
Read/Write ratio for combined random IO test: 1.50
Periodic FSYNC enabled, calling fsync() each 100 requests.
Calling fsync() at the end of test, Enabled.
Using synchronous I/O mode
Doing random read test
Threads started!
Done.

Operations performed:  10000 Read, 0 Write, 0 Other = 10000 Total
Read 156.25Mb  Written 0b  Total transferred 156.25Mb  (182.72Mb/sec)
11693.80 Requests/sec executed

Test execution summary:
    total time:                          0.8552s
    total number of events:              10000
    total time taken by event execution: 0.7972
    per-request statistics:
         min:                                  0.02ms
         avg:                                  0.08ms
         max:                                  1.82ms
         approx.  95 percentile:               0.11ms

Threads fairness:
    events (avg/stddev):           10000.0000/0.00
    execution time (avg/stddev):   0.7972/0.00
Sysbench comparison of BBB and Intel(R) Xeon(R) W3690 @ 3.47GHz
BBB
debian@beaglebone:~$ sysbench --test=cpu --num-threads=1 --cpu-max-prime=2000 run
sysbench 0.4.12:  multi-threaded system evaluation benchmark
Test execution summary:
    total time:                          29.4288s

debian@beaglebone:~$ sysbench --test=cpu --num-threads=2 --cpu-max-prime=2000 run
Test execution summary:
    total time:                          29.3096s
Intel(R) Xeon(R) W3690 @ 3.47GHz (The results shows enabling hyper-threading has no advantage!!)
brb@brbweb4:~/Qt$ sysbench --test=cpu --num-threads=1 --cpu-max-prime=2000 run
Test execution summary:
    total time:                          1.1260s

brb@brbweb4:~/Qt$  sysbench --test=cpu --num-threads=6 --cpu-max-prime=2000 run
Test execution summary:
    total time:                          0.2691s

brb@brbweb4:~/Qt$  sysbench --test=cpu --num-threads=12 --cpu-max-prime=2000 run
sysbench 0.4.12:  multi-threaded system evaluation benchmark
Test execution summary:
    total time:                          0.3012s
PHORONIX TEST SUITE
The software was mentioned in another article about benchmark on different virtualization software.
Qt cross compile
The list below is specific to beaglebone (black)
- http://derekmolloy.ie/beaglebone/qt-with-embedded-linux-on-the-beaglebone/
- http://www.michaelhleonard.com/cross-compile-for-beaglebone-black/ Install Eclipse and toolchain for cross-compile, Not Qt specific
- http://eewiki.net/display/linuxonarm/BeagleBone+Black Not Qt specific
- Bare Metal Qt 5.2 on BeagleBone Black Ubuntu Part 1 Part 2 Part 3
- http://wiki.mentorel.com/doku.php/qt-embedded Not BBB specific, based on Qt 4.8
- http://www.cloud-rocket.com/2013/07/building-qt-for-beaglebone/
- http://qt-project.org/doc/qt-4.8/embeddedlinux-support.html and http://qt-project.org/doc/qt-4.8/embeddedlinux-support.html
Other resource related to Raspberry Pi
sudo apt-get install gcc-arm-linux-gnueabi
What's wrong when running a binary created on x86_64 OS
For the hello world example, I will get an error in BBB if I just scp the binary file from x86_64 OS to BBB.
debian@beaglebone:~$ ./a.out
-bash: ./a.out: cannot execute binary file
What we should do to compile hello.c
arm-linux-gnueabi-gcc -march=armv7-a -mtune=cortex-a8 -mfpu=neon -o hello hello.c
scp hello [email protected]:
Then we run hello program in BBB. It should run successfully.
http://www.valvers.com/embedded-linux/beaglebone/step06-cross-compiling
What we should do to compile hello.cpp
Note: do not install g++-arm-linux-gnueabihf package. It will give me the following error when I try to compile a simple cpp program.
warning: ld-linux.so.3, needed by /usr/lib/gcc/arm-linux-gnueabihf/4.6/libstdc++.so, not found (try using -rpath or -rpath-link)
According to the above website or michaelhleonard.com we shall install the toolchain
sudo apt-get install gcc-arm-linux-gnueabi
sudo apt-get install g++-arm-linux-gnueabi
I can build hello.cpp on my x86_64 host.
arm-linux-gnueabi-g++ -march=armv7-a -mtune=cortex-a8 -mfpu=neon -o hellocpp hello.cpp
But when I run the hellocpp program, I get the following error
debian@beaglebone:~$ ./hellocpp
./hellocpp: error while loading shared libraries: libstdc++.so.6: cannot open shared object file: No such file or directory
I also try the following. It is a big download but still does not help.
sudo apt-get install ia32-libs
Some people suggested to add the following when compiling your program
-static -static-libstdc++
It works!!! The complete compile command is (-static-libstdc++ is not necessary)
arm-linux-gnueabi-g++ -march=armv7-a -mtune=cortex-a8 -mfpu=neon -static -o hellocpp hello.cpp
Linaro Toolchain
Although there are different toolchains, we are particularly interested in linaro toolchain. See https://wiki.linaro.org/WorkingGroups/ToolChain/FAQ.
Check out this page http://www.elinux.org/Toolchains for more information about toolchain.
Some paths
- arm-linux-gnueabi-gcc, arm-linux-gnueabi-g++, arm-linux-gnueabi-ar,... are located at /usr/bin/. This can be found by typing arm-linux-gnuabi-[TAB]
- ar, objcopy, strip also are located at /usr/arm-linux-gnueabi/bin.
brb@brb-P45T-A:~/Documents$ arm-linux-gnueabi-
arm-linux-gnueabi-addr2line  arm-linux-gnueabi-gprof
arm-linux-gnueabi-ar         arm-linux-gnueabi-ld
arm-linux-gnueabi-as         arm-linux-gnueabi-ld.bfd
arm-linux-gnueabi-c++filt    arm-linux-gnueabi-ld.gold
arm-linux-gnueabi-cpp        arm-linux-gnueabi-nm
arm-linux-gnueabi-cpp-4.6    arm-linux-gnueabi-objcopy
arm-linux-gnueabi-elfedit    arm-linux-gnueabi-objdump
arm-linux-gnueabi-g++        arm-linux-gnueabi-ranlib
arm-linux-gnueabi-g++-4.6    arm-linux-gnueabi-readelf
arm-linux-gnueabi-gcc        arm-linux-gnueabi-size
arm-linux-gnueabi-gcc-4.6    arm-linux-gnueabi-strings
arm-linux-gnueabi-gcov       arm-linux-gnueabi-strip
arm-linux-gnueabi-gcov-4.6

brb@brb-P45T-A:~$ dpkg -L gcc-arm-linux-gnueabi
/.
/usr
/usr/share
/usr/share/doc
/usr/share/man
/usr/share/man/man1
/usr/bin
/usr/share/doc/gcc-arm-linux-gnueabi
/usr/share/man/man1/arm-linux-gnueabi-gcov.1.gz
/usr/share/man/man1/arm-linux-gnueabi-gcc.1.gz
/usr/bin/arm-linux-gnueabi-gcov
/usr/bin/arm-linux-gnueabi-gcc
brb@brb-P45T-A:~$ ls -l /usr/bin/arm-linux-gnueabi-gcc
lrwxrwxrwx 1 root root 25 Feb 18  2012 /usr/bin/arm-linux-gnueabi-gcc -> arm-linux-gnueabi-gcc-4.6
brb@brb-P45T-A:~$ locate arm-linux-gnueabi-gcc-4.6
/usr/bin/arm-linux-gnueabi-gcc-4.6
/usr/share/man/man1/arm-linux-gnueabi-gcc-4.6.1.gz
Configure Eclipse for cross compile
http://zombiebabylabs.com/2014/02/hello-beaglebone-world-a-c-primer/
GUI not shown up
http://www.marshut.com/xkshy/beaglebone-black-qt-gui-application.html
Cross compile Qt
Some possible options
./configure -embedded arm -prefix /usr/local/QtEmbedded-arm -platform linux-g++ \
            -little-endian -xplatform qws/linux-arm-g++ -qt-gfx-linuxfb \
            -qt-gfx-vnc -qt-gfx-multiscreen -qt-mouse-pc -release -shared \
            -no-fast -depths all -D QT_NO_QWS_CURSOR -confirm-license -no-pch

# http://www.cloud-rocket.com/2013/07/building-qt-for-beaglebone/
# based on qt 4.8.5
./configure -v -opensource -confirm-license -prefix /opt/qt -embedded arm \
            -platform qws/linux-x86-g++ -xplatform qws/linux-am335x-g++ \
            -depths 16,24,32 -no-mmx -no-3dnow -no-sse -no-sse2 -no-glib -no-cups \
            -no-largefile -no-accessibility -no-openssl -no-gtkstyle -qt-mouse-pc \
            -qt-mouse-linuxtp -qt-mouse-linuxinput -plugin-mouse-linuxtp -plugin-mouse-pc \
            -fast -little-endian -host-big-endian -no-pch -no-sql-ibase -no-sql-mysql \
            -no-sql-odbc -no-sql-psql -no-sql-sqlite -no-sql-sqlite2 -no-webkit \
            -no-qt3support -nomake examples -nomake demos -nomake docs -nomake translations

# http://armsdr.blogspot.com/2014/01/bare-metal-qt-52-on-beaglebone-black_10.html
# Based on qt 5.2.0
# # qwx is located at mkspecs/qws. What does platform and xplatform do?
./qt-everywhere-opensource-src-5.2.0/configure -v -opensource -confirm-license \
    -prefix /usr/local/qt-5.2 -no-largefile -no-accessibility -qt-zlib \
    -no-gif -qt-libpng -qt-libjpeg -no-nis -no-cups -xplatform linux-linaro-gnueabihf-g++ \
    -device linux-beaglebone-g++ -device-option \
    CROSS_COMPILE=/usr/local/linaro/bin/arm-linux-gnueabihf-
- qws
QWS is a window server similar to X11 that works independently from it. Unlike X11, QWS windows cannot be forwarded to your Windows machine and will be displayed by your board directly. Before we proceed with starting our application in QWS mode ensure that your board is showing the text terminal and not the X11 session (press Ctrl-Alt-F1 to switch to it):
Native build Qt on BBB
The following screenshot demonstrates running qt-4.8.5/examples/painting/basicdrawing/ in BBB. That is, it is possible to compile the Qt directly in beaglebone black without using cross-compile.

For general instruction of building Qt on different platforms, consult to http://qt-project.org/doc/qt-4.8/installation.html.
The way I build Qt is
mv qt-everywhere-opensource-src-4.8.5 qt-4.8.5
cd qt-4.8.5
./configure -v -opensource -confirm-license -no-largefile -no-accessibility \
            -qt-zlib -no-gif -qt-libpng -qt-libjpeg -no-nis -no-cups -no-pch
make # BBB is single core; o.w. pass -jN where N is the number of threads
sudo make install
- configure takes about 1 hour. Not much information is given after running configure. It only said Qt is now configured for building. Just run 'make'. Once everything is built, you must run 'make install'. Qt will be installed into /usr/local/Trolltech/Qt-4.8.5. To reconfigure, run make confclean and configure.
- How to shorten the Qt make process? -nomake demos, -nomake examples, -nomake tools, -no-webkit, -no-qt3support, -no-script, -no-scripttools. Recommended flags for a minimalistic Qt build is another post where one user suggested not to use '-nomake tools'.
- Running make will take ~ 20 hours
- Running sudo make install is quick (~ 5 minutes)
- The std output shows /usr/local/Trolltech/Qt-4.8.5 is created
- If we want to save (a little) time when running make, we can add -nomake examples -nomake demos to your configure invocations (I don't see these options in Qt 4.8), it works on both windows and linux. It still took ~18 hours when I build Qt 4.8.6.
It is interesting to compare the qt directory under $HOME and /usr/local/Trolltech. Note that even bin directory is copied to /usr/local, the contents inside bin folder are different (not shown here)
debian@beaglebone:~$ ls qt-4.8.5/
bin              configure      imports             LICENSE.FDL   plugins       templates
changes-4.8.5    configure.exe  include             LICENSE.GPL3  projects.pro  tools
config.profiles  demos          INSTALL             LICENSE.LGPL  qmake         translations
config.status    doc            LGPL_EXCEPTION.txt  Makefile      README        util
config.tests     examples       lib                 mkspecs       src

debian@beaglebone:~/qt-4.8.5$ ls /usr/local/Trolltech/Qt-4.8.5/
bin    doc       imports  lib      phrasebooks  q3porting.xml  translations
demos  examples  include  mkspecs  plugins      tests

debian@beaglebone:~/qt-4.8.5$ ls /usr/local/Trolltech/Qt-4.8.5/examples/
animation    draganddrop            help       mainwindows   qtestlib      threads    widgets
dbus         effects                helper     multimedia    README        tools      xml
declarative  examples-manifest.xml  ipc        network       richtext      touch      xmlpatterns
designer     examples.pro           itemviews  opengl        script        tutorials
desktop      gestures               layouts    painting      sql           uitools
dialogs      graphicsview           linguist   qtconcurrent  statemachine  webkit
debian@beaglebone:~/qt-4.8.5$
The final step is to change PATH environment variable by nano ~/.profile
export PATH=/usr/local/Trolltech/Qt-4.8.5/bin:$PATH
Logout and login again to see if qmake is available OR type . $HOME/.profile to source the profile file.
We can write a simple Qt code to test. See here for the code and how to use command line to compile the code.
It is also interesting to see the gcc version on BBB (v4.6.3)
debian@beaglebone:~$ gcc -v
Using built-in specs.
COLLECT_GCC=gcc
COLLECT_LTO_WRAPPER=/usr/lib/gcc/arm-linux-gnueabihf/4.6/lto-wrapper
Target: arm-linux-gnueabihf
...
Thread model: posix
gcc version 4.6.3 (Debian 4.6.3-14)

debian@beaglebone:~$ ls /usr/bin/arm*
/usr/bin/arm-linux-gnueabihf-cpp      /usr/bin/arm-linux-gnueabihf-gcc-4.6
/usr/bin/arm-linux-gnueabihf-cpp-4.6  /usr/bin/arm-linux-gnueabihf-gfortran
/usr/bin/arm-linux-gnueabihf-g++      /usr/bin/arm-linux-gnueabihf-gfortran-4.6
/usr/bin/arm-linux-gnueabihf-g++-4.6  /usr/bin/arm-linux-gnueabihf-run
/usr/bin/arm-linux-gnueabihf-gcc
Qt Creator
To download the binary version, use
sudo apt-get update
sudo apt-get install qtcreator
This will install Qt Creator 2.5.0 (built on Aug 8 2012 as shown on 'About Qt Creator'). Since my LCD Cape only supports 480x272, I only see a small part of Qt Creator on my tiny screen even I maximize the app.
Note that the current version of Qt Creator 3.5.1 requires Qt 5.4.0. In order to use Qt 4.8.x, we can grab an old version of Qt. One version I can find is 2.5.2 which is available on http://download.qt.io/archive/qtcreator/2.5/.
To build it (assume qmake is in the PATH)
tar xzvf qt-creator-2.5.2-src.tar.gz
cd qt-creator-2.5.2-src
qmake qtcreator.pro
make
This will take a very long time and a lot of space. Not worthy to compile from source!
Qt examples
Some great examples to try include
- examples/animation/appchooser
- examples/animation/states
- examples/dialogs/extension
- examples/dialogs/licensewizard
- examples/effects/lighting
- examples/effects/blurpicker
- examples/graphicsview/weatheranchorlayout
- examples/graphicsview/elasticnodes
- examples/graphicsview/diagramscene (a working app for drawing diagrams)
- examples/help/simpletextviewer (including image on help)
- examples/help/ipc/ (networking)
- examples/itemviews/chart (when a cell is selected, the corresponding text from another item list will be highlighted)
- examples/itemviews/dirview
- examples/itemviews/frozencolumn
- examples/itemviews/pixelator
- examples/itemviews/puzzle (Game)
- examples/layouts/dynamiclayouts (widgets location changed at real time)
- examples/network/bearermonitor (show all networks in a tree on lhs and status on rhs)
- examples/network/fortunateclient
- examples/network/http (download from an address)
- examples/network/loopback (with progress bar for sent and receved packets)
- examples/network/qftp (show contents in the textEdit. Cool!)
- examples/network/securesocketclient (allow input)
- examples/opengl (seems not working)
- examples/painting/concentriccircles (for fun)
- examples/painting/basicdrawing (basic test)
- examples/painting/painterpaths (fill gradient on different shapes or letters)
- examples/qtconcurrent/wordcount (becomes a background job running)
- examples/richtext/calendar
- examples/richtext/orderform
- examples/script/helloscript (not sure about what 'script' means)
- examples/statemachine/trafficlight
- examples/statemachine/twowaybutton (very simple)
- examples/statemachine/rogue (text game. How does it do it)
- examples/statemachine/pingpong (nothing show up on BBB)
- examples/threads/waitconditions (nothing show up on BBB)
- examples/tools/inputpanel (auto pop up input panel from an empty box)
- examples/tools/settingeditor
- examples/uitools/textfinder (can highlight text)
- examples/widgets/styles (use an image as background)
- examples/widgets/stylesheet (no image was used)
- examples/widgets/softkeys (no binary)
- examples/widgets/digitclock (simple)
- examples/widgets/calculator (classical)
- examples/widgets/charactermap (magnifier on mouse-over character)
- examples/widgets/codeeditor (highlight current line)
- examples/widgets/lineedits (contain license key input with format hint)
- examples/widgets/sliders (change widgets location at run time)
- examples/widgets/tablet (manipulate image)
- examples/widgets/tetrix (a game that works)
- examples/widgets/tooltip (tooltip on shapes created at run time)
- examples/xmlpatterns/trafficinfo (not working but background is cool)
- examples/xmlpatterns/schema (specify a background color on a textEdit is effective)
Python + Qt
sudo apt-get install python-qt4
Create Qt application by using examples from http://zetcode.com/gui/pyqt4/
We can launch the application by one of 3 ways
- Run it directly in BBB and the app is shown on BBB too
- ssh -X [email protected] from host machine and run the app from there. The GUI will be shown on the host machine.
- ssh [email protected] from host machine. Issue export DISPLAY=:0.0 and run the app from there. The GUI is shown on BBB.
GPIO Projects
Use terminal to access GPIO pins
Google: beaglebone black gpio /sys/class/gpio
- http://derekmolloy.ie/beaglebone/beaglebone-gpio-programming-on-arm-embedded-linux/
- http://www.armhf.com/using-beaglebone-black-gpios/
- http://www.linux.com/learn/tutorials/725368-getting-started-with-the-beaglebone-black-a-1ghz-arm-linux-machine-for-45
- http://www.linux.com/learn/tutorials/765810-beaglebone-black-how-to-get-interrupts-through-linux-gpio
- http://www.chrisshiplet.com/static/bbb_gpio_pinout.png (GPIO pins diagram)
- http://elinux.org/EBC_Exercise_10_Flashing_an_LED
- https://learn.sparkfun.com/tutorials/programming-the-pcduino/all
- http://hertaville.com/2013/04/17/sparkfun-posts-tutorial-on-programming-i2cspiuartgpio-peripherals-under-linux-and-other-topics/
root@beaglebone:/sys/class/gpio# ls -l
total 0
--w------- 1 root root 4096 Dec 31  1999 export
lrwxrwxrwx 1 root root    0 Dec 31  1999 gpiochip0 -> ../../devices/virtual/gpio/gpiochip0
lrwxrwxrwx 1 root root    0 Dec 31  1999 gpiochip32 -> ../../devices/virtual/gpio/gpiochip32
lrwxrwxrwx 1 root root    0 Dec 31  1999 gpiochip64 -> ../../devices/virtual/gpio/gpiochip64
lrwxrwxrwx 1 root root    0 Dec 31  1999 gpiochip96 -> ../../devices/virtual/gpio/gpiochip96
--w------- 1 root root 4096 Dec 31  1999 unexport
root@beaglebone:/sys/class/gpio# echo 7 > export
root@beaglebone:/sys/class/gpio/gpio7# cat value
0
root@beaglebone:/sys/class/gpio/gpio7# cat direction
in
root@beaglebone:/sys/class/gpio/gpio7# echo low > direction
root@beaglebone:/sys/class/gpio/gpio7# cat direction
out
root@beaglebone:/sys/class/gpio/gpio7# echo high > direction
The LED lit up now. The 'value' is changed by the 'direction'.
/sys/class directory
debian@beaglebone:~$ cd /sys/class/
debian@beaglebone:/sys/class$ ls
arvo       graphics     lcd           pps          sound         usbmon
backlight  hidraw       leds          pwm          spidev        vc
bdi        hwmon        mbox          pyra         spi_master    video4linux
block      i2c-adapter  mdio_bus      rc           thermal       virtio-ports
bsg        i2c-dev      mem           regulator    timed_output  vtconsole
dma        input        misc          rtc          tty           watchdog
drm        isku         mmc_host      savu         ubi
dvb        kone         mtd           scsi_device  udc
firmware   koneplus     net           scsi_disk    uio
gpio       kovaplus     power_supply  scsi_host    usbmisc
GPIO interactive map
http://eskimon.fr/beaglebone-black-gpio-interactive-map. It can toggle available pins (40), HDMI pins (20), emmc2 pins (10), I2C2 pins (2), power related pins (13).
- http://beagleboard.org/Support/bone101 for the Pin layout pictures.
- http://stuffwemade.net/post/beaglebone-pinout with a different format (eg GPIO3_14).
Onboard LEDs
$ ls /sys/class/leds/
beaglebone:green:usr0  beaglebone:green:usr1  beaglebone:green:usr2  beaglebone:green:usr3
## 'trigger' determines what event is monitored
$ ls /sys/class/leds/beaglebone\:green\:usr0/
brightness  device  max_brightness  power  subsystem  trigger  uevent
$ cat /sys/class/leds/beaglebone\:green\:usr0/trigger
none nand-disk mmc0 mmc1 timer oneshot [heartbeat] backlight gpio cpu0 default-on transient

## stop the heart
# echo none > /sys/class/leds/beaglebone\:green\:usr0/trigger

## turn LED on (no blinking)
# echo none > /sys/class/leds/beaglebone\:green\:usr0/trigger
# echo 1 > /sys/class/leds/beaglebone\:green\:usr0/brightness

## strobe LED (get BeagleBone's heart racing at 20 'beats' per second)
# echo timer > /sys/class/leds/beaglebone\:green\:usr0/trigger
# echo 25 > /sys/class/leds/beaglebone\:green\:usr0/delay_off
# echo 25 > /sys/class/leds/beaglebone\:green\:usr0/delay_on

## *whew* ... restore default heartbeat
# echo heartbeat > /sys/class/leds/beaglebone\:green\:usr0/trigger
Use C/C++ to control LED
http://inspire.logicsupply.com/2014/07/beaglebone-c-programming-example.html
4D LCD Cape (480x272) monitor/display
It is a cool add-on for BBB. See official web site. The 4D 4.3” LCD CAPE features a 4.3” TFT LCD 480x272 resolution display. See also elinux.org.
Tip 1: PLA on LCD should connect to P8 on BBB and PLB on LCD should connect to P9 BBB.
Tip 2: To remove full path from terminal, edit ~/.bashrc to replace "\w" with "\W". See for example askubuntu.com.
Tip 3: More pixels does not always mean good; slower refresh. See the comment on Running OpenGL-based Games & Emulators on Adafruit PiTFT Displays.
Tip 4: Possible way to turn off the display: see this or this post using xset or vbetool.
Input Gesture by xstroke
The instruction for Raspberry Pi works on my Debian Wheezy. Unfortunately, it keeps freeze my BBB.
- http://ozzmaker.com/2014/06/17/raspberry-pi-with-stroke-and-gesture-recognition/#more-2202
- https://learn.adafruit.com/adafruit-pitft-28-inch-resistive-touchscreen-display-raspberry-pi/gesture-input
Qt + GPIO
- https://sites.google.com/site/timpicuc/Downhome/beaglebone-black
- http://derekmolloy.ie/beaglebone/qt-with-embedded-linux-on-the-beaglebone/ and https://github.com/derekmolloy/beagleboneQT
Web Camera
To use a USB web camera, it is better to have BBB connected to a physical monitor, keyboard and mouse. However, I figure out it is also fine to use ssh with -X option. Make sure we use root to log in.
ssh -X [email protected]
- Run sudo apt-get update and sudo apt-get install guvcview
- shutdown BBB. Connect the USB camera. Start the system.
- Make sure /dev/video0 exists. It this is the case, it means the USB camera is detected.
- Run guvcview command. It should open 2 windows. One is the video and the other one is the setting dialog.
The third way is to use vnc. On BBB, issue vncserver. On local computer, issue xtightvncviewer 192.168.7.2:1. Once the desktop appears, open a root terminal window instead of a regular terminal window. Type guvcview.
Compare the speed, it is clear using ssh -X is much ideal than using vnc. When we use vnc, the video keeps refreshing.
When we use ssh -X with video resolution 432x240, the video is quite fast. At the default resolution 640x480, the video does not refresh and not as fast as using low resolution.
OpenCV
- http://docs.opencv.org/doc/tutorials/introduction/linux_install/linux_install.html
- Raspberry pi instruction to install OpenCV 2.4.X.
- https://solarianprogrammer.com/2014/04/21/opencv-beaglebone-black-ubuntu/: based on ubuntu
- http://www.javieriparraguirre.net/installing-opencv-debian/: based on debian. If we got the following error
Error :: You must put some 'source' URIs in your sources.list
we shall nano /etc/apt/sources.list and un-comment the lines containing deb-src. However, it still does not work. That said, the step 0 is not working.
If I replace the first step by the sudo apt-get install opencv and continue from step 2 to the end, it works. But it takes several hours (3-4 hours).
Step 0: Check "natural" dependencies on Debian

As root:

su
aptitude build-dep libopencv-dev
exit

Step 1: Remove compromised packages

As root:

su
aptitude purge libavcodec-dev libavformat-dev libswscale-dev
aptitude purge libx264-dev x264
exit

Step 2: Install dependencies

As root:

su
aptitude install autoconf automake build-essential libass-dev libfreetype6-dev libgpac-dev \
                 libsdl1.2-dev libtheora-dev libtool libva-dev libvdpau-dev libvorbis-dev \
                 libx11-dev libxext-dev libxfixes-dev pkg-config texi2html zlib1g-dev
aptitude install yasm
exit

Step 3: Install x264

As user:

mkdir ~/ffmpeg_sources
cd ~/ffmpeg_sources
wget http://download.videolan.org/pub/x264/snapshots/last_x264.tar.bz2
tar xjvf last_x264.tar.bz2
cd x264-snapshot*
./configure --enable-shared --enable-pic
make

As root:

su
make install
ldconfig -v
exit

Step 4: Install FFmpeg

As user:

cd ~/ffmpeg_sources
wget http://ffmpeg.org/releases/ffmpeg-snapshot.tar.bz2
tar xjvf ffmpeg-snapshot.tar.bz2
cd ffmpeg
./configure --extra-libs="-ldl" --enable-gpl --enable-libass --enable-libfreetype \
            --enable-libtheora --enable-libvorbis --enable-libx264 --enable-nonfree \
            --enable-x11grab --enable-shared --enable-pic
make

As root:

su
make install
ldconfig -v
exit

Step 5: Install OpenCV

As user:

mkdir ~/opencv_sources
cd ~/opencv_sources
wget http://kent.dl.sourceforge.net/project/opencvlibrary/opencv-unix/2.4.9/opencv-2.4.9.zip
unzip opencv-2.4.9.zip
cd opencv-2.4.9
mkdir release
cd release
cmake -D CMAKE_BUILD_TYPE=RELEASE -D CMAKE_INSTALL_PREFIX=/usr/local -D BUILD_NEW_PYTHON_SUPPORT=ON ..
make

As root:

su
make install
ldconfig -v
exit
- http://docs.opencv.org/trunk/modules/contrib/doc/facerec/ face recognition
If we use aptitude install libopencv-dev command to install opencv, we only get v2.3.1 (too old).
Setting up an IO python library (GPIO, PWM, ADC, I2C, SPI, UART)
http://learn.adafruit.com/setting-up-io-python-library-on-beaglebone-black
- PWM: P8_13, P8_34, P8_36, P8_45, P8_46, P9_14, P9_21, P9_22, P9_29, P9_42. Eg. blink LED, fading LED, servo.
- ADC (analog input): P9_33, P9_35, P9_36, P9_37, P9_38, P9_39, P9_40. Eg. measure light, ultrasonic sensor, accelerometer, joystick, Potentiometer.
- I2C: P9_19, PI_20. Eg. temperature/pressure sensors.
- SPI: P9_17, P9_18, P9_21, P9_22, P9_28, P9_29, P9_30, P9_31.
- UART: 17 pins.
Adding a push button
http://learn.adafruit.com/connecting-a-push-button-to-beaglebone-black
Measure light
http://learn.adafruit.com/measuring-light-with-a-beaglebone-black My example:
import Adafruit_BBIO.ADC as ADC
import time
from time import localtime, strftime

sensor_pin = 'P9_40'

ADC.setup()

#print('Reading\t\tVolts')
print time.asctime(time.localtime(time.time())), '\tReading\t\tVolts'

while True:
    reading = ADC.read(sensor_pin)
    volts = reading * 1.800
    #print('%f\t%f' % (reading, volts))
    #print(strftime("%Y-%m-%d %H:%M:%S", localtime()))
    print time.asctime(time.localtime(time.time())), '\t%f\t%f' % (reading, volts)
    time.sleep(60)
which can be run (and the output was written to a file for logging)
sudo python light.py > tmp.txt
If we want, we can follow the tutorial in here to have the light reading logged on the COMS or send to google docs like [1]. Alternatively, we can let BBB to send an email to you like here.
Blinking an LED
Do not use a lower value resistor than 470Ω (R=V/I = 3.3/.008 where .008 means 8mA). The outputs can only provide about 4mA and the resistor prevents too much current flowing and potentially damaging the BBB.
But on another project (fading rgb LED), it mentioned you can use 220Ω to 1KΩ resistors.
Note that we have to run sudo su before we work on python program for any gpio project.
http://learn.adafruit.com/blinking-an-led-with-beaglebone-black
To install the Adafruit_BBIO python library in Debian, use the following. See https://github.com/adafruit/adafruit-beaglebone-io-python
sudo ntpdate pool.ntp.org
sudo apt-get update
sudo apt-get install build-essential python-dev python-pip -y
#easy_install -U distribute  //debian only
sudo pip install Adafruit_BBIO
The python example to blink LED is
import Adafruit_BBIO.GPIO as GPIO
import time

GPIO.setup("P8_10", GPIO.OUT)

while True:
    GPIO.output("P8_10", GPIO.HIGH)
    time.sleep(0.5)
    GPIO.output("P8_10", GPIO.LOW)
    time.sleep(0.5)
Fading a RGB LED using PWM
http://learn.adafruit.com/fading-a-rgb-led-on-beaglebone-black/overview
Note that we don't have to use RGB led. We can just connect a single color led. But to use PWM, we cannot choose any pin we want. For example, p8_10 won't work. Below is a simplified example. Save it as fading.py and run it with sudo python fading.py.
import Adafruit_BBIO.PWM as PWM
import time
red = "P8_13"
PWM.start(red, 0)
def fade(colorA):
    for i in range(0, 100):
	    PWM.set_duty_cycle(colorA, 100-i)
	    time.sleep(0.05)
for j in range(10):
    fade(red)
PWM.stop("P8_13")
PWM.cleanup()
The led will fading using the above code. If we change line 7 to
PWM.set_duty_cycle(colorA, i)
the LED will grow. If we change line 9 to while True:, the process will continue until we hit Ctrl+C.
The duty cycle is the reverse of what you might expect: if you have an LED plugged in, a duty cycle of 0 will be brightest, 100 will be dimmest.
PWM pins
BBB has 8 PWM channels. Each channel has 1 or 2 pins. See http://beagleboard.org/Support/bone101/#headers

| P9 | P8 |
|---|---|
| 14,16,21,22,28,29,31,42 | 13,19,34,36,45,46 |
Dictionary
- http://www.barrgroup.com/Embedded-Systems/How-To/PWM-Pulse-Width-Modulation
- http://en.wikipedia.org/wiki/Pulse-width_modulation
- Period: inverse of frequency
- Frequency: Eg period=1000 mS is about freq 1kHz while period=10 mS is about 100 kHz. If we push the frequency too high, a transient noise on the signals would be observed on the waveforms.
- Duty cycle: the unit is 0 to 1=(100%). What percent of time the signal is in high level.
Controlling a servo motor (PWM)
- https://briancode.wordpress.com/2015/01/06/working-with-pwm-on-a-beaglebone-black/ (rev C)
- http://learn.adafruit.com/controlling-a-servo-with-a-beaglebone-black (Python)
- http://www.linux.com/learn/tutorials/776799-servo-control-from-the-beaglebone-black (shell)
We can actually try the following simpler approach using bonescript without bothering a command line. Just open a browser tab and type the address http://beagleboard.org/Support/BoneScript/ServoMotor/. It just works (Angstrom Distribution, running using Bonescript from web)! Make sure to change P9_14 to whatever (eg P8_13) as needed.
The SG90 micro motor operators at 4.0 to 7.2 volts according to here although it works when I plug the power to A9 3.3V pin.
For some reason, the Adafruit python code does not work. The servo has a vibration but not turn. Not sure what needs to be changed.
I found we can control the servo using command line. See the post. Note that for my current Angstrom, I need to use pwm_test_P8_13.15. Also this folder is created only after I run the Bonescript. So the example code is (the pwm_test_P8_13.16 number may change from each run ??)
// On my BBB, polarity is inverted by default
echo 0 > /sys/devices/ocp.2/pwm_test_P8_13.16/polarity

echo 20000000 > /sys/devices/ocp.2/pwm_test_P8_13.16/period
echo 500000 > /sys/devices/ocp.2/pwm_test_P8_13.16/duty
echo 1 > /sys/devices/ocp.2/pwm_test_P8_13.16/run
Valid pulse width for "Tower Pro sg90" is 500-2400 µs, so valid values for "duty" are 500000-2400000.
The contents of the directory look like
root@beaglebone:~# ls -lh /sys/devices/ocp.2/pwm_test_P8_13.14/
driver	duty  modalias	period	polarity  power  run  subsystem  uevent
A summary of tutorial is on http://forum.beaglefu.com/topic/59-quick-beaglebone-black-pwm-commands/. It is obtained from google: /sys/devices/ocp.2/pwm. As we can see, once the command line works, it is easy to wrap the code in other languages (python, c, et al). The full instruction is
echo am33xx_pwm > /sys/devices/bone_capemgr.8/slots
echo bone_pwm_P8_13 > /sys/devices/bone_capemgr.8/slots
echo 20000000 > /sys/devices/ocp.2/pwm_test_P8_13.14/period
echo 0 > /sys/devices/ocp.2/pwm_test_P8_13.14/polarity     # seems necessary
echo 2400000 > /sys/devices/ocp.2/pwm_test_P8_13.14/duty   # counter-clockwise
echo 500000 > /sys/devices/ocp.2/pwm_test_P8_13.14/duty    # clockwise 180 degrees
echo 1 > /sys/devices/ocp.2/pwm_test_P8_13.14/run          # start the fun
echo 0 > /sys/devices/ocp.2/pwm_test_P8_13.14/run          # stop the fun
I found this approach works on both Angstrom and Debian.

Controlling stepper motor
Stepper Motor Driver Board ULN2003
- http://bwgz57.wordpress.com/2012/04/03/beaglebone-stepping-out/
- See also Arduino page.
- GPIO and Pin conversion. See http://www.circuidipity.com/bbb-led.html and Derek Molloy's tables for the P8 and P9 header pins in a pdf format. For example, P8_12 = P8.12 is controlled by GPIO1[12] (see P8's pdf file) = Pin 12 on the 2nd controller = GPIO_44 where 44=(32*1)+12 => /sys/class/gpio/gpio44/. Another example: P8.17 = GPIO0[27] = GPIO_27 where 27=(32*0)+27.
H-bridge L293D
Controlling a Motor with an H-Bridge and the BeagleBone Black
See also Arduino Control DC motors page.
Measuring temperature
http://learn.adafruit.com/measuring-temperature-with-a-beaglebone-black
HC-SR04 (5v) sonar sensor
http://www.youtube.com/watch?v=bssyOCcU_Q4
Connect to 5v device
See 3.2.4 of the book "Bad to the Bone".
- Logic level
- BOB-08745 logic level shifter and BOB-11978 with a tutorial example and a hook up diagram.
- http://www.gigamegablog.com/2012/01/22/beaglebone-coding-101-using-the-serial-and-analog-pins/
Input voltage & voltage divider
http://beagleboard.org/Support/BoneScript/accelerometer/
PIR motion sensor (ADC)
http://beagleboard.org/Support/BoneScript/PIRMotionSensor
Pull-up Resistor
A very simple robot
http://beaglebone.cameon.net/beaglebone-robotics/1-robot-platform
I2C
- https://learn.adafruit.com/setting-up-io-python-library-on-beaglebone-black/i2c
- http://derekmolloy.ie/beaglebone/beaglebone-an-i2c-tutorial-interfacing-to-a-bma180-accelerometer/
- http://datko.net/2013/11/03/bbb_i2c/
Project from Make
Hackster.io
Other applications
https://www.hackster.io/beagleboard/projects
How to make a BeagleBoard Elastic R Beowulf Cluster in a Briefcase
http://antipastohw.blogspot.com/2010/09/how-to-make-beagleboard-elastic-r.html
BeagleSNES
https://www.hackster.io/hendersa/beaglesnes-the-embedded-beagleboard-snes-emulator-547626
Create wireless access point
https://fleshandmachines.wordpress.com/2012/10/04/wifi-acces-point-on-beaglebone-with-dhcp/
Unfortunately I got the following error when I followed the instruction from adafruit.
debian@beaglebone:~$ sudo service isc-dhcp-server start
[....] Starting isc-dhcp-server (via systemctl): isc-dhcp-server.serviceJob failed. See system journal and 'systemctl status' for details.
 failed!
Note that after several tries, it works. Some comments
- isc-dhcp-server is not necessary. Use dnsmasq instead. In Tiddlybot it uses udhcpd as a DHCP server. See creating hotspot and Tiddlybot.
- For hostapda.conf configuration file, I use driver=nl80211 for TP-LINK TL-WN72N adapter (lsusb command shows the usb adapter is Atheros Communications, Inc. AR9271 802.11n. We can also use dmesg | grep ath9k_htc to check. Finally airmon-ng can show the driver). The wpa_passphrase has to be at least 8 characters. There are some discussions about driver selection.
- For some unknown reason, wlan0 static ip is not working. I need to run sudo service networking restart. Also the 1st line to wlan0 is auto wlan0, not allow-hotplug wlan0.
- Use sudo service --status-all to make sure hostapd and dnsmasq services are working (+ sign)
- Need to make sure the BBB can forward traffic through ethernet. See the section 'Configure Network Address Translation' from Adafruit website. The trick to auto run the 3 commands does not work??
- Finally, even though hostapd seems to be running, we need to issue the command sudo /usr/sbin/hostapd /etc/hostapd/hostapd.conf to make wifi access point available (ps: it is fine to ignore the message Failed to update rate sets in kernel module). Now everything should work.
Beaglebone Black wifi access point (AP)