Qt
Official (new) website
Wiki
- http://wiki.qt.io/Qt_for_beginners
- http://wiki.qt.io/Transition_from_Qt_4.x_to_Qt5
- http://wiki.qt.io/Books including Qt 5. The QML book is marvelous.
Documentation, Examples, Demos
Qt 4.8
Qt 5
Transition of code from Qt 4.x to 5.x
To resolve the error invalid use of incomplete type 'class QWidget' or QApplication: No such file or directory ... when compiling the code was written based on Qt 4.
- http://qt-project.org/wiki/Transition_from_Qt_4.x_to_Qt5
- http://mutse.github.io/2013/03/28/compatible-with-qt4-qt5-tip/ 兼容 Qt4 和 Qt5 技巧
- http://stackoverflow.com/questions/24899558/how-to-check-qt-version-to-include-different-header
In summary, we need to add the following line to .pro file (Don't understand why qmake from Qt5 cannot automatic do it for us)
greaterThan(QT_MAJOR_VERSION, 4): QT += widgets
and change all instances of
#include <QtGui>
to
#include <QtGlobal>
#if QT_VERSION >= 0x050000
#include <QtWidgets>
#else
#include <QtGui>
#endif
What's new in Qt 5
https://en.wikipedia.org/wiki/List_of_Qt_releases
- Improved support for Javascript and QML
- Mobile
- Amazing Graphics Capability and Performance
- Qt Quick (qml application)
- HTML5
- Multimedia (qml)
- Qt for Android, Qt for iOS
- Qt Quick Controls, Qt Quick Layouts, Qt Quick Dialogs, Qt Sensors, Qt Serial Port
- Qt Android Extras
- Qt Bluetooth
- Qt Mac Extras
- Qt NFC
- Qt Positioning
- Qt Windows Extras
- Enginio - A client-side library for Qt Cloud Services.
- Qt WebSockets
- WinRT
- Qt WebChannel
- Qt WebEngine
- Qt WebEngine Widgets
- Qt Platform Headers
- New Modules
- Qt 3D
- Qt Location
- New Featrues
- Qt Bluetooth
- Qt Multimedia
- Qt NFC
- Qt QML, Quick, Quick Controls, WebEngine, Webview
- Discussion in UDOO
> ex4  # C:\Qt\4.8.6\examples
 [1] "activeqt"     "animation"    "dbus"         "declarative"  "designer"     "desktop"      "dialogs"      "draganddrop"  "effects"
[10] "gestures"     "graphicsview" "help"         "helper"       "ipc"          "itemviews"    "ja_JP"        "layouts"      "linguist"
[19] "mainwindows"  "multimedia"   "network"      "opengl"       "openvg"       "painting"     "phonon"       "qmake"        "qtconcurrent"
[28] "qtestlib"     "qws"          "richtext"     "script"       "sql"          "statemachine" "threads"      "tools"        "touch"
[37] "tutorials"    "uitools"      "webkit"       "widgets"      "xml"          "xmlpatterns"
> ex5  # C:\Qt\Examples\Qt-5.4
 [1] "activeqt"          "aggregate"         "androidextras"     "assistant"         "bluetooth"         "corelib"
 [7] "dbus"              "declarative"       "designer"          "embedded"          "enginio"           "gui"
[13] "help"              "linguist"          "location"          "macextras"         "multimedia"        "multimediawidgets"
[19] "network"           "nfc"               "opengl"            "positioning"       "qmake"             "qml"
[25] "qmltest"           "qpa"               "qtconcurrent"      "qtestlib"          "quick"             "script"
[31] "sensors"           "serialport"        "sql"               "svg"               "touch"             "uitools"
[37] "wayland"           "webchannel"        "webengine"         "webenginewidgets"  "webkit"            "webkitqml"
[43] "webkitwidgets"     "websockets"        "widgets"           "winextras"         "xml"               "xmlpatterns"
> setdiff(ex5, ex4)
 [1] "aggregate"         "androidextras"     "assistant"         "bluetooth"         "corelib"           "embedded"
 [7] "enginio"           "gui"               "location"          "macextras"         "multimediawidgets" "nfc"
[13] "positioning"       "qml"               "qmltest"           "qpa"               "quick"             "sensors"
[19] "serialport"        "svg"               "wayland"           "webchannel"        "webengine"         "webenginewidgets"
[25] "webkitqml"         "webkitwidgets"     "websockets"        "winextras"
LTS/Long term support
http://blog.qt.io/blog/2015/12/18/introducing-long-term-support/
5.6, 5.7 and 5.8
- http://blog.qt.io/blog/2016/02/22/qt-roadmap-for-2016/
- 5.6 (LTS) is released Mar 16 2016
- 5.7 release candidate, 5.7 is released
Qt Charts, Data Visualization, and more
- http://blog.qt.io/blog/2016/01/18/qt-charts-2-1-0-release/
- http://blog.qt.io/blog/2016/01/13/new-agreement-with-the-kde-free-qt-foundation/
- Internal link
Handwriting recognition
http://blog.qt.io/blog/2016/03/02/qt-virtual-keyboard-updated-with-handwriting-recognition/
Boot to Device (Qt 5.7)
Qt 3D (Qt 5.7)
Qt Lite (Qt 5.8)
http://blog.qt.io/blog/2017/05/31/qt-lite-qt-5-9-lts/
Qbs
Download open source Qt
https://www.qt.io/download-open-source/
Qt Installer Framework
https://doc.qt.io/qtinstallerframework/index.html
Developer Page
Forum
- New forum from qt.io
- Classical forum from qtcentre.org
World Summit
https://www.qt.io/qtws-videos/
Qt Tutorial
- http://doc.qt.io
- Qt5 http://www.bogotobogo.com/Qt/Qt5_Creating_QtQuick2_QML_Application_Animation_A.php
- http://qt-project.org/doc/qt-4.8/tutorials.html
- http://www.zetcode.com/gui/qt4/ This website contains tutorials of GUI programming by many different languages.
- Over 300 built-in examples available locally in Qt directory. See Qt Creator > Welcome > Examples. A list of examples is on "qt-4.8.5/doc/html/examples-manifest.xml" directory and the filename of each screenshot can be found on the same file. For example, the xml file says the analog clock example has a link "qthelp://com.trolltech.qt.485/qdoc/images/analogclock-example.png". The real location of the screenshot is at qt-4.8.5/doc/html/images/analogclock-example.png and qt-4.8.5/doc/src/images/analogclock-example.png.
- Lots of examples from codeprogress.com
- Lots of examples from java2s.com
- Qt4 tutorial for absolute beginner
- Using Qt designer from KDE.org
- Qt 5 OpenGL https://www.youtube.com/watch?v=GYa5DLV6ADQ&list=PLizsthdRd0YzA1a8iIRT-c3YPnT5v3Zxw
- 106 Qt programming videos on youtube from VoidRealms
- Qt mouse even on QLabel by Saeed Ghoassy OR http://www.codeprogress.com/cpp/libraries/qt/qtClasses.php?item=QMouseEvent
- Qt C++ drawing mouse event by redbear8174
- Qt create custom widget, repaint(), etc
- Qt + histogram, scatterplot, contour plot,... by -http://qwt.sourceforge.net/ Qwt] See forum
- Forum about heatmap http://www.qtcentre.org/threads/45776-Using-Qt-to-display-a-interactive-heatmap
- Search http://code.google.com/ to find projects based on Qt. Other hosting sites includes sourceforge.org, githumb,... See wikipedia web site.
- Sourceforge sorted by freshness or relevance
Books
- http://wiki.qt.io/Books
- C++ GUI Programming with Qt 4 and porting to Qt5 tested with various Qt5 versions.
- Advanced Qt Programming: Creating Great Software with C++ and Qt 4
- Introduction to Design Patterns in C++ with Qt It contains a good review of basic C++ on Chapter 1, class on Chapter 2, Lists on Chapter 4, Functions on Chapter 5, Inheritance & Polymorphism on Chapter 6, Libraries on Chapter 7.
- Foundations of Qt Development
- Application Development with Qt Creator
- The Book of Qt 4: The Art of Building Qt Applications Good for beginners.
- Sams Teach Yourself Qt Programming in 24 Hours
- Qt 5 Blueprints by Symeon Huang
Code snippets
http://qt-project.org/wiki/Category:Snippets
Uses
- http://www.omgubuntu.co.uk/2013/03/unity-next-project-announced
- RStudio is written in the C++ programming language and uses the Qt framework for its graphical user interface. See http://en.wikipedia.org/wiki/RStudio, http://support.rstudio.org/help/discussions/suggestions/3154-rstudio-and-qt-5 and Linux platform or Windows platform.
- Qt is used in a lot of places. See some example in wikipedia. Some famous ones are Calibre, KeePassX, Mathematica, DreamWorks, flameshot, Google Earth, HP, KDE, LyX, Roku TV box, Samsung, Scribus, Skype, Ubuntu, VirtualBox, VLC, Volvo, Propeller GCC IDE, Texmaker, Yarock music player, etc. I guess 'Glucore Omics Explorer' was also made from Qt; see LinkedIn.
- 10 Qt use cases “we” didn’t know
- Win32Image: build requirement: 1. MinGW (20120426 from http://mingw.org) 2. Qt for Windows SDK (currently using 4.8.4 mingw from http://qt-project.org)
- SearchMonkey
- APK Icon Editor Edit and replace APK icons, easily and quickly. Written in C++ / Qt. Open source. See also howtogeek.com page.
- ggobi
- Juk Application in KDE.
- Yarock music player.
- Phototonic image viewer and its web page.
- Rcount simple and flexible RNA-Seq read counting.
- luckyBackup. luckyBackup is an application that backs-up and/or synchronizes any directories with the power of rsync. See an article from ubuntugeek.com.
- NitroShare file sharing on your local network (open source on Github).
- MIA --- Mass isotopolome analyzer
- NixNote 2 (Evernote on Linux) and its source code in github.
- Notepadqq Notepad++-like editor for Linux
- SMPlayer
List of Qt Applications
Binding with different languages
http://qt-project.org/wiki/Category:LanguageBindings
Mobile Applications
Install precompiled binary Qt on Windows
http://download.qt.io/official_releases/ (this does not go through the normal download process)
For example, the source code for 5.0.1 can be downloaded from http://download.qt-project.org/official_releases/qt/5.0/5.0.1/single/
Qt 4.8.5 based on MinGW binary
Got an error of 'Only versions with W32API 3.13 are supported'. See https://bugreports.qt-project.org/browse/QTBUG-26137. I am using MinGW-get-setup.exe to install MinGW. The gcc version is 4.7.2-1.
Some suggestions are to install old versions of GCC. http://qt-project.org/forums/viewthread/22352 and http://wiki.qt.io/MinGW.
Download gcc 4.4.0 (mingw-gcc440_1.zip) from search google. Just unzip it to C:\. There is no need to put 'C:\mingw\bin' in Windows environment variable PATH. At the end, we will have a new folder C:\mingw.
Although Qt can be installed without any errors, when I try some examples, some of them will give an error "The program has unexpectedly finished". Update: the error was caused by previous build residue. Just delete the build directory (Debug/Release) and re-build again. Things works well. However, remember the executable file can only be run through Qt Creator. It does not work by just double clicking the executable file.
The order of installation is
- mingw
- Qt library
- Qt creator
Qt 4.8.6 based on MinGW binary
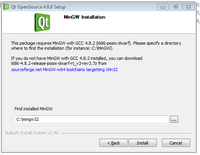
During installation, the Qt installer will give a link to download MinGW. That is, we can take a break during the Qt installation to download & install MinGW.
Note that the Qt Creator was not included in the Qt installer. We have to download/install it separately. We actually also need to go to Qt Creator > Tools > Options to add compiler and Qt from 'Build & Run' menu.
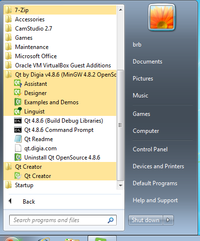
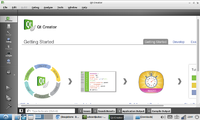
The first screen shows one dialog in Qt installation and the 2nd one displays the Qt programs under Windows Start menu.
Qt 5.5.1 based on MinGW binary
The default installation location is C:\Qt\Qt5.5.1. The installer will let users to select components to install. We need to manually check Qt -> Tools -> MinGW 4.9.2. The Qt Creator version is 3.5.1. I am testing it on Windows 10. It takes a while to install all components.
Note that the application created by this precompiled Qt still depend on the Qt environment. If we try to run an application created by this Qt environment in another machine, we will get an error like The program cannot start because Qt5Core.dll is missing from your computer. Try reinstalling the program to fix this problem..
Check out http://doc.qt.io/qt-5/windows-building.html for building Qt 5 from source.
If we take a look at Windows Start menu, we see 'Qt5.5.1' with Assistant, Designer, Linguist, Qt 5.5 for Desktop (command prompt), and Qt Creator.
The Qt can be uninstall from Settings -> System -> Apps & features on Windows 10.
Qt 5.1.1 based on MSVC
I try Qt 5.1.1 for Windows 32bit (VS 2010, OpenGL 504 MB) on my Windows 7 + VS 2010. The <fancybrowser> works fine.
Note that after I install it to "C:\Qt\5.1.1" directory, I will get the following sub-directories "5.1.1" (another one), "Licenses", "Tools", "vcredist" with a few files. The <Qt Creator> cannot be unselect in installation and it is located under "Tools" folder.
How to Build static Qt on Windows
General resource:
- http://wiki.qt.io/Build_Standalone_Qt_Application_for_Windows
- http://stackoverflow.com/questions/14932315/how-to-compile-qt-5-0-1-static-or-dynamic-on-vs2010-or-vs2012-express-under-wind
- http://stackoverflow.com/questions/14870272/qt-error-while-compiling-qt-5-0-1-on-windows-visual-studio-2010-vs2010
- Google: Qt 5.0 windows build static visual studio 2010 QMAKESPEC
- I can only succeed running configure command from Qt 4.8.4. See also http://qt-project.org/doc/qt-4.8/install-win.html.
- OpenGL: Qt uses OpenGL as cross-platform accelerated graphics API. On windows, some PC do not have OpenGL installed, so for those Qt ships linked against ANGLE which only provides OpenGL ES 2 support by implementing it on top of DirectX 9. See the forum. The instruction about graphical driver is shown on here. That is, we want to install DirectX SDK
Why do we need to
Using the VS2010 version of Qt to build an app has a problem when it is time to distribute the application. In my first example of GUI with button & label, I need to put the following 7 dll files in the same exe directory in order to run the exe file from Windows Command Prompt instead of Qt Creator.
- icudt49.dll (17MB)
- icuin49.dll (1.3MB)
- icuuc49.dll (1MB)
- Qt5Cored.dll (7MB)
- Qt5Guid.dll (5.5MB)
- Qt5Widgets.dll (4MB)
- Qt5Widgetsd.dll (7.5MB)
Google: how to reploy application on windows, how to build qt contains all dll static on windows
- http://wiki.qt.io/Build_Standalone_Qt_Application_for_Windows (How to build a static version of Qt and a static application)
- http://doc.qt.io/qt-4.8/deployment-windows.html
- http://wiki.qt.io/How_to_build_a_static_Qt_version_for_Windows_with_gcc
- http://stackoverflow.com/questions/15153910/qt-build-to-a-single-exe-file-without-dlls
- http://yjyao.com/2011/02/how-to-deploy-your-qt-application.html
My experience based on Qt 4.x.x
MSVC 2010
- http://wiki.qt.io/Build_Standalone_Qt_Application_for_Windows (How to build a static version of Qt and a static application)
Download and install Perl (no need for python and ruby unless we want WebKit).- Unzip source file in zip format and put it under C:\Qt
- Rename C:\Qt\qt-everywhere-opensource-src-4.8.6 to C:\Qt\4.8.6
Open c:\Qt\4.8.4\mkspecs\win32-msvc2010\qmake.conf and replace
QMAKE_CFLAGS_RELEASE = -O2 -MD
QMAKE_CFLAGS_RELEASE_WITH_DEBUGINFO += -O2 -MD -Zi
QMAKE_CFLAGS_DEBUG = -Zi -MDd
with
QMAKE_CFLAGS_RELEASE = -O2 -MT
QMAKE_CFLAGS_RELEASE_WITH_DEBUGINFO += -O2 -MT -Zi
QMAKE_CFLAGS_DEBUG = -Zi -MTd
according to the page
Change PATH variable and add C:\Qt\4.8.4\bin- Open Visual Studio command prompt from Windows Start menu and
cd C:\Qt\4.8.6
configure -platform win32-msvc2010 -static -opensource -debug-and-release
nmake sub-src
The build time is 1 hour 15 min on a VirtualBox virtual machine running Xeon @3.2GHz (1cpu is allocated & 2.5GB memory).
If we need to reconfigure, run make confclean and configure. Some guide also includes '-release' option.
See here when we want to build both release and debug mode applications. If we just specify '-release' in the configure line, we will not be able to create debug program although I still do not know how to use debug program in Qt creator with MSVC.
For mingw, we need to use 'mingw32-make' instead of 'make' or 'nmake'. See Building Qt Desktop for Windows with MinGW.
MSVCP90.dll or MSVCP100.dll is missing
or MSVCR100.dll is missing. See
- http://wiki.qt.io/Build_Standalone_Qt_Application_for_Windows
- Use Dependency Walker program on Windows OS. The Dependency Walker has x86 and x64 version. If our application exe file cannot be opened by x64 version of Dependency Walker, it means our application is only 32 bit.
- Use ldd on Linux to find/confirm the dependencies.
To build the Qt project as a standalone executable file run qmake and nmake. After that you should execute mt.exe to embed a manifest inside the application to avoid error such as missing MSVCP90.dll when the application is started on other computers.
qmake Hello.pro
nmake release
cd release
mt.exe -manifest Hello.exe.manifest -outputresource: Hello.exe
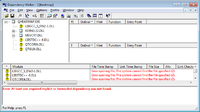
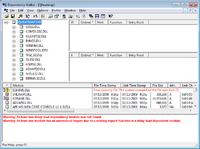
The following screenshot from the Dependence Walker shows 4 dll files required in the 'qheatmap.exe' program when the program was built from MinGW's Qt on Windows OS. The 2nd screenshot shows the same program but created using VS2010's Qt with static build.
MinGW
Download and install MinGW-gcc440_1 & ActivePerl.
C:\Perl64\site\bin, C:\Perl64\bin (these 2 were added by ActivePerl installer by default), C:\mingw\bin and C:\Qt\4.8.5-src should be put in the PATH variable.
I have successfully built Qt using MinGW.
configure
mingw32-make
When I try to run my program (either Debug or Release version), I get an error The program can't start because QtCore4.dll is missing from your computer. Try reinstalling the program to fix this problem.. Reboot?
For Qheatmap application, we still need to copy 2 dll files: mingwm10.dll(11 KB) and libgcc_s_dw2-1.dll(43 KB) from C:\mingw\bin folder to the same folder as Qheatmap.exe. These 2 files were also mentioned in Building Qt Desktop for Windows with MinGW.
See also
My experience based on Qt 5.x.x
- See the instruction on Git
- The directory structure in Qt 5 is quite different from Qt 4. For example, \bin directory is now under \qtbase directory not under the root directory.
- read ReadME file to download Perl, Python and Ruby. Make sure the executable path in in PATH env variable.
- Download/Install Windows SDK 7.1 (for Windows 7) or 8 (for Windows 8).
- OpenGL (NOT optional): DirectX SDK The 6/7/2010 version is about 572MB. This will be installed to C:\Program Files (x86)\Microsoft DirectX SDK(June 2010) directory. (The precompiled Qt is built against ANGLE which provides OpenGL ES 2.0 support. ANGLE allows Windows users to run OpenGL ES 2.0 content by translating OpenGL ES 2.0 API calls to DirectX 9 API calls) I actually got an error of Error code S1023 when I installed DirectX SDK. See the solution here/Basically uninstall x86 & x64 VC2010 Redistr and install DirectX SDK and then re-install x86 & x64 VC2010 Redistr.
- modify mkspecs by searching qmake.conf. It was found in C:\Qt\qt-everwhere-opensource-src-5.1.1\qtbase\mkspecs\win32-msvc2010
- run the following
cd c:\qt\5.1.1-src
set PATH=C:\QT\5.1.1-src\qtbase\bin;C:\qt\5.1.1-src\gnuwin32\bin;%PATH%
set QMAKESPEC=win32-msvc2010

configure -debug-and-release -static -opensource -opengl desktop -nomake examples -nomake tests

jom
It works when I tested qtbase\examples\widgets\painting.
MSVC 2013 Express + Qt 5.5.1
Download and install (not have to be in this order). Make sure the binary path is added to the environment variable PATH.
- SDK for windows 10: default C:\Program Files (x86)\Windows Kits\10\. It installs several components including .NET framework 4.6 software development kit, Debugging Tools, Performance Tools, et al. Since the installer is not offline, it is extremely slow to install. No offline version for Windows 10. ISO is available only for Win7.
- Ruby: default C:\Ruby22-x64\
- Python: default C:\Users\username\AppData\Local\Programs\Python\Python35-32
- Perl: default C:\Perl64\
- Visual Studio 2013 Express C:\Program Files (x86)\Microsoft Visual Studio 12.0\
After that, follow the instruction on http://doc.qt.io/qt-5/windows-building.html to set the environment variables.
- the architecture on the 'CALL' line should be x86_amd64 since it is the only folder name found under C:\Program Files (x86)\Microsoft Visual Studio 12.0\VC\bin folder.
- As mentioned in http://josuegomes.blogspot.com/2013/05/building-qt5-with-mingw.html, we need to create a blank file .gitignore under qtbase\ directory. That is, running a command like "notepad qtbase\.gitignore". Otherwise, it will complain configure.exe is not recognized as an internal or external command.
- I directly go to qtbase directory and run
configure -release -confirm-license -static -nomake examples -opensource
nmake
The output of running 'configure' can be found on my gist page.
The cmd file used to set up the environment variables looks like
CALL "C:\Program Files (x86)\Microsoft Visual Studio 12.0\VC\vcvarsall.bat" x86_amd64
SET _ROOT=C:\qt\qt-everywhere-5.5.1
SET PATH=%_ROOT%\qtbase\bin;%_ROOT%\gnuwin32\bin;%PATH%
REM Uncomment the below line when using a git checkout of the source repository
REM SET PATH=%_ROOT%\qtrepotools\bin;%PATH%
SET QMAKESPEC=win32-msvc2013
SET _ROOT=
Note: If you later need to reconfigure and rebuild Qt from the same location, ensure that all traces of the previous configuration are removed by entering the build directory and typing nmake distclean before running configure again.
The jom program does not need to be installed. I just download the zip file and extract it to my Download folder. Then I added C:\Users\brb\Downloads\jom_1_1_0 to PATH variable.
In my case I have installed Pre-compiled MinGW version of Qt and now the self-compiled MSVC version of Qt. When using the Qt creator to create a new Kit based on the self-compiled Qt + MSVC, it is essential to make sure the C++ compiler is from MSVC.
A simple QWidget application will be taking about 13MB in size when the application was built statically.
Build Webkit
- http://trac.webkit.org/wiki/BuildingQtOnWindows
- http://qt-project.org/wiki/MinGW-64-bit
- http://qt-project.org/forums/viewthread/20484
- I add 'C:\win_flex_bison;C:\GnuWin32\bin' to PATH variable for Webkit build in my Windows 7. The 'C:\win_flex_bison' seems not necessary since Qt\5.1.1-src\gnuwin32\bin has included win_flex.exe.
- Still I got an error that 'Building WebKit with Qt versions older than 5.0 is not supported.'
Try on Qt 5.1.1
- download icu from http://site.icu-project.org/download/51#TOC-ICU4C-Download (64bit MSVC 2010). I unzip and put it under C:\icu folder. This folder contains 3 subfolders: bin64, include and lib64.
- Building Qt Webkit from qt-project.org. Also paying attention to the section of 'ICU on Windows'.
set PATH=%PATH%;C:\icu\bin64
set INCLUDE=%INCLUDE%;C:\icu\include
set LIB=%LIB%;C:\icu\lib64

perl qtwebkit\Tools\Scripts\build-webkit --qt --release --minimal
- https://bugreports.qt-project.org/browse/QTBUG-32496
- Got an error
The WebKit build was disabled for the following reasons:
    * ICU is required. To build QtWebKit with Qt 5 you need to build Qt 5 with l
ibICU support. Check for ICU support being mentioned in qtbase/config.summary.
- The static build of WebKit is not successful when I use qt source code. I get the message "Project ERROR: WebKit requires SQLite. Either make it available via pkg-config, set $SQLITE3SRCDIR or build Webkit under qt5.git."
# Open Qt command prompt from Windows Start
cd c:\qt\5.1.1\5.1.1\Src\qtwebkit\
perl Tools\Scripts\build-webkit --qt --release --minimal
- The static build of WebKit is not successful when I use SVN version. I get the message "Failed to set up build environment using SQLite. Either make it available via pkg-config, set $SQLITE3SRCDIR or build WebKit under qt5.git."
- Another try according to stackoverflow. First of all, we still need to follow the build instruction for QtWebKit build on Windows to install GNU tools and setup PATH. Open a QT command prompt (The Qt was not from source code but from MSVC binary) and
cd C:\qt\5.1.1\5.1.1\src\qtwebkit
qmake
Open another VS 2010 command prompt and
set PATH=%PATH%;C:\icu\bin64
set INCLUDE=%INCLUDE%;C:\icu\include
set LIB=%LIB%;C:\icu\lib64
SET SQLITE3SRCDIR=C:\qt\5.1.1\5.1.1\src\qtbase\src\3rdparty\sqlite
cd C:\qt\5.1.1\5.1.1\src\qtwebkit
nmake
Still get errors "LNK2001: unresolved external symbol _u_charType_51 JavaScriptCore.lib(Lexer.obj)" as reported by this case. This is a good reference.
Build script
http://wohlsoft.ru/pgewiki/Building_static_Qt_5#Configure
Install Qt on Ubuntu
ArchWiki is useful; see https://wiki.archlinux.org/index.php/Qt.
https://wiki.qt.io/Building_Qt_for_Linux
http://www.linuxfromscratch.org/blfs/view/svn/x/qt5.html
It is also necessary to follow http://wiki.qt.io/Install_Qt_5_on_Ubuntu to install g++ and OpenGL libraries. Note the last one is what I added to resolve the error of cannot finding -lGL; check Compile Qt 4.7 on Ubuntu 10.10.
sudo apt-get install build-essential
sudo apt-get install libgl1-mesa-dev
If Qt Creator was installed (eg from binary installer of Qt 5.1.0), then it can be launched by
~/Qt5.1.0/Tools/QtCreator/bin/qtcreator
Build Qt5 from source
Note:
- If Qt is built from source, the release version of executable created by this Qt will be automatically static; there is no need to modify .pro file.
- Over 30GB disk space will be used after running 'make' command on Qt 5.5.0 or Qt 5.7.0. It is safe to allocate at least 50 (20+30) or, say 80GB for the disk space (after installing Linux the available space under / may be only 67GB).
- If we follow the instruction on Building Qt 5 from Git to run the command sudo apt-get build-dep qt5-default, we will get an error message E: You must put some 'source' URIs in your sources.list. To fix the problem, edit the file </etc/apt/sources.list> and uncomment the lines starts with deb-src. Then run sudo apt-get update before calling sudo apt-get build-dep qt5-default. The whole reason is the sources.list file contains only binary URIs, but you need source URIs for build-dep to work.
- On Intel Core2Duo E8400 @3.0GHz (2-core) with 2768MB RAM , it took 223m to run make -j2 with Qt 5.7.0. sudo make install took < 1m. The disk space took by qt-everywhere-opensource-5.7.0 is 25GB. The partition /dev/sda1 is reduced from 47GB to 15GB.
- A static build of Qt applicatio has to be open source. For commercial development, we have to purchase the commercial license. See here.
- When we create a static & released executable (barcharts, 233MB) in Ubuntu 14.04 and move it to another machine (Ubuntu 14.04 or Ubuntu 16.04) to run, we get errors (recall that we can use ldd barcharts | grep 'not found' to find out what libraries are missing in the target OS)
- error while loading shared libraries: libxcb-xinerama.so.0: cannot open shared object file: No such file or directory. The reason is Libxcb is now the default window-system backend for platforms based on X11/Xorg. This seems strange. But if the target computer is Ubuntu 14.04, we can solve the problem by running sudo apt-get install libxcb-xinerama0-dev.
- error while loading shared libraries: libicui18n.so.52: cannot open shared object file: No such file or directory. Try to install WebKit related package libicu-dev. Not help. See here. However, libicu52 is not available in xenial (Ubuntu 16.04). Xenial has libicui18n.so.55, however. See this post. Use ldd ./barcharts to see all dynamic loading libraries.
brb@xenial:~$ lsb_release -a
No LSB modules are available.
Distributor ID:	Ubuntu
Description:	Ubuntu 16.04 LTS
Release:	16.04
Codename:	xenial
brb@xenial:~$ ldd barchart  | grep 'not found'
	libicui18n.so.52 => not found
	libicuuc.so.52 => not found
brb@xenial:~$ ls -l /usr/lib/x86_64-linux-gnu/libicui*
-rw-r--r-- 1 root root 5226788 Jan 21 16:19 /usr/lib/x86_64-linux-gnu/libicui18n.a
lrwxrwxrwx 1 root root      18 Jan 21 16:19 /usr/lib/x86_64-linux-gnu/libicui18n.so -> libicui18n.so.55.1
lrwxrwxrwx 1 root root      18 Apr 24 08:11 /usr/lib/x86_64-linux-gnu/libicui18n.so.55 -> libicui18n.so.55.1
-rw-r--r-- 1 root root 2496856 Jan 21 16:19 /usr/lib/x86_64-linux-gnu/libicui18n.so.55.1
-rw-r--r-- 1 root root   84606 Jan 21 16:19 /usr/lib/x86_64-linux-gnu/libicuio.a
lrwxrwxrwx 1 root root      16 Jan 21 16:19 /usr/lib/x86_64-linux-gnu/libicuio.so -> libicuio.so.55.1
lrwxrwxrwx 1 root root      16 Apr 24 08:11 /usr/lib/x86_64-linux-gnu/libicuio.so.55 -> libicuio.so.55.1
-rw-r--r-- 1 root root   55304 Jan 21 16:19 /usr/lib/x86_64-linux-gnu/libicuio.so.55.1
brb@xenial:~$ ls -l /usr/lib/x86_64-linux-gnu/libicuuc*
-rw-r--r-- 1 root root 2907296 Jan 21 16:19 /usr/lib/x86_64-linux-gnu/libicuuc.a
lrwxrwxrwx 1 root root      16 Jan 21 16:19 /usr/lib/x86_64-linux-gnu/libicuuc.so -> libicuuc.so.55.1
lrwxrwxrwx 1 root root      16 Apr 24 08:11 /usr/lib/x86_64-linux-gnu/libicuuc.so.55 -> libicuuc.so.55.1
-rw-r--r-- 1 root root 1636360 Jan 21 16:19 /usr/lib/x86_64-linux-gnu/libicuuc.so.55.1
The source code for Qt 5 can be obtained from (Not tested this approach to get the source code)
git clone git://code.qt.io/qt/qt5.git
cd qt5
git checkout 5.5
Note that for Qt 4 the source code can be obtained
git clone git://code.qt.io/qt/qt.git
cd qt
To install the requirements
# Modify /etc/apt/sources.list to uncomment lines starting with deb-src
sudo apt-get update
sudo apt-get build-dep qt5-default # get an error on ubuntu 14.04 & 16.04. This line is not required.

# build essential
sudo apt-get install -y build-essential perl python git

# Libxcb
sudo apt-get install -y "^libxcb.*" libx11-xcb-dev libglu1-mesa-dev libxrender-dev libxi-dev

# Webkit
sudo apt-get install -y flex bison gperf libicu-dev libxslt-dev ruby

# WebEngine
sudo apt-get install -y libssl-dev libxcursor-dev libxcomposite-dev libxdamage-dev libxrandr-dev libfontconfig1-dev

# Additional dependencies on Ubuntu 14.04
sudo apt-get install -y libcap-dev libbz2-dev libgcrypt11-dev libpci-dev libnss3-dev libxcursor-dev \
   libxcomposite-dev libxdamage-dev libxrandr-dev libdrm-dev libfontconfig1-dev libxtst-dev \
   libcups2-dev libpulse-dev libudev-dev

# Multimedia
sudo apt-get install -y libasound2-dev libgstreamer0.10-dev libgstreamer-plugins-base0.10-dev
To build Qt (I added -static option so the Qt build is static. Maybe useful to consider -openssl-linked option to enabled linked OpenSSL support. Use './configure -h' to see a full list of options and Qt Configure Options page)
# Open browser to http://download.qt.io/official_releases/qt/5.5/5.5.0/single/
wget http://qt.mirror.constant.com/archive/qt/5.5/5.5.0/single/qt-everywhere-opensource-src-5.5.0.tar.xz
tar --xz -xvf qt-everywhere-opensource-src-5.5.0.tar.xz
cd qt-everywhere-opensource-src-5.5.0/

./configure -developer-build -opensource -confirm-license -static -nomake examples -nomake tests
time make -j4
# 190 minutes on Xeon w/ 2.5G mem, 76 min w/ 4G mem, 16 min w/ 64G mem and 12 cores.
# No need to run 'sudo make install' to install according to the ./configure output or the doc
The result of the build
brb@brb-VirtualBox:~/qt-everywhere-opensource-src-5.5.0$ ls
configure                   qtconnectivity      qtsvg
configure.bat               qtdeclarative       qttools
gnuwin32                    qtdoc               qttranslations
LGPL_EXCEPTION.txt          qtenginio           qtwayland
LICENSE.FDL                 qtgraphicaleffects  qtwebchannel
LICENSE.GPLv2               qtimageformats      qtwebengine
LICENSE.LGPLv21             qtlocation          qtwebkit
LICENSE.LGPLv3              qtmacextras         qtwebkit-examples
LICENSE.PREVIEW.COMMERCIAL  qtmultimedia        qtwebsockets
Makefile                    qt.pro              qtwinextras
qt3d                        qtquick1            qtx11extras
qtactiveqt                  qtquickcontrols     qtxmlpatterns
qtandroidextras             qtscript            README
qtbase                      qtsensors
qtcanvas3d                  qtserialport
brb@brb-VirtualBox:~/qt-everywhere-opensource-src-5.5.0$ ls qtbase
bin             header.BSD         LGPL_EXCEPTION.txt          qmake
config.status   header.FDL         lib                         qml
config.summary  header.LGPL21      LICENSE.FDL                 qtbase.pro
config.tests    header.LGPL3       LICENSE.LGPLv21             src
configure       header.LGPL3-COMM  LICENSE.LGPLv3              sync.profile
configure.bat   header.LGPL-ONLY   LICENSE.PREVIEW.COMMERCIAL  tests
dist            imports            Makefile                    tools
doc             include            mkspecs                     translations
examples        INSTALL            plugins                     util
brb@brb-VirtualBox:~/qt-everywhere-opensource-src-5.5.0$ ls qtbase/bin
assistant             qdbus           qml1plugindump    qmlviewer
designer              qdbuscpp2xml    qmleasing         qt.conf
fixqt4headers.pl      qdbusviewer     qmlimportscanner  qtdiag
lconvert              qdbusxml2cpp    qmljs             qtpaths
linguist              qdoc            qmllint           qtplugininfo
lrelease              qhelpconverter  qmlmin            rcc
lupdate               qhelpgenerator  qmlplugindump     syncqt.pl
moc                   qlalr           qmlprofiler       uic
pixeltool             qmake           qmlscene          xmlpatterns
qcollectiongenerator  qml             qmltestrunner     xmlpatternsvalidator
Qt 5 ./configure
./configure full list
./configure output
See here for the output of configure from Qt 5.7.0 with -openssl-linked option.
brb@brb-VirtualBox:~/qt-everywhere-opensource-src-5.5.0$ ./configure -developer-build -opensource -static -nomake examples -nomake tests
+ cd qtbase
+ /home/brb/qt-everywhere-opensource-src-5.5.0/qtbase/configure -top-level -developer-build -opensource -static -nomake examples -nomake tests

This is the Qt Open Source Edition.

You are licensed to use this software under the terms of
the Lesser GNU General Public License (LGPL) versions 2.1.
You are also licensed to use this software under the terms of
the GNU Lesser General Public License (LGPL) versions 3.

Type '3' to view the GNU Lesser General Public License version 3.
Type 'L' to view the Lesser GNU General Public License version 2.1.
Type 'yes' to accept this license offer.
Type 'no' to decline this license offer.

Do you accept the terms of either license? yes

Creating qmake...
........................................................................................Done.
Running configuration tests...

WARNING: Using static linking will disable the WebKit module.


   Configure summary

Build type:    linux-g++ (x86_64, CPU features: mmx sse sse2)
Platform notes:

            - Also available for Linux: linux-kcc linux-icc linux-cxx

Build options:
  Configuration .......... accessibility accessibility-atspi-bridge alsa audio-backend avx avx2 c++11 clock-gettime clock-monotonic compile_examples concurrent cups dbus debug enable_new_dtags evdev eventfd fontconfig full-config getaddrinfo getifaddrs gif glib gstreamer-0.10 harfbuzz headersclean iconv icu inotify ipv6ifname jpeg large-config largefile libudev linuxfb medium-config minimal-config mremap nis opengl openssl pcre png posix_fallocate precompile_header private_tests pulseaudio qpa qpa reduce_exports reduce_relocations rpath small-config sse2 sse3 sse4_1 sse4_2 ssse3 static system-freetype system-png system-zlib use_gold_linker warnings_are_errors xcb xcb-glx xcb-plugin xcb-render xcb-xlib xinput2 xkbcommon-qt xlib xrender
  Build parts ............ libs tools
  Mode ................... debug
  Using sanitizer(s)...... none
  Using C++11 ............ yes
  Using gold linker....... yes
  Using new DTAGS ........ yes
  Using PCH .............. yes
  Target compiler supports:
    SSE2/SSE3/SSSE3 ...... yes/yes/yes
    SSE4.1/SSE4.2 ........ yes/yes
    AVX/AVX2 ............. yes/yes

Qt modules and options:
  Qt D-Bus ............... yes (loading dbus-1 at runtime)
  Qt Concurrent .......... yes
  Qt GUI ................. yes
  Qt Widgets ............. yes
  Large File ............. yes
  QML debugging .......... yes
  Use system proxies ..... no

Support enabled for:
  Accessibility .......... yes
  ALSA ................... yes
  CUPS ................... yes
  Evdev .................. yes
  FontConfig ............. yes
  FreeType ............... yes (system library)
  Glib ................... yes
  GStreamer .............. yes (0.10)
  GTK theme .............. no
  HarfBuzz ............... yes (bundled copy)
  Iconv .................. yes
  ICU .................... yes
  Image formats:
    GIF .................. yes (in QtGui, using bundled copy)
    JPEG ................. yes (in QtGui, using bundled copy)
    PNG .................. yes (in QtGui, using system library)
  journald ............... no
  libinput................ no
  mtdev .................. no
  Networking:
    getaddrinfo .......... yes
    getifaddrs ........... yes
    IPv6 ifname .......... yes
    libproxy.............. no
    OpenSSL .............. yes (loading libraries at run-time)
  NIS .................... yes
  OpenGL / OpenVG:
    EGL .................. no
    OpenGL ............... desktop
    OpenVG ............... no
  PCRE ................... yes (bundled copy)
  pkg-config ............. yes
  PulseAudio ............. yes
  QPA backends:
    DirectFB ............. no
    EGLFS ................ no
      EGLFS i.MX6....... . no
      EGLFS KMS .......... no
      EGLFS Mali ......... no
      EGLFS Raspberry Pi . no
      EGLFS X11 .......... no
    LinuxFB .............. yes
    XCB .................. yes (system library)
      EGL on X ........... no
      GLX ................ yes
      MIT-SHM ............ yes
      Xcb-Xlib ........... yes
      Xcursor ............ yes (loaded at runtime)
      Xfixes ............. yes (loaded at runtime)
      Xi ................. no
      Xi2 ................ yes
      Xinerama ........... yes (loaded at runtime)
      Xrandr ............. yes (loaded at runtime)
      Xrender ............ yes
      XKB ................ yes
      XShape ............. yes
      XSync .............. yes
      XVideo ............. yes
  Session management ..... yes
  SQL drivers:
    DB2 .................. no
    InterBase ............ no
    MySQL ................ no
    OCI .................. no
    ODBC ................. no
    PostgreSQL ........... no
    SQLite 2 ............. no
    SQLite ............... yes (plugin, using bundled copy)
    TDS .................. no
  tslib .................. no
  udev ................... yes
  xkbcommon-x11........... yes (bundled copy, XKB config root: /usr/share/X11/xkb)
  xkbcommon-evdev......... no
  zlib ................... yes (system library)


WARNING: Using static linking will disable the use of dynamically
loaded plugins. Make sure to import all needed static plugins,
or compile needed modules into the library.
Info: creating super cache file /home/brb/qt-everywhere-opensource-src-5.5.0/.qmake.super

Qt is now configured for building. Just run 'make'.
Once everything is built, Qt is installed.
You should not run 'make install'.

Prior to reconfiguration, make sure you remove any leftovers from
the previous build.
-skip option to exclude submodules and -no- to exclude some features
- http://doc.qt.io/qt-5/configure-options.html
- One example from https://github.com/LairdCP/UwTerminalX/wiki/Compiling-Qt-Statically
./configure -prefix /usr/local/qt5-static/ -release -opensource -confirm-license -static -no-largefile -no-sql-mysql -no-sql-psql -no-sql-sqlite -no-journald -qt-zlib -no-mtdev -no-gif -qt-libpng -qt-libjpeg -qt-freetype -qt-harfbuzz -no-openssl -qt-pcre -qt-xcb -no-xinput2 -no-glib -no-egl -no-xcursor -no-xfixes -no-xrandr -no-xinerama -no-xinput -qt-xkbcommon-x11 -no-pulseaudio -no-alsa -no-gtkstyle -no-compile-examples -no-nis -no-cups -no-iconv -no-tslib -fontconfig -dbus-linked -qt-xcb -no-xcb-xlib -no-eglfs -no-directfb -no-linuxfb -no-kms -no-opengl -no-gstreamer -nomake examples -nomake tests -skip qtwebkit -skip qtwebsockets -skip qtwebkit-examples -skip qtwebchannel -skip qtwebengine -skip qtwayland -skip qtwinextras -skip qtsvg -skip qtsensors -skip qtcanvas3d -skip qtconnectivity -skip declarative -skip multimedia -skip quick1 -no-audio-backend -no-xkbcommon-evdev -no-evdev -no-libproxy
Qt 5.x.x (offline + binary)
It is straight forward if we use the binary version installer instead of building from Qt source. Just use 'chmod +x' to make the downloaded file executable and then run the executable file. Note that the installer name may be changed from time to time.
./qt-linux-opensource-5.1.1-x86_64-offline.run
It is still necessary to install opengl library by executing sudo apt-get install libgl1-mesa-dev. Otherwise when we try to build an application requiring OPENGL, we will get an error
GL/gl.h: No such file or directory
At the end, the qmake program is available under ~/Qt5.1.1/5.1.1/gcc_64/bin/qmake.
The Qt creator is bundled in the installer so we don't have to download it separately.
Q: How to resolve the error <QPrinter> no such file or directory in Qt 5? Ans: Add QT += printsupport according to http://qt-project.org/forums/viewthread/24668.
Q: How to resolve the error /home/brb/Qt5.1.1/5.1.1/gcc/include/QtCore/qobject.h:214: Error no type named 'Object' in 'struct QtPrivate::FunctionPointer<const char*>'
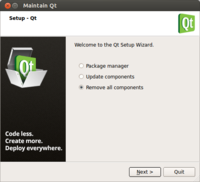
Q: How to uninstall Qt5 that I installed from .run? Ans: run MaintenanceTools program from Qt directory. See this post. A screenshot of the maintenance tool is given below,
Qt 5 online
(tested on 12/25/2014) By default, it will be installed on ~/Qt directory. We can choose what versions of Qt to install. The newest version is Qt 5.4 now.
chmod +x qt-opensource-linux-x64-1.6.0-7-online.run
./qt-opensource-linux-x64-1.6.0-7-online.run
(tested on 9/29/2015) By default, Qt5.5 will be installed to ~/Qt5.5.0 directory (or /opt/Qt5.5.0 if we use sudo to run the installer). It will install Qt 5.5 (Desktop gcc, Qt Quick Controls, Qt Script, Qt Canvas 3D, Qt WebEngine, Qt Quick 1, Qt3D, Qt Location and optional Source Components), Tools (Qt Creator) and Qt Extras (Qt WebView). In the 'Ready to install' dialog of the installation wizard, it shows the installation will use 803.99 MB of disk space.
chmod u+x qt-opensource-linux-x64-5.5.0-2.run
./qt-opensource-linux-x64-5.5.0-2.run
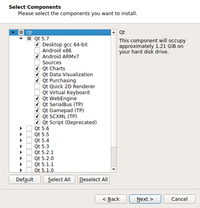
(tested on 6/19/2016). I installed Qt 5.7.0 to ~/Qt5.7.0 (default is ~/Qt and we cannot use an old directory). Some modules are selected by default. I also checked Qt Charts and Qt Data Visualization. For Tools part, it contains Qt Creator 4.0.2. Once the new Qt is installed, the old Qt (installed through online installer too) will be replaced by the new Qt in Qt Creator. See the screenshot below.
chmod +x qt-unified-linux-x64-2.0.3-1-online.run
./qt-unified-linux-x64-2.0.3-1-online.run
Qt 4.8.x
configure full list
https://gist.github.com/arraytools/dc265aff8deb03fd43b28da866569789
build
Qt 4.x.x can be downloaded from the Qt archive. The latest version of 4.8 branch is 4.8.6. Strangely 4.8.7 is available to download too according to linuxfromscratch.
Method 1. Use apt-get install approach. See http://www.wikihow.com/Install-Qt-SDK-on-Ubuntu-Linux. This will install old version of qmake in the system.
sudo apt-get install qt4-dev-tools
At the time of writing (tested on Linux Mint 15), the qmake is 4.5.2 (the Qt website offers 4.8.5).
Method 2. Manually compile it. First we download Linux/X11 one from qt-project.org (230MB). It is the same as the source code file. The INSTALL file points to http://qt-project.org/doc/qt-4.8/install-x11.html. We also need to do 'apt-get install libxext-dev' to resolve an error that 'basic XLib functionality test failed'.
sudo apt-get install build-essential -y
sudo apt-get install mesa-common-dev -y
sudo apt-get install libglu1-mesa-dev -y
sudo apt-get install libxext-dev -y
sudo apt-get install libssl-dev

wget http://download.qt.io/archive/qt/4.8/4.8.6/qt-everywhere-opensource-src-4.8.6.tar.gz
tar xzvf qt-everywhere-opensource-src-4.8.6.tar.gz
cd qt-everywhere-opensource-src-4.8.6
./configure -static -debug-and-release -nomake examples -nomake tests -opensource -confirm-license -openssl-linked
make -j3
sudo make install
Note that
- the last step make install is required; if this is skipped, Qt Creator won't let you to add 4.8.6 as a Kit.
- the directory 'qt-everywhere-opensource-src-4.8.6' is not useful anymore. It can be deleted to save space (7GB).
- The arguments -nomake examples -nomake tests -opensource is used to save time. On my Odroid xu4, 'make -j7' took 45 minutes.
- In my application, I also need to add -fontconfig option (provided libfontconfig1-dev package is installed).
At the end of "./configure", it shows
Qt is now configured for building. Just run 'make'.
Once everything is built, you must run 'make install'.
Qt will be installed into /usr/local/Trolltech/Qt-4.8.6

To reconfigure, run 'make confclean' and 'configure'.
In .profile (if your shell is bash, ksh, zsh or sh), add the following lines:
 PATH=/usr/local/Trolltech/Qt-4.8.6/bin:$PATH
 export PATH
If qt-creator was not found in the dash, we can find creator a desktop file and drag&drop it to the launcher. The icon for qt-creator can be found in /usr/share/app-install/icons/qtcreator.png.
Built-in Qt libraries on a fresh Ubuntu
On a fresh Ubuntu 14.04, it already contains several Qt 4 & Qt 5 libraries/modules (Ubuntu 12.04 contains Qt 4 but no Qt 5 libraries). So even the Qt was build with 'debug' mode and the application was created in 'debug' release, the executable can still be run on a fresh Ubuntu 14.04 system.
brb@brb-T3500:~$ ls /usr/lib/x86_64-linux-gnu/libQt*
/usr/lib/x86_64-linux-gnu/libQt5Core.so.5               /usr/lib/x86_64-linux-gnu/libQt5Xml.so.5.2.1
/usr/lib/x86_64-linux-gnu/libQt5Core.so.5.2             /usr/lib/x86_64-linux-gnu/libQtAssistantClient.so.4
/usr/lib/x86_64-linux-gnu/libQt5Core.so.5.2.1           /usr/lib/x86_64-linux-gnu/libQtAssistantClient.so.4.8
/usr/lib/x86_64-linux-gnu/libQt5DBus.so.5               /usr/lib/x86_64-linux-gnu/libQtAssistantClient.so.4.8.4
/usr/lib/x86_64-linux-gnu/libQt5DBus.so.5.2             /usr/lib/x86_64-linux-gnu/libQtCLucene.so.4
/usr/lib/x86_64-linux-gnu/libQt5DBus.so.5.2.1           /usr/lib/x86_64-linux-gnu/libQtCLucene.so.4.8
/usr/lib/x86_64-linux-gnu/libQt5Feedback.so.5           /usr/lib/x86_64-linux-gnu/libQtCLucene.so.4.8.6
/usr/lib/x86_64-linux-gnu/libQt5Feedback.so.5.0         /usr/lib/x86_64-linux-gnu/libQtCore.so.4
/usr/lib/x86_64-linux-gnu/libQt5Feedback.so.5.0.0       /usr/lib/x86_64-linux-gnu/libQtCore.so.4.8
/usr/lib/x86_64-linux-gnu/libQt5Gui.so.5                /usr/lib/x86_64-linux-gnu/libQtCore.so.4.8.6
/usr/lib/x86_64-linux-gnu/libQt5Gui.so.5.2              /usr/lib/x86_64-linux-gnu/libQtDBus.so.4
/usr/lib/x86_64-linux-gnu/libQt5Gui.so.5.2.1            /usr/lib/x86_64-linux-gnu/libQtDBus.so.4.8
/usr/lib/x86_64-linux-gnu/libQt5Multimedia.so.5         /usr/lib/x86_64-linux-gnu/libQtDBus.so.4.8.6
/usr/lib/x86_64-linux-gnu/libQt5Multimedia.so.5.2       /usr/lib/x86_64-linux-gnu/libQtDeclarative.so.4
/usr/lib/x86_64-linux-gnu/libQt5Multimedia.so.5.2.1     /usr/lib/x86_64-linux-gnu/libQtDeclarative.so.4.8
/usr/lib/x86_64-linux-gnu/libQt5Network.so.5            /usr/lib/x86_64-linux-gnu/libQtDeclarative.so.4.8.6
/usr/lib/x86_64-linux-gnu/libQt5Network.so.5.2          /usr/lib/x86_64-linux-gnu/libQtDesignerComponents.so.4
/usr/lib/x86_64-linux-gnu/libQt5Network.so.5.2.1        /usr/lib/x86_64-linux-gnu/libQtDesignerComponents.so.4.8
/usr/lib/x86_64-linux-gnu/libQt5OpenGL.so.5             /usr/lib/x86_64-linux-gnu/libQtDesignerComponents.so.4.8.6
/usr/lib/x86_64-linux-gnu/libQt5OpenGL.so.5.2           /usr/lib/x86_64-linux-gnu/libQtDesigner.so.4
/usr/lib/x86_64-linux-gnu/libQt5OpenGL.so.5.2.1         /usr/lib/x86_64-linux-gnu/libQtDesigner.so.4.8
/usr/lib/x86_64-linux-gnu/libQt5Organizer.so.5          /usr/lib/x86_64-linux-gnu/libQtDesigner.so.4.8.6
/usr/lib/x86_64-linux-gnu/libQt5Organizer.so.5.0        /usr/lib/x86_64-linux-gnu/libQtGui.so.4
/usr/lib/x86_64-linux-gnu/libQt5Organizer.so.5.0.0      /usr/lib/x86_64-linux-gnu/libQtGui.so.4.8
/usr/lib/x86_64-linux-gnu/libQt5Positioning.so.5        /usr/lib/x86_64-linux-gnu/libQtGui.so.4.8.6
/usr/lib/x86_64-linux-gnu/libQt5Positioning.so.5.2      /usr/lib/x86_64-linux-gnu/libQtHelp.so.4
/usr/lib/x86_64-linux-gnu/libQt5Positioning.so.5.2.1    /usr/lib/x86_64-linux-gnu/libQtHelp.so.4.8
/usr/lib/x86_64-linux-gnu/libQt5PrintSupport.so.5       /usr/lib/x86_64-linux-gnu/libQtHelp.so.4.8.6
/usr/lib/x86_64-linux-gnu/libQt5PrintSupport.so.5.2     /usr/lib/x86_64-linux-gnu/libQtNetwork.so.4
/usr/lib/x86_64-linux-gnu/libQt5PrintSupport.so.5.2.1   /usr/lib/x86_64-linux-gnu/libQtNetwork.so.4.8
/usr/lib/x86_64-linux-gnu/libQt5Qml.so.5                /usr/lib/x86_64-linux-gnu/libQtNetwork.so.4.8.6
/usr/lib/x86_64-linux-gnu/libQt5Qml.so.5.2              /usr/lib/x86_64-linux-gnu/libQtOpenGL.so.4
/usr/lib/x86_64-linux-gnu/libQt5Qml.so.5.2.1            /usr/lib/x86_64-linux-gnu/libQtOpenGL.so.4.8
/usr/lib/x86_64-linux-gnu/libQt5Quick.so.5              /usr/lib/x86_64-linux-gnu/libQtOpenGL.so.4.8.6
/usr/lib/x86_64-linux-gnu/libQt5Quick.so.5.2            /usr/lib/x86_64-linux-gnu/libQtScript.so.4
/usr/lib/x86_64-linux-gnu/libQt5Quick.so.5.2.1          /usr/lib/x86_64-linux-gnu/libQtScript.so.4.8
/usr/lib/x86_64-linux-gnu/libQt5Sensors.so.5            /usr/lib/x86_64-linux-gnu/libQtScript.so.4.8.6
/usr/lib/x86_64-linux-gnu/libQt5Sensors.so.5.2          /usr/lib/x86_64-linux-gnu/libQtScriptTools.so.4
/usr/lib/x86_64-linux-gnu/libQt5Sensors.so.5.2.1        /usr/lib/x86_64-linux-gnu/libQtScriptTools.so.4.8
/usr/lib/x86_64-linux-gnu/libQt5Sql.so.5                /usr/lib/x86_64-linux-gnu/libQtScriptTools.so.4.8.6
/usr/lib/x86_64-linux-gnu/libQt5Sql.so.5.2              /usr/lib/x86_64-linux-gnu/libQtSql.so.4
/usr/lib/x86_64-linux-gnu/libQt5Sql.so.5.2.1            /usr/lib/x86_64-linux-gnu/libQtSql.so.4.8
/usr/lib/x86_64-linux-gnu/libQt5Svg.so.5                /usr/lib/x86_64-linux-gnu/libQtSql.so.4.8.6
/usr/lib/x86_64-linux-gnu/libQt5Svg.so.5.2              /usr/lib/x86_64-linux-gnu/libQtSvg.so.4
/usr/lib/x86_64-linux-gnu/libQt5Svg.so.5.2.1            /usr/lib/x86_64-linux-gnu/libQtSvg.so.4.8
/usr/lib/x86_64-linux-gnu/libQt5Test.so.5               /usr/lib/x86_64-linux-gnu/libQtSvg.so.4.8.6
/usr/lib/x86_64-linux-gnu/libQt5Test.so.5.2             /usr/lib/x86_64-linux-gnu/libQtTest.so.4
/usr/lib/x86_64-linux-gnu/libQt5Test.so.5.2.1           /usr/lib/x86_64-linux-gnu/libQtTest.so.4.8
/usr/lib/x86_64-linux-gnu/libQt5WebKit.so.5             /usr/lib/x86_64-linux-gnu/libQtTest.so.4.8.6
/usr/lib/x86_64-linux-gnu/libQt5WebKit.so.5.1           /usr/lib/x86_64-linux-gnu/libQtWebKit.so.4
/usr/lib/x86_64-linux-gnu/libQt5WebKit.so.5.1.1         /usr/lib/x86_64-linux-gnu/libQtWebKit.so.4.10
/usr/lib/x86_64-linux-gnu/libQt5WebKitWidgets.so.5      /usr/lib/x86_64-linux-gnu/libQtWebKit.so.4.10.2
/usr/lib/x86_64-linux-gnu/libQt5WebKitWidgets.so.5.1    /usr/lib/x86_64-linux-gnu/libQtXmlPatterns.so.4
/usr/lib/x86_64-linux-gnu/libQt5WebKitWidgets.so.5.1.1  /usr/lib/x86_64-linux-gnu/libQtXmlPatterns.so.4.8
/usr/lib/x86_64-linux-gnu/libQt5Widgets.so.5            /usr/lib/x86_64-linux-gnu/libQtXmlPatterns.so.4.8.6
/usr/lib/x86_64-linux-gnu/libQt5Widgets.so.5.2          /usr/lib/x86_64-linux-gnu/libQtXml.so.4
/usr/lib/x86_64-linux-gnu/libQt5Widgets.so.5.2.1        /usr/lib/x86_64-linux-gnu/libQtXml.so.4.8
/usr/lib/x86_64-linux-gnu/libQt5Xml.so.5                /usr/lib/x86_64-linux-gnu/libQtXml.so.4.8.6
/usr/lib/x86_64-linux-gnu/libQt5Xml.so.5.2
On Udoo, we will get the list by using the command find /usr/lib -iname libQt*. They are under /usr/lib/arm-linux-gnueabihf directory.
QtConfig
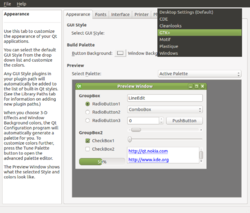
On my Odroid xu4 running Ubuntu 16.04 MATE, the qtconfig-qt4 (System -> Preferences -> Look and Feel -> Qt 4 Settings) looks like
Actually the configure program is call qtconfig-qt4 which is under
odroid@odroid:~/$ ls -l /usr/bin/qt*
-rwxr-xr-x 1 root root 26388 Dec  8  2015 /usr/bin/qtchooser
lrwxrwxrwx 1 root root     9 Dec  8  2015 /usr/bin/qtconfig -> qtchooser
lrwxrwxrwx 1 root root    43 Apr  5 12:16 /usr/bin/qtconfig-qt4 -> ../lib/arm-linux-gnueabihf/qt4/bin/qtconfig
-rwxr-xr-x 1 root root 51744 Nov 30  2015 /usr/bin/qtcreator
-rwxr-xr-x 1 root root  9904 Nov 30  2015 /usr/bin/qtcreator_process_stub
-rwxr-xr-x 1 root root   950 Nov 30  2015 /usr/bin/qtcreator.sh
lrwxrwxrwx 1 root root     9 Dec  8  2015 /usr/bin/qtdiag -> qtchooser
-rwxr-xr-x 1 root root  9680 Mar 14 16:04 /usr/bin/qt-faststart
lrwxrwxrwx 1 root root     9 Dec  8  2015 /usr/bin/qtpaths -> qtchooser
-rwxr-xr-x 1 root root 30716 Nov 30  2015 /usr/bin/qtpromaker
On my Mint 17.2 (based on Ubuntu 14.04), I have
brb@T3600 ~ $ ls qt-everywhere-opensource-src-4.8.6/bin
assistant          elf2e32_qtwrapper.bat  lupdate                 qcollectiongenerator  qmlviewer      setcepaths.bat  xmlpatternsvalidator
createpackage      elf2e32_qtwrapper.pl   moc                     qdoc3                 qt3to4         syncqt
createpackage.bat  findtr                 patch_capabilities      qhelpconverter        qtconfig       syncqt.bat
createpackage.pl   lconvert               patch_capabilities.bat  qhelpgenerator        qtdemo         uic
designer           linguist               patch_capabilities.pl   qmake                 qttracereplay  uic3
elf2e32_qtwrapper  lrelease               pixeltool               qmlplugindump         rcc            xmlpatterns
brb@T3600 ~ $ ls /usr/bin/qt*
/usr/bin/qtchooser  /usr/bin/qtconfig  /usr/bin/qt-faststart  /usr/bin/qtpaths
Install Qt on Mac
Follow the instruction on https://github.com/sandym/qt-patches/tree/master/mac/qt-4.8.7 or here. It works on my Mac 10.11 El Capitan (Xcode 8.0 + Qt 4.8.7).
Download qt 4.8.7 source code and qt-patches first.
tar xzvf ~/Downloads/qt-everywhere-opensource-src-4.8.7.tar.gz
mv ~/qt-everywhere-opensource-src-4.8.7/ ~/qt-4.8.7-src
cd ~/qt-4.8.7-src
patch -p1 < ../qt-patches/mac/qt-4.8.7/qt-4.8.7-mac.patch

mkdir ../qt-4.8.7-build
cd ../qt-4.8.7-build
export PATH=/usr/bin:/bin:/usr/sbin:/sbin
../qt-4.8.7-src/configure -debug-and-release -nomake examples -no-qt3support -no-multimedia -no-audio-backend \
  -no-phonon -no-phonon-backend -no-gif -no-webkit -no-libtiff -prefix /usr/local/Qt-4.8.7 \
  -arch x86_64 -openssl-linked -I "$PWD/../qt-patches/mac_openssl_include" -opensource -confirm-license
make -j4
sudo make install
Note that the executable file created by Qt is in .app format.
How to specify Mac platform in qmake (QtCreator)
http://stackoverflow.com/questions/18462420/how-to-specify-mac-platform-in-qmake-qtcreator
How to detect reliably Mac OS X, iOS, Linux, Windows in C preprocessor?
modalSession has been exited prematurely
https://bugreports.qt.io/browse/QTBUG-37699
Deploying an Application
http://doc.qt.io/qt-4.8/deployment-mac.html
The app file created by Qt is actually not a file but a directory. So a better way is to distribute a dmg file. To create a dmg file from an app, simply run the following command:
cd /path/to/contain/yourappname.app
/usr/local/Qt-4.8.7/bin/macdeployqt yourappname.app -dmg
In my case, I got the following warnings but the final dmg looks fine.
WARNING: Could not find any external Qt frameworks to deploy in "SeqTools.app"
WARNING: Perhaps macdeployqt was already used on "SeqTools.app" ?
WARNING: If so, you will need to rebuild "SeqTools.app" before trying again.
Create an Installer
Creating nice dmg “installer” for Mac OS X
Qt on SBC
Raspberry Pi
- Howto compile Qt 5.4 or newer for Raspberry Pi (Step-by-Step tutorial)
- https://wiki.qt.io/Qt5_on_RaspberryPi (outdated) and https://wiki.qt.io/Native_Build_of_Qt5_on_a_Raspberry_Pi (new)
Beaglebone Black
See Native build Qt on BBB. For Qt 4.8, it took about 20 hours to make.
UDOO
See Native build Qt on BBB. For Qt 4.8.6, it took about 9.5 hours run make -j2 (I have UDOO Dual).
For Qt 5, see Set up Qt on i.MX6.
ODROID xu4
- It seems it is not necessary to build a static Qt by myself on Odroid (at least Ubuntu 16.04) since Qt 4.8.7 is already available in Ubuntu 16.04 MATE.
# sudo apt-get install qt4-dev-tools
$ dpkg -L qt4-dev-tools | grep qmake # nothing
$ sudo apt-get install qtcreator

# Qt Creator needs to be launched by calling
# qtcreator -noload Welcome

$ ls -l /usr/lib/arm-linux-gnueabihf/qt4/bin/qmake
-rwxr-xr-x 1 root root 2566408 Apr  5 12:20 /usr/lib/arm-linux-gnueabihf/qt4/bin/qmake
$ ls -l /usr/bin/qmake
lrwxrwxrwx 1 root root 9 Dec  8  2015 /usr/bin/qmake -> qtchooser
$ /usr/bin/qmake -v
QMake version 2.01a
Using Qt version 4.8.7 in /usr/lib/arm-linux-gnueabihf
$ qtchooser
Usage:
  qtchooser { -l | -list-versions | -print-env }
  qtchooser -install [-f] [-local] <name> <path-to-qmake>
  qtchooser -run-tool=<tool name> [-qt=<Qt version>] [program arguments]
  <executable name> [-qt=<Qt version>] [program arguments]

Environment variables accepted:
 QTCHOOSER_RUNTOOL  name of the tool to be run (same as the -run-tool argument)
 QT_SELECT          version of Qt to be run (same as the -qt argument)
- It only took 52 minutes to finish 'make -j8' on my Odroid xu4 (8 cores) for Qt 4.8.6. I limited the cpu freq to 1.4GHz.
- http://wiki.odroid.in/index.php/Qt5
- https://wiki.qt.io/ODROID-XU3
- http://stackoverflow.com/questions/33503004/how-do-i-build-and-run-qt-qt-creator-on-odroid-xu3
- http://forum.odroid.com/viewtopic.php?f=77&t=14923
- qt5 xu4 site:forum.odroid.com
NVIDIA Jetson
Qt on the NVIDIA Jetson TX1 – Device Creation Style
Qt Creator
- Download link
- Qt Creator Manual
- Multiple version of Qt library
- Qt Creator Welcome requires QtQuick. On my ODroid I don't have Qt Quick 2.1 (software repository only has Qt Quick 1)installed so the Welcome tab is blank.
$ qtcreator
Starting process:  "/usr/bin/cmake" "--help"
file:///usr/share/qtcreator/welcomescreen/welcomescreen.qml:30:1: module "QtQuick" is not installed
     import QtQuick 2.1
     ^
Starting process:  "/usr/bin/cmake" "--help-command-list"
Starting process:  "/usr/bin/cmake" "--help-commands"
Starting process:  "/usr/bin/cmake" "--help-property-list"
Starting process:  "/usr/bin/cmake" "--help-variable-list"
- Keyboard shortcuts:
- Ctrl + Click the symbol - move to the definition or the declaration of a symbol.
- Click a symbol + Right click + Follow the symbol under cursor - move to the definition
The default build directory is parallel to the folder of source code which is a pain if there is a same project name. A better default build directory should be under the source code folder. To change the default setting, go to Tools -> Options -> Build and Run -> Remove "../" from the Default build directory value "../build-%{CurrentProject:Name}-%{CurrentKit:FileSystemName}-%{CurrentBuild:Name}". The project name is determined by Qt project file XXXX.pro.- This teaches us how to set warning level when compiling a Qt project. Qt project uses the settting in makefile. We can overwrite it by setting something in .pro file
win32:QMAKE_CXX_FLAGS_WARN_ON += -Wextra
Google: Qt change warning level.
Announcement
Source code
https://github.com/danimo/qt-creator
debug and release folders
For some unknown reason, no matter I use the Debug mode or Release mode to build my application, there are always two subfolders debug and release under build-ProjectName-KitName-Debug or build-ProjectName-KitName-Release directory. Actually, the release' folder is empty under build-ProjectName-KitName-Debug directory and similarly the debug folder is empty under build-ProjectName-KitName-Release directory.
Tools > Options
Text Editor
- Font & Colors tab: Font 9 -> 12. Color Scheme Default -> Dark.
- Display: check 'Enable text wrapping'
Build and Run
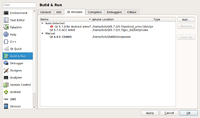
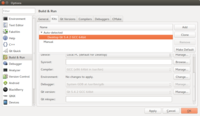
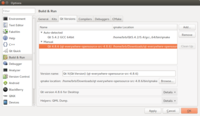
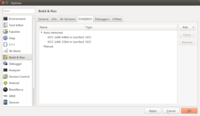
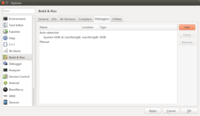
See the screenshots below to see how to set up the Qt in the Qt Creator when the Qt was built by ourselves. We need to add 'Kits' in order to build applications.
The default build directory is
../build-%{CurrentProject:Name}-%{CurrentKit:FileSystemName}-%{CurrentBuild:Name}
If we change it to the following, the build directory will be under %HOME/Templates (and it won't be in parallel with the source directory). This is useful if my source directory is in a git directory.
%{Env:HOME}/Templates/build-%{CurrentProject:Name}-%{CurrentKit:FileSystemName}-%{CurrentBuild:Name}
Debug Qt program built with the Microsoft Visual Studio compilers
- http://wiki.qt.io/Qt_Creator_Windows_Debugging
- http://doc.qt.io/qtcreator/creator-debugger-engines.html. That is, we need to download Windows Driver Kit 8.1.
- This kit will be installed under 'C:\Program Files (x86)\Windows Kits' directory.
- The cdb.exe can be found under C:\Program Files (x86)\Windows Kits\8.1\Debuggers\x86 or C:\Program Files (x86)\Windows Kits\8.1\Debuggers\x64 directories.
- Another problem is about the error Error LINK : fatal error LNK1123: failure during conversion to COFF: file invalid or corrupt when we compile a Qt program. The solution is posted on here. In summary, we want to rename/delete the file C:\Program Files (x86)\Microsoft Visual Studio 10.0\VC\BIN\cvtres.exe since the file appears in another place too (C:\Windows\Microsoft.NET\Framework\v4.0.30319\cvtres.exe).
Simple program to debug
In the following program, we can put a break at the line QString msg="" to test the debug function in QT Creator.
#include <QApplication>
#include <QPushButton>

int main(int argc, char **argv)
{
  QApplication app (argc, argv);

  QString msg="";
  msg = "abcd";
  msg = "ABCD";

  QPushButton button ("Hello world !");
  button.show();

  return app.exec();
}
Also in the .pro file, add one more line (QT += widgets) to the code. So the file looks like
SOURCES += \
    main.cpp
greaterThan(QT_MAJOR_VERSION, 4): QT += widgets
Click the 2nd green triangle button (F5) to start debugging. Click F10 to step over and F11 to step in.
How to close the debugger window
No need to close anything. Just click the 'Edit' icon in the left hand dock to switch out of the 'Debug' mode.
Plugins
Qt Creator -> Help -> About Plugins...
Tips
- Ctrl +a, Ctrl + i to re-indent the code
OpenGL driver
On my Windows tablet (Lenovo lynx), Qt Creator 4.1.0 shows Qt Creator crash/stopped working. The solution is to disable Welcome plugin. Changing the command to qtcreator.exe -noload Welcome. After Qt Creator is loaded, we can go to Help -> About Plugins... and uncheck the item Welcome under the Qt Creator category.
This trick also works on ARM based SOC like Odroid, Raspberry Pi, Udoo, etc.
Could not initialize GLX. Aborted
When I try to launch Qt Creator 4.1.0 on updated Mint 17.2 on T3600 w/ NVIDIA GF108GL (not on Virtual machine), I got the error Could not initialize GLX. Aborted. See
Similar issue happened when I try to run Blender. It shows X11 glXChooseVisual() failed, verify working openGL system! initial window could not find the GLX extension. See
- https://ubuntuforums.org/showthread.php?t=2165524
- http://askubuntu.com/questions/86465/switch-from-nvidia-to-internal-intel-hd-graphics-opengl-does-not-work
- https://bbs.archlinux.org/viewtopic.php?id=200242
The Driver Manager shows I am using nvidia-367 (recommended) driver.
Simple Test
Non-Gui/Console application
The project can be created by Qt Creator -> New File or Project -> Application -> Qt Console Application. See How to exit Qt console application?.
#include <QCoreApplication>
#include <QStringList>
#include <QtDebug>

int main(int argc, char *argv[])
{
    QCoreApplication a(argc, argv);
    QString x="step 1 step 2 step 3 step 4 babab";
    QStringList strlist;
    strlist = x.split(" ");
    int stepIndex = strlist.lastIndexOf("step",-1);
    int curstep = strlist[++stepIndex].toInt();
    qDebug() << curstep;   // return 4
    // return a.exec(); this line will create an event loop; need ctrl+c to exit.
}
QWidget
To quickly test whether the Qt was built successfully, we can
- On the VS command prompt (the test.cpp can be generated from http://www.zetcode.com/gui/qt4/introduction/)
#include <QApplication>
#include <QWidget>

int main(int argc, char *argv[])
{
    QApplication app(argc, argv);

    QWidget window;

    window.resize(250, 150);
    window.setWindowTitle("Simple example");
    window.show();

    return app.exec();
}
Go to Windows Command line (The 'nmake' command will be 'make' on Linux OS).
cd c:\Qt
mkdir example
cd example
notepad test.cpp
set PATH=%PATH%;C:\QT\4.8.4\bin
qmake -project        # Create .pro file
qmake                 # Create Makefile
nmake                 # Run 'make' on Linux
If everything went well, we will obtain the executable file under release folder. That is, we can run the executable file by
release\example.exe
QPushButton
The example is used in http://wiki.qt.io/Qt_for_beginners. Note QPushButton inherits from QAbstractButton and QAbstractButton inherits from QWidget.
#include <QApplication>
#include <QPushButton>

int main(int argc, char **argv)
{
  QApplication app (argc, argv);

  QPushButton button ("Hello world !");
  button.show();

  return app.exec();
}
QWidget + setLayout()
See Listing 1-10 from FQD.
#include <QApplication>
#include <QWidget>
#include <QVBoxLayout>
#include <QLabel>
#include <QLineEdit>

int main( int argc, char **argv )
{
  QApplication app( argc, argv );

  QWidget widget;
  QLineEdit *lineEdit = new QLineEdit();
  QLabel *label = new QLabel("Relax Saturday!");

  QVBoxLayout *layout = new QVBoxLayout();
  layout->addWidget( lineEdit );
  layout->addWidget( label );
  widget.setLayout( layout );

  //  MyClass *bridge = new MyClass( "", &app );
  //  QObject::connect(
  //    lineEdit, SIGNAL(textChanged(const QString&)),
  //    bridge, SLOT(setText(const QString&)) );
  //  QObject::connect(
  //    bridge, SIGNAL(textChanged(const QString&)),
  //    label, SLOT(setText(const QString&)) );

  widget.show();

  return app.exec();
}
The widget (QWidget) above can be formed as a class and separated from the main program.
#include <QApplication>
#include <QWidget>
#include <QVBoxLayout>
#include <QLabel>
#include <QLineEdit>

class MyWidget : public QWidget
{
public:
  MyWidget();
};

MyWidget::MyWidget()
{
    QLineEdit *lineEdit = new QLineEdit();
    QLabel *label = new QLabel("Relax Saturday!");

    QVBoxLayout *layout = new QVBoxLayout();
    layout->addWidget( lineEdit );
    layout->addWidget( label );
    setLayout( layout );
}

int main(int argc, char *argv[])
{
    QApplication app(argc, argv);
    QObject parent;

    MyWidget widget;
    widget.show();

  return app.exec();
}
The pro file looks like
QT      += gui
TARGET  = findWordfromFile
SOURCES += main.cpp
See also the Layout of a Widget section.
setLayout()
We don't have to use setLayout(); we can use this keyword as the parent in the QGridLayout, QHBoxLayout or QVBoxLayout. For example the MyWidget constructor can be written as
MyWidget::MyWidget()
{
    QLineEdit *lineEdit = new QLineEdit();
    QLabel *label = new QLabel("Relax Saturday!");

    QVBoxLayout *layout = new QVBoxLayout(this);
    layout->addWidget( lineEdit );
    layout->addWidget( label );
    // setLayout( layout );
}
QMainWindow + setCentralWidget()
See Listing 9-10 from FQD.
#include <QApplication>
#include <QMainWindow>

class MainWindow : public QMainWindow
{
public:
  MainWindow();
};

MainWindow::MainWindow() : QMainWindow()
{
  setCentralWidget( new QTextEdit( this ) );
}

int main( int argc, char **argv )
{
  QApplication app( argc, argv );

  MainWindow window;
  window.show();

  return app.exec();
}
Similarly we can use setCentralWidget() in QMainWindow. See Chapter 4 of 'The Book of Qt4'.
#include <QApplication>
#include <QMainwindow>
#include <QLabel>
int main(int argc, char *argv[])
{
  QApplication a(argc, argv);

  QMainWindow mainWindow;
  QLabel *label = new QLabel("<center>Central Widget</center>");
  mainWindow.setCentralWidget(label);
  mainWindow.show();

  return a.exec();
}
Qt Basic
C++ useful for Qt
See C++ tutorial.
- Use dot (.) to refer to any public member of a class.
- Use the arrow operator (->) to refer to a member of an object pointed by a pointer. The label below is a pointer rather than an object but *label is an object.
QLabel *label = new QLabel("ABCDE");
label->show();
// (*label).show();
- Use the operator of scope (::) to set a definition of a class's member function or call a function from some class. For example,
QObject::connect();
means to use connect() function from QObject class.
- The this pointer passed on to the EditDialog sets the parent of the dlg to the list dialog.
EditDialog dlg( this );
Here explains: The keyword this identifies a special type of pointer. Suppose that you create an object named x of class A, and class A has a nonstatic member function f(). If you call the function x.f(), the keyword this in the body of f() stores the address of x..
Q_OBJECT macro, SIGNAL/SLOT and moc
This macro is required if a class contains SIGNAL/SLOT.
In 'C++ GUI Programming with Qt4': Creating Dialog. It describes
- The makefile generated by qmake will include special rules to run moc, Qt's meta-object compiler.
- For moc to work correctly, we must put the class definition in a header file, separate from the implementation file. The code generated by moc includes this header file and adds some C++ boilerplate code of its own.
- Classes that use the Q_OBJECT macro must have moc run on them; qmake automatically adds the necessary rules to the makefile. But if you forget to regenerate your makefile using qmake and moc isn't run, the linker will complain that some functions are declared but not implemented. If this ever happens, run qmake again to update the makefile, then rebuild the application.
For more detail about the Qt's Meta-Object System, see this article.
Common Signals
| Signal | |
|---|---|
| ComboBox | currentIndexChanged or activated |
| PushButton | clicked |
| RadioButton | toggler |
| Action | triggered |
| Process | finished, started, stateChanged, readyReadStandardOutput, readyReadStandardError |
| ListWidget | itemClicked |
| NetworkReply | finished, readyRead, downloadProgress |
tr()
tr() means translation; the characters were auto translated depending on system's locale. See http://qt-project.org/doc/qt-4.8/linguist-hellotr.html
Run Qt from Command Line
I use
# Open command prompt from Visual Studio 2010
set PATH=C:\Qt\Qt5.0.2\5.0.2\msvc2010_opengl\bin;%PATH%
Now we can build the project by for example
cd C:\Qt\FQD\Chapter01\plain-cpp
qmake -project
qmake
nmake
The executable will be located under release subfolder.
From C++ to Qt
See Chap 1 of Foundation of Qt Development book.
| No Qt | Qt | |
|---|---|---|
| Class | List 1.1
#include <string>
using std::string;
class MyClass
{
public:
  MyClass (const string & text);
  const string& text() const;
  void setText (const string& text);
  int getLengthOfText() const;
private:
  string m_text
}
|
List 1.2
#include <QObject>
#include <string>
using std::string;
class MyClass : public QObject
{
public:
  MyClass (const string& text, QObject *parent = 0);
...
}
|
| Main | List 1.3
#include <iostream>
int main(int argc, char **argv)
{
  MyClass *a, *b, *c;
  a = new MyClass ("foo");
  b = new MyClass("ba-a-ar");
  c = new MyClass("baz");
  std::cout << a->text() << "(" << a->getLengthOfText() << ")" << std::endl;
  a->setText( b-> text() );
  std::cout << a->text()  << "(" << a->getLengthOfText() << ")" << std::endl;
  int result = a->getLengthOfText() - c ->getLengthOfText();
  delete a;
  delete b;
  delete c;
  return result;
}
|
List 1.4
#include <QtDebug>
int main (int argc, char **argv)
{
  QObject parent;
  MyClass *a, *b, *c;
  a = new MyClass ("foo", &parent); // Or a = new MyClass("foo", this);
  b = new MyClass("ba-a-ar", &parent);
  c = new MyClass ("baz", &parent);
  qDebug() << QString::fromStdString(a->text()) << "(" << a->getLengthOfText() << ")";
  a -> setText( b-> text());
  qDebug() << QString::fromStdString(a->text()) << "(" << a->getLengthOfText() << ")";
  return a->getLengthOfText() - c->getLengthOfText();
}
|
| File | Output
const char *filename="/home/brb/file"; string filename2; std::ofstream myfile myfile.open(filename, ios::out | ios::app); myfile.open(filename); // Error myfile.open(filename.c_str()); if (!myfile.is_open()) return; myfile << "ABC\n"; myfile.close(); |
Qstring filename; QFile file(filename) if (!file.open(QFile::WriteOnly | QFile::Text)) return; QTextStream out(&file); out << "ABC\n"; file.flush(); file.close(); |
Forward Declaration
The forward declarations of the Qt classes tells the C++ compiler that a class exists, without giving all the detail that a class definition provides.
// <finddialog.h>
class QCheckBox;
On the other hand, we can simply include QtGui in the cpp file. That saves us to include every class we need individually.
// <finddialog.cpp>
#include <QtGui>
#include "finddialog.h"
FindDialog::FindDialog(QWidget *parent) : QDialog(parent)
{
 ...
}
Subclass and Parent in constructor
The QDialog in the class definition shows the base class for FindDialog class.
The parent parameter in FindDialog constructor specifies the parent widget (QWidget). The default is a null pointer, meaning that the dialog has no parent.
The private variable is a pointer declared in the header file. So the compiler does not need the full class definition. We could have included the header file <QCheckBox> in the header file, but using forward declarations will makes compiling faster.
// <finddialog.h>
class FindDialog : public QDialog
{
   Q_OBJECT
  public:
    FindDialog(QWidget *parent = 0);
  private;
    QCheckBox *caseCheckBox;
}
Sub Qt's widgets
Suppose we don't like the default behavior of a Qt's built-in widget, we can subclass it.
Subclass QLabel from youtube.
For example, suppose we want to override the default mouse behavior in the QTextEdit class.
// <qtexteditsub.h>

#include <QtCore>
#include <QtGui>
class QTextEditSub : public QTextEdit
{
  Q_OBJECT
public: QTextEditSub(QWidget *parent=0);
        ~QTextEditSub();
protected:
  void mouseReleaseEvent(QMouseEvent *e);
  void mousePressEvent(QMouseEvent *e);
  void mouseMoveEvent(QMouseEvent *e);
  void mouseDoubleClickEvent(QMouseEvent *e);

}

// <qtexteditsub.cpp>

#include "qtexteditsub.h"
QTextEditSub::QTextEditSub(QWidget *parent) : QTextEdit(parent)
{
}

QTextEditSub::~QTextEditSub()
{
}

void QTextEditSub::mouseReleaseEvent(QMouseEvent *e);
{
    e->ignore();
}

void QTextEditSub::mousePressEvent(QMouseEvent *e);
{
    e->ignore();
}

void QTextEditSub::mouseMoveEvent(QMouseEvent *e);
{
    e->ignore();
}

void QTextEditSub::mouseDoubleClickEvent(QMouseEvent *e);
{
    e->ignore();
}
Naming Convention
- Class name starts with an uppercase letter and the words are divided using Camel-Casing.
- The names of the methods all start with a lowercase letter, and the words are again divided by using CamelCasing.
QWidget vs QDialog
- If a class's parent is QWidget, the class will be shown at the top-left corner of the screen.
- If a class's parent is QDialog, the class will be shown at the center of the screen (seems better).
QWidget vs QDialog vs QMainWindow
- A QWidget is the base class for all drawable classes in Qt. Any QWidget-based class can be shown as a window by showing it when it has no parent. A simple example of QWidget class can be found on zetcode.com or Simple Test section. More examples can be found on most Qt programs.
// header file
class StopWatch : public QWidget
{
    Q_OBJECT
public:
    StopWatch(QWidget *parent = 0);
    ~StopWatch();
};
// cpp file
StopWatch::StopWatch(QWidget *parent)
    : QWidget(parent)
{
}
- A QDialog is based on QWidget, but designed to be shown as a window. It will always appear in a window, and has functions to make it work well with common buttons on dialogs (accept, reject, etc.). Examples of using QDialog class can be found on http://www.informit.com/articles/article.aspx?p=1405224, http://doc.qt.io/qt-5/qtwidgets-dialogs-extension-example.html, BDGE software and searching my bitbucket\qt repository.
// header file
class ButtonDialog : public QDialog
{
  Q_OBJECT
public:
  ButtonDialog( QWidget *parent=0 );
};
// cpp file
ButtonDialog::ButtonDialog( QWidget *parent ) : QDialog( parent )
{
}
- A QMainWindow is based on QWidget and is designed around common needs for a main window to have. It has predefined places for a menu bar, a status bar, a toolbar, and other widgets. It does not have any built-in allowances for buttons like QDialog does. QMainWindow examples can be found at Simple Test > No layout section, http://doc.qt.io/qt-4.8/examples-mainwindow.html, or searching my bitbucket\qt repository.
int main(int argc, char **argv)
{
  QApplication app;
  QMainWindow *window;

  window->setCentralWidget(XXX);
  // XXX can be any pointer from a class inherited from QWidget
  //
  // Or do not explicitly specify the widget type as the following example (BDGE, not common)
  //    window->setCentralWidget(new QWidget);
  //    window->centralWidget()->setLayout(mainLayout);

  window->show()
  return app.exec()
}
The following table shows the differences of show method and layout management of these classes.
| class | show method | layout |
|---|---|---|
| QApplication | .exec() | |
| QWidget | .show() | layout |
| QMainWindow | .show() | centralwidget |
| QDialog | .exec() or .show() | layout |
Widgets and layouts
- http://doc.qt.io/qt-4.8/widgets-and-layouts.html
- Chapter 3 of FQD
To set a layout to a widget, we can use this keyword or the ref to a QWidget as in QGridLayout(this), QHBoxLayout(this), QVBoxLayout or use the setLayout() function.
QGridLayout *layout = new QGridLayout(this); // see Listing 3-5 of FQD
# OR
QGridLayout *layout = new QGridLayout();
setLayout(layout); // used in a class    // see Listing 1-10 of FQD

QWidget widget;
QGridLayout *layout = new QGridLayout(&widget);
widget.show(); // used in main()

QDialog dlg;
QGridLayout *layout = new QGridLayout(&dlg); // see Listing 3-4 of FQD
dlg.show(); // used in main()
To add widgets to a layout, we can use addWidget() function. For example,
QGroupBox *groupBox = new QGroupBox();
QGridLayout *layout = new QGridLayout(this);
layout->addWidget(groupBox);
So the pattern is widget (parent) -> layout -> widget -> layout -> ...
Layout of a widget
See http://doc.qt.io/qt-4.8/layout.html#adding-widgets-to-a-layout. We can use setLayout() method to a widget. The layout itself can contains several widgets that can be added to the layout using the addWidget() method. See an example (from the layout documentation) below
    QWidget *window = new QWidget;
    QPushButton *button1 = new QPushButton("One");
    QPushButton *button2 = new QPushButton("Two");
    QPushButton *button3 = new QPushButton("Three");
    QPushButton *button4 = new QPushButton("Four");
    QPushButton *button5 = new QPushButton("Five");

    QHBoxLayout *layout = new QHBoxLayout;
    layout->addWidget(button1);
    layout->addWidget(button2);
    layout->addWidget(button3);
    layout->addWidget(button4);
    layout->addWidget(button5);

    window->setLayout(layout);
    window->show();
See the following diagram
Widget
+-----------------------+
|    Layout             |
|  +-----------------+  |
|  | Widget 1        |  |
|  | Widget 2        |  |
|  | ...             |  |
|  +-----------------+  |
+-----------------------+
(from the layout documentation) Note: Widgets in a layout are children of the widget on which the layout is installed, not of the layout itself. Widgets can only have other widgets as parent, not layouts.
You can nest layouts using addLayout() on a layout; the inner layout then becomes a child of the layout it is inserted into.
When a QDialog will be closed?
accept() or reject() is called.
QDialog::exec()
QDialog::exec() will return 1 if accepted and 0 if rejected (e.g. use 'X' to close a QDialog). To check whether users have accepted or rejected a dialog, see QDialog exec() and getting result value; ie use QDialog::Accepted or QDialog::Rejected to do an integer comparison.
In the following example, it will show 'Title 2' qdialog first and then 'Title 1' qwidget second because it is the order the code has been written. Because 'Title 1' was written in QDialog it will be positioned in the center of the screen.
// main.cpp
#include <QApplication>
#include "mywidget.h"

int main(int argc, char **argv)
{
  QApplication app (argc, argv);

  MyWidget widget;
  widget.move(QApplication::desktop()->screen()->rect().center() \
              - widget.rect().center());
  widget.resize(200, 200); // not include the title bar
  widget.show();
  return app.exec();
}

// mywidget.h
#ifndef MYWIDGET_H
#define MYWIDGET_H

#include <QtGui>
#include "dialog.h"
class MyWidget : public QWidget
{
    Q_OBJECT
public:
    explicit MyWidget(QWidget *parent = 0);
signals:
public slots:
};
#endif // MYWIDGET_H


// mywidget.cpp
#include "mywidget.h"
MyWidget::MyWidget(QWidget *parent) :
    QWidget(parent)
{
    this->setWindowTitle("Title 1");
    QPushButton *button = new QPushButton("Default Button");
    QVBoxLayout *layout = new QVBoxLayout();
    layout->addWidget( button);
    setLayout( layout );
    Dialog *dialog=new Dialog;
    if (dialog->exec()) {   // dialog will be shown first
        qDebug() << "return 1";
    } else qDebug() << "return 0";
}

// dialog.h
#ifndef DIALOG_H
#define DIALOG_H
#include <QtGui>
class Dialog : public QDialog
{
    Q_OBJECT
public:
    explicit Dialog(QWidget *parent = 0);
signals:
public slots:
};
#endif // DIALOG_H

// dialog.cpp
#include "dialog.h"

Dialog::Dialog(QWidget *parent) : QDialog(parent)
{
    QPushButton *colorbackbutton = new QPushButton("Colored Background");
    colorbackbutton->setStyleSheet("background-color:black; color:white");
    QVBoxLayout *layout = new QVBoxLayout();
    layout->addWidget( colorbackbutton );
    setLayout( layout );
    this->setWindowTitle("Title 2");
    this->resize(200, 200);
}
Customize QComboBox
Use setView() and setModel()
Qlistview vs QCombobox
- QListview example A vertical scrollbar will appear on the RHS if the height is too narrow.
// main.cpp
#include"myListView.h"

int main(int argc,char** argv)
{
    QApplication app(argc,argv);

    myListView* view = new myListView();

    return app.exec();
}

// myListView.h
#include <QtGui>
class myListView:public QListView
{
  Q_OBJECT
public:
  myListView():QListView()
  {
    QStringListModel* model = new QStringListModel();
    model->setStringList(QString("Item 1;Item 2;Item 3;Item 4").split(";"));

    setModel(model);
    setWindowTitle("QListView Detect Click");
    show();

    connect(this,SIGNAL(clicked(const QModelIndex)),this,SLOT(ItemClicked(QModelIndex)));
  }
  ~myListView() {}

private slots:
  void ItemClicked (QModelIndex index )
  {
      QMessageBox::information(this,"Hello!","You Clicked: \n"+index.data().toString());
  }

};
// main.cpp
#include <QtGui>
#include "myComboBox.h"
int main(int argc, char **argv)
{
    QApplication app(argc, argv);
    QMainWindow *window = new QMainWindow();

    window->setWindowTitle(QString::fromUtf8("QComboBox currentIndexChanged"));
    window->resize(330, 220);

    QWidget *centralWidget = new QWidget(window);
    QHBoxLayout *layout = new QHBoxLayout();
    centralWidget->setLayout(layout);

    MyComboBox* comboBox = new MyComboBox(centralWidget);
    comboBox->addItem("Item 1");
    comboBox->addItem("Item 2");
    comboBox->addItem("Item 3");
    comboBox->addItem("Item 4");
    layout->addWidget(comboBox);
    window->setCentralWidget(centralWidget);
    window->show();
    return app.exec();
}

// myComboBox.h
#ifndef MYCOMBOBOX_H
#define MYCOMBOBOX_H
#include <QtGui>

//Derived Class from QComboBox
class MyComboBox: public QComboBox
{
  Q_OBJECT
  public:
    MyComboBox(QWidget* parent):QComboBox(parent)
    {
      this->setParent(parent);
      connect(this , SIGNAL(currentIndexChanged(int)),this,SLOT(handleSelectionChanged(int)));
    }
    ~ MyComboBox(){}

  public slots:
    //Slot that is called when QComboBox selection is changed
    void handleSelectionChanged(int index)
    {
        QMessageBox* msg = new QMessageBox();
        msg->setWindowTitle("Hello !");
        msg->setText("Selected Index is :"+QString::number(index));
        msg->show();
    }

};
#endif // MYCOMBOBOX_H
QScrollArea
The QScrollArea class provides a scrolling view onto another widget.
Memory Management
- Chapter 1 of Foundation of Qt Development
- http://www.qtcentre.org/threads/41449-Parent-child-relationship-in-Qt
Parent is on heap. So it has to be deleted manually.
#include <QtGui>
#include "addressbook.h"
//...every needed header

int main(...) {
   //QApplication app ....
   QWidget *parent = new QWidget; //a parent for your addressbook
   AddressBook *myAddressBook = new AddressBook(parent); //pass a pointer to parent widget when you construct an AddressBook object
   //... other code, maybe some layout if necessary...
   parent->show(); //will show the chidren widgets too

   int returnValue = app.exec();
   delete parent; //this will delete the parent children too
   return returnValue;
}
OR creating parent on the stack
int main(...) {
   //QApplication app ....
   QWidget parent; //a parent for your addressbook - parent is created on stack
   AddressBook *myAddressBook = new AddressBook(&parent); //pass a pointer to parent widget when you construct an AddressBook object
   //... other code, maybe some layout if necessary...
   parent.show(); //will show the chidren widgets too

   return app.exec();
}
Bundle a file in app
Check out The Qt Resource System
Coordinate System
http://doc.qt.io/qt-4.8/coordsys.html
Scientific Plot
Histograms
It seems there are no histograms available in QCustomPlot or Qt Charts. The example at this post is not quite the one we usually see.
Qwt's histograms look good.
StyleSheet
Margin, border, padding
Customizing Qt Widgets Using Style Sheets
  +---------------------
  | Margin
  |  +------------------
  |  |  Border
  |  |  +---------------
  |  |  |  Padding
  |  |  |  +------------
  |  |  |  |   Content
  QPushButton *toyButton = new QPushButton(tr("&Toy"));
  QPushButton *nullButton = new QPushButton(tr("Default button"));
  QPalette pal = toyButton->palette();
  pal.setColor(QPalette::Button, QColor(59,89,152));
  pal.setColor(QPalette::ButtonText,Qt::white);
  toyButton->setAutoFillBackground(true);
  toyButton->setPalette(pal);
  toyButton->setFlat(true);
  toyButton->setMinimumHeight(20);
  toyButton->update();

  QPushButton *runButton = new QPushButton(tr("&Automatic setup"));
  runButton->setStyleSheet("background-color: #3B5998; color: #FFFFFF");

  QPushButton *runButton2 = new QPushButton(tr("Zero border"));
  runButton2->setStyleSheet("background-color: #3B5998; color: #FFFFFF; border-width: 0px");

  QPushButton *runButton3 = new QPushButton(tr("No border, Large margin"));
  runButton3->setStyleSheet("background-color: #3B5998; color: #FFFFFF; border:none; margin:20px");

  QPushButton *runButton4 = new QPushButton(tr("Medium border, no margin"));
  runButton4->setStyleSheet("background-color: #3B5998; color: #FFFFFF; border-width:10px; margin:0px");

  QPushButton *runButton5 = new QPushButton(tr("No border, no margin, small padding"));
  runButton5->setStyleSheet("background-color: #3B5998; color: #FFFFFF; border:none; margin:0px; padding:5px");
From the experiment, it shows
- Margin (see button #3) is defined outside the pushbutton (distance to the neighbor objects). So its color is the same as the background color
- Border (see button #4) is used to show object's 3D effect. Its top-left color = white and bottom-right color = black. Other than these 4 edges, it has the same color as the pushbutton's background.
- Padding (see button #5) defines the distance between the text and border.
- Effect of increasing border width is similar to that of increasing padding (though padding does not include 4 edges for the 3D effect). See button #4 and #5.
- Zero border width (see button #2) is not the same as no border (see button #3)
Actually, Qt 4 has a bug that using a stylesheet with a background color will cause the pushbutton about 2 times tall (too large border or padding?) on Mac OS. The screenshot above is based on Qt5 which has fixed the bug.
Color and stylesheet
w.setAttribute(Qt::WA_TranslucentBackground);

w.setStyleSheet("background-color: white;");
w.setStyleSheet("background-color: cyan;");
w.setStyleSheet("background-color: #1abc9c;");  // material design
w.setStyleSheet("background-color: #1ab7ea;");  // twitter
textEdit->setStyleSheet("background: lightgray");

# http://stackoverflow.com/questions/12292592/qt-stylesheet-for-custom-button-on-mouse-hovered-and-clicked
# Pseudo-States, single colon
yourBtn->setStyleSheet("QPushButton{background:url(:/Resources/pause_nor.png);border:0px;}"
    "QPushButton:hover{background:url(:/Resources/pause_over.png);border:0px}"
    "QPushButton:pressed{background:url(:/Resources/pause_over.png); position: relative;top: 1px; left: 1px;}");

# linear gradient; http://doc.qt.io/qt-4.8/qlineargradient.html
QLinearGradient linearGrad(QPointF(0, 100), QPointF(0, rect().height()));
linearGrad.setColorAt(0, QColor(26,188,156));
linearGrad.setColorAt(1, QColor(178,223,219));
painter.setBrush(QBrush(linearGrad));
And an example:
// main.cpp
#include "mywidget.h"

int main(int argc, char **argv)
{
  QApplication app (argc, argv);

  MyWidget widget;
  widget.move(QApplication::desktop()->screen()->rect().center() \
              - widget.rect().center());
  widget.resize(200, 200); // not include the title bar
  widget.show();

  return app.exec();
}

// mywidget.cpp
#include "mywidget.h"

MyWidget::MyWidget(QWidget *parent) :
    QWidget(parent)
{
    QPushButton *button = new QPushButton("Default Button");
    QPushButton *disableButton = new QPushButton("Disabled Button");
    disableButton->setEnabled(false);
    QPushButton *colorbackbutton = new QPushButton("Colored Background");
    colorbackbutton->setStyleSheet("background-color:black; color:white");
    QPushButton *colorbackbutton2 = new QPushButton("Colored Background 2");
    QColor bkcolor = QWidget::palette().color(QWidget::backgroundRole());
    qDebug() << bkcolor;
    colorbackbutton2->setStyleSheet("color:#9E9E9E; "
         "background-color:QColor(ARGB 1, 0.878431, 0.878431, 0.878431)");
    QVBoxLayout *layout = new QVBoxLayout();
    layout->addWidget( button);
    layout->addWidget( disableButton);
    layout->addWidget( colorbackbutton );
    layout->addWidget( colorbackbutton2 );
    setLayout( layout );
}

// mywidget.h
#ifndef MYWIDGET_H
#define MYWIDGET_H

#include <QtGui>

class MyWidget : public QWidget
{
    Q_OBJECT
public:
    explicit MyWidget(QWidget *parent = 0);

signals:

public slots:

};

#endif // MYWIDGET_H
Ref:
- http://doc.qt.io/qt-4.8/stylesheet-syntax.html
- http://doc.qt.io/qt-4.8/qcolor.html
- Qt Creator -> Welcome -> type 'style' to search. The style & stylesheet (read from files) can be changed in real time. See also stylesheet in a file
- http://www.materialui.co/flatuicolors
- https://openclassrooms.com/forum/sujet/qt-setstylesheet-et-qcolor-68966
- http://doc.qt.io/qt-4.8/stylesheet-examples.html
- http://www.materialui.co/socialcolors
- All child objects of your text edit inherit the stylesheet. For example if we change the color of a TextEdit then its scrollbar (TextEdit's child) will have a new color instead of the default color. To change the color of the TextEdit ONLY, see this post.
QSettings
Note: the documentation said For efficiency, the changes may not be saved to permanent storage immediately. (You can always call sync() to commit your changes.) So don't try to copy the file to another location immediately since the copied file may be coming from the old setting file. If we don't use QSettings::sync() function, we can put the command of copying the QSetting file outside the original function that saved a new QSetting file.
If QSettings object does not specify a file, the default location is defined here.
In Linux system, the directory "~/.config" stores configuration parameters for applications. See also this and this.
For example in my main.cpp,
    QApplication app(argc, argv);
    app.setOrganizationName("Trolltech");
    app.setApplicationName("Recent Files Example");
then the ini file is saved in "/home/brb/.config/Trolltech/Recent Files Example.conf" as indicated by
    QSettings settings;
    qDebug() << settings.fileName();
To set or retrieve a key from the setting, use
settings.setValue("bowtie", inputBowtie);
settings.setValue("recentFiles", recentFiles);

inputBowtie = settings.value("bowtie", "").toString();
recentFiles = settings.value("recentFiles").toStringList();
There are different locations we can use to save the parameter file.
- The following way will create an entry <testSettings> under <Computer\HKey_CURRENT_USER\Software\ArrayTools> on Windows registry on Windows OS (NativeFormat will be used).
QSettings settings("ArrayTools", "testSettings");
- The following way will create a folder name <ArrayTools> and a file <Heatmap.ini> in %AppData% folder (C:\Users\USERNAME\AppData\Roaming) on Windows OS.
QSettings settings(QSettings::IniFormat, QSettings::UserScope, "ArrayTools", "Heatmap"); // %APPDATA%
- The following way will create a file <test.ini> under a desired folder on Windows OS. Note that if we omit the QSettings::IniFormat option, the parameter file will not be working (read/write).
QSettings settings(QString("C:/Qt/examples/BRCA/test.ini"), QSettings::IniFormat);
- The following way will create a file <.BDGE.ini> under %HOME% directory on Linux OS.
QString m_sSettingsFile = "/home/" + QString(getenv("USER")) + "/.BDGE.ini";
QSettings settings(m_sSettingsFile, QSettings::NativeFormat);
.pri file, subprojects
- http://stackoverflow.com/questions/1967646/using-pri-files-in-qt
- http://stackoverflow.com/questions/61405/how-do-i-make-a-subproject-with-qt
- http://qt-project.org/doc/qtcreator-2.6/creator-project-creating.html
Javascript
- Chapter 14 of QML book. The example contains 3 source files (*.qmlproject, *.js and *.qml) where
// javascript
.pragma library

var scope = {
}

function call(msg) {
    var exp = msg.toString();
    console.log(exp)
    var data = {
        expression : msg
    }
    try {
        var fun = new Function('return (' + exp + ');');
        data.result = JSON.stringify(fun.call(scope), null, 2)
        console.log('scope: ' + JSON.stringify(scope, null, 2) + 'result: ' + result)
    } catch(e) {
        console.log(e.toString())
        data.error = e.toString();
    }
    return data;
}
and
import QtQuick 2.2
import QtQuick.Controls 1.1
import QtQuick.Layouts 1.1
import QtQuick.Window 2.0
import "jsconsole.js" as Util

ApplicationWindow {
    id: root
    title: qsTr("JSConsole")
    width: 640
    height: 480

    Menu {
        title: qsTr("File")
        MenuItem {
            text: qsTr("Exit")
            onTriggered: Qt.quit();
        }
    }
    ColumnLayout {
    ...
    }
    function jsCall(exp) {
        var data = Util.call(exp);
        outputModel.insert(0, data)
    }
}
Misc
- If we want to create a new class member to be used in class method, we should declare it in the header file. For example, look at the variable 'label' below. Of course, variables only used locally have not this rule.
class MyButton : public QWidget
{
   Q_OBJECT
public:
    MyButton(QWidget *parent = 0);
    QLabel *label;
private slots:
    void showText();
};

MyButton::MyButton(QWidget *parent)
    : QWidget(parent)
{
  label = new QLabel(); // NOT QLabel *label = new QLabel();
}

void MyButton::showText()
{
  label->setText("My Text!");
}
- Frame (seems to be the same as 'Dock' in Qt's language)
- Dock window/Dock Widget http://qt-project.org/doc/qt-4.8/mainwindows-dockwidgets.html
- 'namespace Ui' in xxxx.h helps to glue classes together.
- Qt widget - Basic widgets, Advanced widgets, Organizer widgets and Abstract widigets.
- Qt class hierarchy diagram http://doc.qt.digia.com/extras/qt43-class-chart.pdf
- size().width() can get the width of a widget. See http://www.zetcode.com/gui/qt4/customwidget/
- Qt Event System and Event Classes.
- mouseMoveEvent and an example. Once we reimplement mouseMoveEvent(), it will be automatically used.
- Click on a widget and click promote to. Then type a class name.
- Suppose we create a member function in some class. We can declare it in the header file automatically and move focus to the header to finish it: Click on a member function and click Refactor -> Add Definition in xxxx.h
- On the other hand, we can declare a slot of member function in the header file and then Refactor to have it added to xxx.cpp file.
- ui->setupUi(this); or ui.setupUi(this) . See here.
- Right click context menu
- Can I use Qpainter outside paintEvent or here
- Add background to QWidget
Qt Quick
- http://qt.digia.com/Product/User-Interface-Creation-with-Qt/Qt-Quick/
- http://doc.qt.io/qt-5/qtquick-index.html Qt quick 2
- http://doc.qt.io/qt-5/qml-tutorial1.html Tutorial
- http://doc.qt.io/qt-5/qtquick-codesamples.html Demos
- Youtube tutorial from Joseph Mills
- Youtube tutorial by VoidRealms
QML
To load/test a qml file, use qmlscene command.
$ ~/Qt55/5.5/gcc_64/bin/qmlscene ~/Qt55/Examples/Qt-5.5/quick/demos/clocks/clocks.qml
Simple tests
http://doc.qt.io/qt-5/qmlfirststeps.html
1. A simple Rectangle object
import QtQuick 2.3

Rectangle {
    width: 200
    height: 100
    color: "red"

    Text {
        anchors.centerIn: parent
        text: "Hello, World!"
    }
}
Then run
$ ~/Qt/Qt5.5.1/5.5/gcc_64/bin/qmlscene simple.qml
2. A second test is to create a QML application (with menu bar, status bar, etc) with Qt Quick Control
//import related modules
import QtQuick 2.3
import QtQuick.Controls 1.2
import QtQuick.Window 2.2

//window containing the application
ApplicationWindow {

    //title of the application
    title: qsTr("Hello World")
    width: 640
    height: 480

    //menu containing two menu items
    menuBar: MenuBar {
        Menu {
            title: qsTr("File")
            MenuItem {
                text: qsTr("&Open")
                onTriggered: console.log("Open action triggered");
            }
            MenuItem {
                text: qsTr("Exit")
                onTriggered: Qt.quit();
            }
        }
    }

    //Content Area

    //a button in the middle of the content area
    Button {
        text: qsTr("Hello World")
        anchors.horizontalCenter: parent.horizontalCenter
        anchors.verticalCenter: parent.verticalCenter
    }
}
Then run
$ ~/Qt/Qt5.5.1/5.5/gcc_64/bin/qmlscene simplewindow.qml
3. Handling user input (mouse or keyboard)
import QtQuick 2.3
// mouse input
Rectangle {
    width: 200
    height: 100
    color: "red"

    Text {
        anchors.centerIn: parent
        text: "Hello, World!"
    }

    MouseArea {
        anchors.fill: parent
        onClicked: parent.color = "blue"
    }
}
and
import QtQuick 2.3
// keyboard input
Rectangle {
    width: 200
    height: 100
    color: "red"

    Text {
        anchors.centerIn: parent
        text: "Hello, World!"
    }

    focus: true
    Keys.onPressed: {
        if (event.key == Qt.Key_Return) {
            color = "blue";
            event.accepted = true;
        }
    }
}
4. Create customized QML types for re-use
// Button.qml
import QtQuick 2.3

Rectangle {
    width: 100; height: 100
    color: "red"

    MouseArea {
        anchors.fill: parent
        onClicked: console.log("Button clicked!")
    }
}
and
// application.qml
import QtQuick 2.3

Column {
    Button { width: 50; height: 50 }
    Button { x: 50; width: 100; height: 50; color: "blue" }
    Button { width: 50; height: 50; radius: 8 }
}
Then run the code
~/Qt/Qt5.5.1/5.5/gcc_64/bin/qmlscene application.qml
.qmlproject file and Qt Creator
- http://bckmnn.com/opening-qmlproject-files-in-qtcreator/
- https://forum.qt.io/topic/27525/what-is-qmlproject-file/3
Ubuntu apps
- https://developer.ubuntu.com/en/apps/qml/tutorials/building-your-first-qml-app/
- https://developer.ubuntu.com/en/apps/
QML elements
These are the functionally grouped lists of QML elements as part of Qt Quick.
http://doc.qt.io/qt-4.8/qdeclarativeelements.html (QtQuick 1.0)
- Basic QML elements: Item, Component, QObject
- Graphics: Rectangle, Image, ...
- Text Handling: Text, TextInput, TextEdit, ...
- Mouse and Interaction Area: MouseArea, Keys, PinchArea, ...
- Positioners and Repeater: Column, Row, Grid, Flow, Repeater
- Transformations: Scale, Rotation, Translate
- States: State, AnchorChange, ...
- Animation and Transitions: Transition, SequentialAnimation, ParallelAnimation, PauseAnimation, SmoothedAnimation ,...
- Models and Data Handling:
- Views:
- Path Definition:
- Utility:
- Graphical Effects:
http://doc.qt.io/qt-5/qtquick-index.html QtQuick2 (Qt 5.0)
QML Applications
Qt Quick Examples and Tutorials
http://doc.qt.io/qt-5/qtquick-codesamples.html
Creating Qt Quick (Controls) Applications
First let's see the screen shots of creating an Application and Other Project. Each one category provides several templates.
If we use the Qt Creator to create a Qt Quick Application, it will create the following files
- APPLICATION.pro
- main.cpp
- main.qml
- MainForm.ui.qml
- qml.qrc
- deployment.pri
The following screen shot gives a picture how Qt Creator organize these files. The 'qtquick' project is a Qt Quick Application and the 'qtquickui' is a Qt Quick UI project (next section).
Pathway of Developing Qt Quick Applications
Creating Qt Quick UI projects
If we use the Qt Creator to create a QT Quick UI Projects, it will create the following 3 files (.qmlproject -> .qml -> .ui.qml)
- PROJECT.qmlproject
import QmlProject 1.1

Project {
    mainFile: "qtquickui.qml"

    /* Include .qml, .js, and image files from current directory and subdirectories */
    QmlFiles {
        directory: "."
    }
    JavaScriptFiles {
        directory: "."
    }
    ImageFiles {
        directory: "."
    }
    /* List of plugin directories passed to QML runtime */
    // importPaths: [ "../exampleplugin" ]
}
- PROJECT.qml (e.g. qtquickui.qml in this example)
import QtQuick 2.6
import QtQuick.Window 2.2

Window {
    visible: true
    width: 640
    height: 480
    title: qsTr("Hello World")

    MainForm {
        anchors.fill: parent
        mouseArea.onClicked: {
            Qt.quit();
        }
    }
}
- MainForm.ui.qml: defines a form for the application UI. The main filename MainForm appears in the PROJECT.qml file. Note that It is recommended that you edit the forms in the Design mode and Qt Creator will show this file should only be edited in Design mode.
import QtQuick 2.6

Rectangle {
    property alias mouseArea: mouseArea

    width: 360
    height: 360

    MouseArea {
        id: mouseArea
        anchors.fill: parent
    }

    Text {
        anchors.centerIn: parent
        text: "Hello World"
    }
}
Using Qt Quick Designer
QmlBook - A book about Qt 5
Qt Quick Controls 1
- Overview. Qt Quick Controls module starts in Qt 5.1.
- http://doc.qt.io/qt-5/qtquickcontrols-index.html
- Qt Quick Controls & Qt Quick Designer demo
Qt Quick Controls 2
- http://blog.qt.io/blog/2016/06/10/qt-quick-controls-2-0-a-new-beginning/
- http://blog.qt.io/blog/2016/06/06/more-of-qt-quick-designer-and-qt-quick-controls-2/
Special Modules
Qt Charts
Update: the instruction below is for Qt 5.6.0. However Qt Charts can be installed by checking the appropriate check box when we install Qt 5.7.0.
When plots are launched or resized, there is an animation. It also supports themes (see the 'charthemes' example) Very cool!
1. Install requirements (this step may be optional because we are using the binary Qt) according to
sudo apt-get update
sudo apt-get build-dep qt5-default
2. Download the binary Qt 5.6.0 beta from http://download.qt.io/development_releases/qt/5.6/5.6.0-beta/
3. Download qtcharts by using the git command from https://codereview.qt-project.org/#/admin/projects/qt/qtcharts
git clone https://codereview.qt-project.org/qt/qtcharts
4. Run
# Install Qt 5.6 and Qt Creator
chmod +x qt-opensource-linux-x64-5.6.0-beta.run
./qt-opensource-linux-x64-5.6.0-beta.run  # by default Qt will be installed to ~/Qt5.6.0

# Install qtcharts
cd ~/qtcharts
~/Qt5.6.0/5.6/gcc_64/bin/qmake
make

# Build one qtcharts example: barchart. The source code is one cpp and one pro.
cd ~/qtcharts/examples/charts/barchart
export LD_LIBRARY_PATH=~/Qt5.6.0/5.6/gcc_64/lib
~/Qt5.6.0/5.6/gcc_64/bin/qmake
make

# Run the example
export LD_LIBRARY_PATH=$LD_LIBRARY_PATH:~/qtcharts/lib
./barchart
# You will see a dynamic bar chart on the Ubuntu desktop
Some help from
Full list of examples is
vagrant@vagrant:~$ ls qtcharts/examples/charts/
areachart                  horizontalstackedbarchart  qmlchart
audio                      legend                     qmlcustomizations
barchart                   legendmarkers              qmlcustomlegend
barmodelmapper             lineandbar                 qmlf1legends
boxplotchart               linechart                  qmloscilloscope
callout                    logvalueaxis               qmlpiechart
chartinteractions          modeldata                  qmlpolarchart
charts.pro                 multiaxis                  qmlweather
chartthemes                nesteddonuts               scatterchart
customchart                openglseries               scatterinteractions
datetimeaxis               percentbarchart            splinechart
donutbreakdown             piechart                   stackedbarchart
donutchart                 piechartcustomization      stackedbarchartdrilldown
dynamicspline              piechartdrilldown          temperaturerecords
examples.pri               polarchart                 zoomlinechart
horizontalbarchart         qmlaxes
horizontalpercentbarchart  qmlboxplot
Qt Data Visualization
Get the source code from https://codereview.qt-project.org/#/admin/projects/
git clone https://codereview.qt-project.org/p/qt/qtdatavis3d.git
The examples include
vagrant@vagrant:~/qtdatavis3d/examples/datavisualization$ ls
audiolevels  datavisualization.pro  qmlaxisformatter  qmloscilloscope   rotations
bars         draggableaxes          qmlbars           qmlscatter        scatter
custominput  examples.pri           qmlcustominput    qmlspectrogram    surface
customitems  itemmodel              qmllegend         qmlsurface        texturesurface
customproxy  qmlaxisdrag            qmlmultigraph     qmlsurfacelayers  volumetric
Create source code documentation using Doxygen
Create documentation for your Qt projects, classes, and functions.
- https://www.youtube.com/watch?v=KPN1y_vstjY
- https://www.youtube.com/watch?v=UeJ9nrPsfmo
- source code is on github
sudo apt-get install doxygen doxygen-gui
Then run
doxywizard
from a terminal. The rest should be trivial: enter project directory (nothing will be generated here actually), source code directory and output directory. Click Next. Click 'Run' tab to create HTML file. Click 'x' to quit and choose the default name 'Doxyfile' for the doxy file (> 900 lines). We can click 'Open HTML output' button to see the output or go to the output folder and select html/index.html or html/annotated.html file to view the result.
Note that the input and output (absolute path) values will be written to 'Doxyfile'.
If the source code was changed, we just need to run the following command to update files in the doxy output folder.
doxygen
We can also create Doxyfile from scratch by running
doxygen -g
and then generate (default) output files by running
doxygen Doxyfile # Or just doxygen
A better practice is to create a project folder and then create subfolders like
MyProject/
         |--doc/
         |-->Doxyfile
         |--src/
doxywizard
Qt Tricks
- Build the project in a linux environment has two advantages over VS on Windows: 1) the C++ code is more stringent 2) we can run debugging in Qt Creator.
- Mouse location
- Resize a rectangle as window
- Visual large data (million of data)
- Qt repaint() vs update()
Resize
- Resize when child resize by using sizeHint() and minimumSizeHint.
- For some reason, sizeHint() does not work. In this case, use resize(sizeHint()). See here.
- Qt widget with minimal size to fit all contents
- Setting text on a QLabel in a layout, doesn't resize Set the vertical sizepolicy of your label to QSizePolicy::Minimum. Then set the sizeconstraint of your dialog's layout to QLayout::SetMinimumSize. This should make your dialog grow so all the content will fit inside of it.
- The maximum button on the toolbar is controlled by the window manager. For example, there is a maximum button on Ubuntu but there is no maximum button on Mint for QDialog windows. One alternative to remove the maximum button is to disable it. This can be done by using setFixedWidth(int width)'. See this post.
QLabel
The trick is the line about the layout, not the QLabel object.
QVBoxLayout *mainLayout = new QVBoxLayout;
mainLayout->setSizeConstraint(QLayout::SetMinimumSize);
// or if we want a fixed size; the main widget's size is set to sizeHint().
mainLayout->setSizeConstraint(QLayout::SetFixedSize);
QLabel + icon
- http://www.qtcentre.org/threads/3256-Qlabel-with-(icon-and-text)-HowTo
- https://forum.qt.io/topic/59183/display-icon-into-qlabel-solved/3
Appearance/Desktop Environment Style
See https://wiki.archlinux.org/index.php/qt#Appearance
Conditional compilation
#ifdef Q_OS_WIN32
// Windows specific code
#elif defined(Q_OS_LINUX) || defined(Q_OS_MAC)
// Mac and Linux specific code
#endif
Search QtGlobal for more information about the global declarations (eg Q_OS_WIN32).
C++11 support
Add the following to the .pro file.
CONFIG += c++11
A simple C++ code that uses a range-based for loops is:
 int my_array[5] = {1, 2, 3, 4, 5};
for(int &x : my_array)
{
  x *= 3;
}
Break long text
- QTextDocument; see Chapter 7 in FQD.
- QGraphicsSceneTextItem
- QLabel with setWordWrap()
- QTextEdit as used in QHeatmap
- Qt TextWordWrap
Set Windows initial posiiton
Set main window initial position
Get the current working path
Use QCoreApplication::applicationDirPath() to get the current working path or QFile::absolutePath() to get the absolute path from relative one.
Pop up a help file
- QMessageBox: no maximize button on top-right corner. Cannot resize (old Qheatmap)
- QTextBrowser: the html file cannot be part of C++ (Qtextbrowser)
- QLabel: No scroll bar (Qt07_BasicApplication)
- QTextEdit: Good (used in Qheatmap)
- QWebkit
- QTextDocument: no scroll bar (Qt79_drawText)
Convert std::string to QString
QString::fromStdString());
Convert QString to std::string
http://stackoverflow.com/questions/4214369/how-to-convert-qstring-to-stdstring
.toStdString()
Convert QString to const char*
in C++03, ofstream::open takes const char* parameter.
If OutputFileName is std::string.
ofstream CSVFile;
CSVFile.open(OutputFileName.c_str());
If outputFileName is Qstring
CSVFile.open(OutputFileName.toStdString().c_str());
See QString::toStdString reference
Convert QString to UTF-8
http://stackoverflow.com/questions/23175024/qt-convert-string-to-utf-8
QString str = "Bob Rosén";
qDebug() << QString::fromUtf8(str);
Custom Plots
- Boxplot, line plot, barplot, etc : http://www.qcustomplot.com/
- Histogram: https://www.assembla.com/code/histogram/subversion/nodes
CPU/RAM real-time performance widget
https://www.youtube.com/watch?v=eSHTXQbPquk and https://github.com/giordi91/performanceWidget
Use boost libraries with an example
http://stackoverflow.com/questions/16998326/using-boost-libraries-in-qt
On Windows OS, we can add the following to the .pro file
INCLUDEPATH += C:/boost/boost_1_53_0/
LIBS += "-LC:/boost/boost_1_53_0/stage/lib/"
On Ubuntu OS, I can use (the first line Qt += widgets is only necessary on Qt 5)
QT += widgets
INCLUDEPATH += /home/brb/Downloads/boost_1_55_0/
LIBS += "-L/home/brb/Downloads/boost_1_55_0/stage/lib/"
The following is an example to compute the 95% percentile from the T distribution (df=195) is
#include <QApplication>
#include <QLabel>

#include <boost/math/distributions/students_t.hpp>

using namespace std;
using boost::math::students_t;

int main(int argc, char *argv[])
{
    QApplication a(argc, argv);

    int df = 195;
    double alpha = .1;
    students_t dist(df);
    double T = quantile(complement(dist, alpha / 2));

    QLabel *label = new QLabel("T(.95, df=195)=" + QString::number(T));
    label->show();

    return a.exec();
}
Home directory
QDir::homePath()
In regular C++, we shall use
char * getenv("HOME")
# convert to string by std::string(getenv("HOME"))
Create a new directory/Check a directory exists or not
QDir dir("path/to/dir");
if (!dir.exists()) {
    QDir().mkdir("path/to/dir");
}
Check if a file exists or not
- http://stackoverflow.com/questions/10273816/how-to-check-whether-file-exists-in-qt-in-c
- http://doc.qt.io/qt-4.8/qfile.html
- http://doc.qt.io/qt-4.8/qfileinfo.html
Use QFileInfo class.
bool fileExists(QString path) {
    QFileInfo checkFile(path);
    // check if file exists and if yes: Is it really a file and no directory?
    if (checkFile.exists() && checkFile.isFile()) {
        return true;
    } else {
        return false;
    }
}
Qt Designer
From C++ GUI Programming with Qt book Chapter 2:
In the constructor, we call setupUi() to initialize the form. Thanks to multiple inheritance, we can access Ui::GoToCellDialog's members directly. After creating the user interface, setupUi() will also automatically connect any slots that follow the naming convention on_objectName_signalName() to the corresponding objectName's signalName() signal. In our example, this means that setupUi() will establish the following signal–slot connection:
connect(lineEdit, SIGNAL(textChanged(const QString &)),
        this, SLOT(on_lineEdit_textChanged()));
However, just like the GUI created in VBA, the text in the QLabel can be cut. So it is best not to use Qt Designer from my opinion.
Using a Designer UI File in Your Application
http://doc.qt.io/qt-4.8/designer-using-a-ui-file.html
| ui file (Direct approach) | No ui | |
|---|---|---|
| ui | <a.ui> | NA |
| header | #include "ui_a.h"
class A:public QDialog
{
private:
Ui::A *ui;
}
|
None |
| cpp | A::A(QDialog *parent)
:QDialog(parent),
ui(new Ui::A)
{
}
|
A:A(QWidget *parent)
 :QDialog(parent)
{
}
|
Cross compile Windows app on Linux
QProcess
Synchronous processing of QProcess (without freezing the gui)
Google: Qprocess synchronous use. http://stackoverflow.com/questions/11191988/qt-synchronous-processing-of-qprocess-without-freezing-the-gui
[...]
ui->status->setText("Do something with program 1");
proc1.setReadChannelMode(QProcess::SeparateChannels);
proc1.start("program 1 -args", QIODevice::ReadWrite);
connect(proc1, SIGNAL(finished(int, QProcess::ExitStatus)), this, SLOT(finishedProc1()))
[...]

void finishedProc1()
{
   ui->status->setText("Do something with program 2");
   proc2.setReadChannelMode(QProcess::SeparateChannels);
   proc2.start("program 2 -args", QIODevice::ReadWrite);
   connect(proc2, SIGNAL(finished(int, QProcess::ExitStatus)), this, SLOT(finishedProc2()))
}

void finishedProc2()
{
  [...]
}
QProcess: Destroyed while process is still running
If I manually clicked the 'x' button to close an application, I will get this message in Qt-Creator output window.
How to solve this problem?
Reading the system() command output
Use QProcess. See this post.
QProcess process;
process.start(/* command line stuff */);
process.waitForFinished(-1); // will wait forever until finished

QString stdout = process.readAllStandardOutput();
QString stderr = process.readAllStandardError();
Example Redirect Real-Time Standard Output to QTextEdit
http://www.codeprogress.com/cpp/libraries/qt/showQtExample.php?index=474&key=QProcessRedirectOutput
Example from Chapter 12 of FQD
The way the designer form was used in the code is exactly the same as the calculator example (Single Inheritance Approach).
1. We have to change line 62 from
arguments << "-tr" << "MYTR" << "/processdialog.ui";
to
arguments << "-tr" << "MYTR" << "../processes/processdialog.ui";
So the code looks like
#include <QProcess>

#include "processdialog.h"

ProcessDialog::ProcessDialog() : QDialog()
{
  process = 0;

  ui.setupUi( this );

  connect( ui.uicButton, SIGNAL(clicked()), this, SLOT(runUic()) );
}

void ProcessDialog::runUic()
{
  ui.uicButton->setEnabled( false );
  ui.textEdit->setText( "" );

  if( process )
    delete process;
  process = new QProcess( this );

  connect( process, SIGNAL(error(QProcess::ProcessError)), this, SLOT(handleError(QProcess::ProcessError)) );
  connect( process, SIGNAL(finished(int,QProcess::ExitStatus)), this, SLOT(handleFinish(int,QProcess::ExitStatus)) );
  connect( process, SIGNAL(readyReadStandardError()), this, SLOT(handleReadStandardError()) );
  connect( process, SIGNAL(readyReadStandardOutput()), this, SLOT(handleReadStandardOutput()) );
  connect( process, SIGNAL(started()), this, SLOT(handleStarted()) );
  connect( process, SIGNAL(stateChanged(QProcess::ProcessState)), this, SLOT(handleStateChange(QProcess::ProcessState)) );

  QStringList arguments;
  arguments << "-tr" << "MYTR" << "../processes/processdialog.ui";
  process->start( "uic", arguments );
}
void ProcessDialog::handleError( QProcess::ProcessError error ) {}
void ProcessDialog::handleFinish( int code, QProcess::ExitStatus status ) {}
void ProcessDialog::handleReadStandardError() {}
void ProcessDialog::handleReadStandardOutput() {}
void ProcessDialog::handleStarted() {}
void ProcessDialog::handleStateChange( QProcess::ProcessState state ) {}
2. In output, it shows
New status: Starting    <= connect( process, SIGNAL(stateChanged(QProcess::ProcessState)), this, SLOT(handleStateChange(QProcess::ProcessState)) );
...
New status: Running     <= connect( process, SIGNAL(stateChanged(QProcess::ProcessState)), this, SLOT(handleStateChange(QProcess::ProcessState)) );
Started                 <= connect( process, SIGNAL(started()), this, SLOT(handleStarted()) );

New status: Not running <= connect( process, SIGNAL(stateChanged(QProcess::ProcessState)), this, SLOT(handleStateChange(QProcess::ProcessState)) );
Normal exit(0)
Chapter 11.4 of The Book of Qt 4
Synchronous use of QProcess: showtar example
Note: for some reason, when I change the 'tar' command to 'ls -l' command and argv[1] to be some directory, the command does not give an output??
#include <QtGui>

int main(int argc, char* argv[])
{
  if (argc < 2)
    return 1;

  QApplication app(argc, argv);

  QProcess tar;
  QStringList env = QProcess::systemEnvironment();
  env.replaceInStrings(QRegExp("^LANG=(.*)"),"LANG=C");
  tar.setEnvironment(env);
  QStringList args;
  args << "tf" << argv[1];
  tar.start("tar", args);
  QByteArray output;
  while ( tar.waitForReadyRead() )
    output += tar.readAll();
  QStringList entries = QString::fromLocal8Bit(output).split('\n');
  entries.removeLast();

  QListWidget w;

  QIcon fileIcon = app.style()->standardIcon(QStyle::SP_FileIcon);
  QIcon dirIcon = app.style()->standardIcon(QStyle::SP_DirClosedIcon);

  foreach(QString entry, entries) {
    if (entry.endsWith('/'))
      new QListWidgetItem(dirIcon, entry, &w);
    else
      new QListWidgetItem(fileIcon, entry, &w);
  }

  w.show();
  return app.exec();
}
Asynchronous use of QProcess: Lineparseprocess example
// main.cpp
#include <QtGui>
#include "lineparserprocess.h"

int main(int argc, char* argv[])
{
  if (argc < 2) return 1;
  QApplication app(argc, argv);
  QListWidget w;
  LineParserProcess process(&w);
  process.setWorkingDirectory(QString::fromLocal8Bit(argv[1]));
  process.start("ls", QStringList() << "-Rl" );
  w.show();
  return app.exec();
}

// lineparserprocess.cpp
#include <QtGui>
#include <QDebug>
#include "lineparserprocess.h"

LineParserProcess::LineParserProcess(QListWidget *w, QObject *parent)
  : QProcess(parent), listWidget(w)
{
  connect(this, SIGNAL(readyRead()), SLOT(readData()));
  QStringList env = systemEnvironment();
  env.replaceInStrings(QRegExp("^LANG=(.*)"),"LANG=C");
  setEnvironment(env);
}

void LineParserProcess::readData()
{
  QByteArray line;
  while (!(line = readLine()).isEmpty())
     new QListWidgetItem(QString::fromLocal8Bit(line), listWidget);
}
Show table text file in QTableWidget
http://qt-project.org/forums/viewthread/31706
#include <QApplication>
#include <QMainWindow>
#include <QTableWidget>
#include <QTableWidgetItem>
#include <QFile>
#include <QString>
#include <QStringList>
#include <QTextStream>
#include <QMessageBox>
#include <QDebug>

int main(int argc, char **argv)
{
    QApplication app(argc, argv);
    QMainWindow *window = new QMainWindow();
    QMessageBox msg;

    QFile file("Data.txt");
    if(!file.open(QIODevice::ReadOnly))
    msg.information(0,"Error!","Error opening file!",0);

    QTextStream in(&file);
    QStringList *loadCsv;
    QTableWidget *myTable=new QTableWidget();

    int rowsCount = 1;

    while(!in.atEnd())
    {
        loadCsv = new QStringList(in.readLine().split(";"));
        myTable->setRowCount(rowsCount);
        myTable->setColumnCount(loadCsv->size());
        for(int col = 0; col < loadCsv->size(); ++col)
        {
            QTableWidgetItem *items= new QTableWidgetItem(loadCsv->at(col));
            myTable->setItem((rowsCount - 1), col, items);
        }
        rowsCount++;
        delete loadCsv;
    }
    window->setCentralWidget(myTable);
    window->show();
    return app.exec();
}
and the Data.txt file
bq. John Kl;34;1335532;CA;0444344
Kuma jo;54;44432;NY;0322355
Lebal ho;24;44022;NY;0110004
Creating spinning image/progress spinner, progressbar
- http://qt-project.org/forums/viewthread/25335
- http://stackoverflow.com/questions/13393174/create-spin-progress-bar-in-qt
- http://kokkachiprogramming.wordpress.com/2012/11/07/how-to-use-qt-qprogressbar-to-show-busyindefinite-status/
- https://github.com/mojocorp/QProgressIndicator (java like)
- https://sourceforge.net/projects/qroundprogressbar/
- FatRat - an open source download manager for Linux written in C++ and Qt
- qBittorrent - uTorrent like software written in Qt
- Qt Output Parser for tar, zip, unzip, unrar, 7z with a compression/extraction progress indicator
- A progress bar with an expandable details when we install new packages in Ubuntu (2x Ubuntu Mate and 1x Ubuntu Unity)
Note that the icon (box with a '+' sign) is located in /usr/share/icons/Humanity/status/48/aptdaemon-add.svg.
Extract files
QuaZip to extract file and show its progress in QProgressDialog
How Win32 Disk Imager know the progress
// from v0.9 <mainwindow.cpp>
void MainWindow::on_bWrite_clicked()
{
    progressbar->reset();

    hFile = getHandleOnFile(LPCWSTR(leFile->text().data()), GENERIC_READ);
    *sectorsize = (unsigned long long)diskgeometry.Geometry.BytesPerSector;
    numsectors = getFileSizeInSectors(hFile, sectorsize);

    progressbar->setRange(0, (numsectors == 0ul) ? 100 : (int)numsectors);
    lasti = 0ul;
    timer.start();
    for (i = 0ul; i < numsectors && status == STATUS_READING; i += 1024ul)
    {
        sectorData = readSectorDataFromHandle(hFile, i, (numsectors - i >= 1024ul) ? 1024ul:(numsectors - i), sectorsize);
        ....
        delete sectorData;
        sectorData = NULL;

        QCoreApplication::processEvents();
        if (timer.elapsed() >= 1000)
        {
            mbpersec = (((double)sectorsize * (i - lasti)) * (1000.0 / timer.elapsed())) / 1024.0 / 1024.0;
            statusbar->showMessage(QString("%1MB/s").arg(mbpersec));
            timer.start();
            lasti = i;
        }

        progressbar->setValue(i);
        QCoreApplication::processEvents();
    }
    ....
    progressbar->reset();
}
See also
- QProgressDialog A QProgressBar in the status bar of your main window is often an alternative to a modeless progress dialog. See the example findfiles in Qt Creator -> Welcome -> Examples.
- Staying Responsive during Intensive Processing
Running a terminal process
Google: qprogressbar readyReadStandardOutput OR qprogressbar shell script
- http://stackoverflow.com/questions/27749659/how-to-link-a-qprogressbar-to-a-terminal-process-percentage
- The shell script needs to report its progress (eg a number). Qt will parse the output, extract the progress percentage and change the progressbar accordingly. See this post or this post
progressbar->setvalue(download->readAll().toInt());
- Use QRegExp or QRegularExpression (Qt5) to extract digits and convert only them. toInt() supports checking if a conversion error has occured, see documentation
- Run a command needs a sudo password
echo sudoPass | sudo -S COMMAND
- See examples of readyReadStandardOutput() in Qt books (such as an intro to design patters in c++ with qt4).
QApplication::processEvents() - Staying Responsive during Intensive Processing
http://www.informit.com/articles/article.aspx?p=1405544&seqNum=3
Download, QNetworkAccessManager, QNetworkReply
- https://wiki.qt.io/Download_Data_from_URL or http://www.codeprogress.com/cpp/libraries/qt/qtClasses.php?item=QNetworkAccessManager (work after we correct the link from http to https!!. But in general https, like from github.com, does not work)
- VoidRealms
- http://www.java2s.com/Code/Cpp/Qt/QNetworkAccessManager.htm QNetworkAccessManager
$ ./DownloadfromURL https://github.com/arraytools/toy/archive/master.zip
qt.network.ssl: QSslSocket: cannot resolve SSLv2_client_method
qt.network.ssl: QSslSocket: cannot resolve SSLv2_server_method
Download of https://github.com/arraytools/toy/archive/master.zip succeded (saved to master.zip)
$ cat master.zip
<html><body>You are being <a href="https://codeload.github.com/arraytools/toy/zip/master">redirected</a>.</body></html>
# Actually the downloaded file is not right!
- Qt5 tutorials from bogotobogo.com
- 60. QHttp - Downloading Files (idea: QHttp is outdated)
- 61. QNetworkAccessManager and QNetworkRequest - Downloading Files (can show file's header and download error message)
- 62. Qt's Network Download Example - Reconstructed SSL is considered (Tested on Qt 5.7). Note that https works for text files but not for binary files (github server). The tarball from NIH also works if there is no redirection.
$ ./NetworkDownloadExample https://raw.githubusercontent.com/arraytools/bdge/master/install_rnaseq.sh  # works
qt.network.ssl: QSslSocket: cannot resolve SSLv2_client_method
qt.network.ssl: QSslSocket: cannot resolve SSLv2_server_method
Download of https://raw.githubusercontent.com/arraytools/bdge/master/install_rnaseq.sh succeeded (saved to install_rnaseq.sh)
$ ls -l install_rnaseq.sh
-rw-r--r-- 1 brb brb 6694 Sep 29 12:21 install_rnaseq.sh

$ ./NetworkDownloadExample https://github.com/arraytools/bdge/archive/master.zip # not works
qt.network.ssl: QSslSocket: cannot resolve SSLv2_client_method
qt.network.ssl: QSslSocket: cannot resolve SSLv2_server_method
Download of https://github.com/arraytools/bdge/archive/master.zip succeeded (saved to master.zip)
$ ls -l master.zip
-rw-r--r-- 1 brb brb 120 Sep 29 12:16 master.zip

$ # rebuild Qt 5.7.0 on Linux Mint with -openssl-linked. Then test the binary on Ubuntu 12.04 machine.
$ # no more complains of "qt.network.ssl: QSslSocket: cannot resolve SSLv2_client_method" and the file can be downloaded completely
$ ./NetworkDownloadExample https://ftp-trace.ncbi.nlm.nih.gov/sra/sdk/2.7.0/sratoolkit.2.7.0-ubuntu64.tar.gz
Download of https://ftp-trace.ncbi.nlm.nih.gov/sra/sdk/2.7.0/sratoolkit.2.7.0-ubuntu64.tar.gz succeeded (saved to sratoolkit.2.7.0-ubuntu64.tar.gz)
$ ls -lth sratoolkit*
-rw-rw-r-- 1 mli mli 61M Sep 29 15:37 sratoolkit.2.7.0-ubuntu64.tar.gz
- 63. QNetworkAccessManager - Downloading Files with UI and QProgressDialog (best code; it can handle URL redirection)
- Download http with a QProgressBar (not a QProgressDialog)
Google: how to use qt download binary files https with progress bar
Here we want to ensure
- https instead of http
- binary file (nothing special)
- progress bar (use QProgressDialog)
SSL
- Internal link
- Check SSL configuration
- QSslSocket: cannot resolve SSLV2_client_method The problem has solved by compiling openssl as shared library.
Github and take-home messages
http://stackoverflow.com/questions/20774727/how-does-github-releases-generate-archive-filenames
$ curl --head https://github.com/arraytools/bdge/archive/master.zip
HTTP/1.1 302 Found
Server: GitHub.com
Date: Sun, 02 Oct 2016 19:14:48 GMT
Content-Type: text/html; charset=utf-8
Status: 302 Found
Cache-Control: no-cache
Vary: X-PJAX
Location: https://codeload.github.com/arraytools/bdge/zip/master
X-UA-Compatible: IE=Edge,chrome=1
Set-Cookie: logged_in=no; domain=.github.com; path=/; expires=Thu, 02 Oct 2036 19:14:48 -0000; secure; HttpOnly
Set-Cookie: _gh_sess=eyJzZXNzaW9uX2lkIjoiMGUxMTZhOTBkZTUyZDBmNGQ2ODgyNDAwMDhmMzBlYTEiLCJzcHlfcmVwbyI6ImFycmF5dG9vbHMvYmRnZSIsInNweV9yZXBvX2F0IjoxNDc1NDM1Njg4fQ%3D%3D--65e86f9f830aeb6d760165f11a2a668e96729802; path=/; secure; HttpOnly
X-Request-Id: 00cf137d95b9d718f8fe3e8c90502993
X-Runtime: 0.011499
Content-Security-Policy: default-src 'none'; base-uri 'self'; block-all-mixed-content; child-src render.githubusercontent.com; connect-src 'self' uploads.github.com status.github.com api.github.com www.google-analytics.com github-cloud.s3.amazonaws.com wss://live.github.com; font-src assets-cdn.github.com; form-action 'self' github.com gist.github.com; frame-ancestors 'none'; frame-src render.githubusercontent.com; img-src 'self' data: assets-cdn.github.com identicons.github.com collector.githubapp.com github-cloud.s3.amazonaws.com *.githubusercontent.com; media-src 'none'; script-src assets-cdn.github.com; style-src 'unsafe-inline' assets-cdn.github.com
Strict-Transport-Security: max-age=31536000; includeSubdomains; preload
Public-Key-Pins: max-age=5184000; pin-sha256="WoiWRyIOVNa9ihaBciRSC7XHjliYS9VwUGOIud4PB18="; pin-sha256="RRM1dGqnDFsCJXBTHky16vi1obOlCgFFn/yOhI/y+ho="; pin-sha256="k2v657xBsOVe1PQRwOsHsw3bsGT2VzIqz5K+59sNQws="; pin-sha256="K87oWBWM9UZfyddvDfoxL+8lpNyoUB2ptGtn0fv6G2Q="; pin-sha256="IQBnNBEiFuhj+8x6X8XLgh01V9Ic5/V3IRQLNFFc7v4="; pin-sha256="iie1VXtL7HzAMF+/PVPR9xzT80kQxdZeJ+zduCB3uj0="; pin-sha256="LvRiGEjRqfzurezaWuj8Wie2gyHMrW5Q06LspMnox7A="; includeSubDomains
X-Content-Type-Options: nosniff
X-Frame-Options: deny
X-XSS-Protection: 1; mode=block
Vary: Accept-Encoding
X-Served-By: f0ee042be143fcba78041fc2f69c0aa7
X-GitHub-Request-Id: AD424587:19B3:3DABBBD:57F15CA8

$ # Write output to a file named as the remote file, follow redirects and use the header-provided filename:
$ curl -LOJ https://github.com/arraytools/bdge/archive/master.zip
  % Total    % Received % Xferd  Average Speed   Time    Time     Time  Current
                                 Dload  Upload   Total   Spent    Left  Speed
100   120    0   120    0     0    269      0 --:--:-- --:--:-- --:--:--   270
100 54475  100 54475    0     0  50078      0  0:00:01  0:00:01 --:--:--  287k
curl: Saved to filename 'bdge-master.zip'
The take-home messages:
- Github will redirect the download url (https://github.com) to another real url (https://codeload.github.com)
- If we use the real url in the Qt code, it will download the binary zip file successfully
- If we use the original url obtained from the github.com, our code has to be able to redirect the url. If it can, the final zip file can be downloaded successfully; if not, the downloaded file is just an HTML document.
Cpp and libcurl
- https://techoverflow.net/blog/2013/03/15/c-simple-http-download-using-libcurl-easy-api/ The code needs to be modified for binary files.
$ dpkg -l libcurl* | grep '^i'
ii  libcurl3:amd64             7.35.0-1ubuntu2.9 amd64 easy-to-use client-side URL transfer library (OpenSSL flavour)
ii  libcurl3-gnutls:amd64      7.35.0-1ubuntu2.9 amd64 easy-to-use client-side URL transfer library (GnuTLS flavour)
ii  libcurl4-openssl-dev:amd64 7.35.0-1ubuntu2.9 amd64 development files and documentation for libcurl (OpenSSL flavour)

$ dpkg -l libssl* | grep '^i'
ii  libssl-dev:amd64   1.0.1f-1ubuntu2.21  amd64        Secure Sockets Layer toolkit - development files
ii  libssl-doc         1.0.1f-1ubuntu2.21  all          Secure Sockets Layer toolkit - development documentation
ii  libssl1.0.0:amd64  1.0.1f-1ubuntu2.21  amd64        Secure Sockets Layer toolkit - shared libraries
ii  libssl1.0.0:i386   1.0.1f-1ubuntu2.21  i386         Secure Sockets Layer toolkit - shared libraries
- How to download a file by libcurl Binary file?
Adding a child to QMainWindow
This is related to the error message Attempting to set QLayout "" on MainWindow "", which already has a layout. See
- http://qt-project.org/forums/viewthread/19647
- http://stackoverflow.com/questions/9290767/adding-child-in-qmainwindow
Shape-Changing Dialogs
Extension Dialogs
- http://doc.qt.digia.com/qq/qq03-extension-dialogs.html
- http://www.informit.com/articles/article.aspx?p=1405224
Multi-page dialogs
QTabWidget and QToolBox
Dialog examples of successful installation
- VirtualBox - install a new version of extension pack
- JDK
qtextedit change font individual paragraph
http://stackoverflow.com/questions/27716625/qtextedit-change-font-of-individual-paragraph-block
Collapsible/Expandable Group Box
- QToolBox - a column of tabbed widget items (Cf. The QToolButton class provides a quick-access button to commands or options, usually used inside a QToolBar).
- http://www.programmershare.com/1297423/, or http://qtforum.org/article/11286/qtoolbox-containing-vertical-tabs.html (working, use QToolBox that is a vertical tabs, see my bitbucket qt/example/drawer)
- http://stackoverflow.com/questions/18575656/with-qtoolbox-which-setting-to-have-page-be-only-its-content-size, or http://stackoverflow.com/questions/11077793/is-there-a-standard-component-for-collapsible-panel-in-qt (working, not use QToolBox, use a customized QWidget, each item can work independently, see my bitbucket qt/example/toolbox). This example is closer to what we see in Ubuntu's Software Updater since each items are independent.
- http://www.qtcentre.org/threads/8400-Suggestions-for-collapsible-group-boxes (just instruction)
- https://bugreports.qt.io/browse/QTBUG-8058 (tree, not pretty but fine)
- http://www.codeproject.com/Articles/7534/Collapsible-Group-Box (VBA form)
Resize a window to fit its contents
- Automatic resize to fit the elements in a Dialog by sizeHint()/minimumSizeHint() or adjustSize()
- http://stackoverflow.com/questions/13731284/qt-widget-with-minimal-size-to-fit-all-contents
Screen
Place widget in the center of screen
#include <QDesktopWidget>
...
Widget w;
w.move(QApplication::desktop()->screen()->rect().center() - w.rect().center());
w.show();
Another example is still based on QDesktopWidget
QRect rec = QApplication::desktop()->screenGeometry();
height = rec.height();
width = rec.width();
Choose the primary display when multiple monitors are used.
Query current window size
- http://doc.qt.io/qt-4.8/qwidget.html#size-prop
- https://forum.qt.io/topic/20207/get-current-window-size
QFontMetrics
Font's baseline in y-axis is not on top. It is on bottom. See the image explanation below.
height() = ascent() + descent() + 1
- Qt 字体大小的计算
- Qt5官方demo解析集36——Wiggly Example
- http://qtdebug.com/Paint-Base.html Chinese characters (e.g. 太极) can be shown on Qt widget too.
- QPainter 類別 - 文字繪製
Control the application font (and size)
Qt fonts have different sizes on different systems
QFont _Font("Tahoma", 9);
QApplication::setFont(_Font);
Resource file
Create a resource file
For example, if we want to include an image as a background for QTextEdit, then we can do put the following in <main.cpp>
#include <QtGui>

int main(int argc, char **argv)
{
     QApplication app(argc, argv);

     QTextEdit* edit = new QTextEdit();
     edit->setWindowTitle("QTextEdit Background Image");

     edit->setStyleSheet("background-image: url(:/image/cherryblossom_pink.jpg)");

     // the following 4 lines are playing with font
     edit->setTextColor(QColor("white"));
     edit->setFont (QFont ("Courier", 20));
     edit->setText("Can you see me?");
     edit->setGeometry(100,100, 480, 272);

     edit->show();
     return app.exec();
}
The image file <cherryblossom_pink.jpg> can be (not necessary) in the source directory.
To add a resource file
- right click project name and choose 'add new'
- choose 'Qt resource file'. Enter 'resource' for the resource file name (Qt will add .qrc as ext name)
- click 'Add Prefix'. Type '/image' for instance.
- click 'Add file'. It will open a file explorer for us to browse files we want.
- We can refer to this image file by adding colon, prefix and file name such as the above example.
The image file will part of executable file. We can access the file at run time. We can add any files in the resource file. The prefix mechanism is just a way to organize these files when we want to refer them in our code.
If the image is used as an icon, we can do like here
QIcon(":/image/simple-triangle.jpg")
Re-compile resource file
If some files in the resource got changed, it won't be reflected on the next project build.
To fix the problem, we can open the qrc file in a text editor (Or right select the qrc file in Qt Creator -> Open with -> Plain Text Editor) and do a non-functional change. Save and then rebuild the project. See this post.
Search files in a directory (QDir and QStringList)
#include <QApplication>
#include <QStringList>
#include <QDir>
#include <QtDebug>
int main(int argv, char **args)
{
   QApplication app(argv, args);

   QStringList nameFilter("*.fastq");
   QDir directory("/home/brb/Anders2013small");
   QStringList files = directory.entryList(nameFilter);
   for (int i = 0; i < files.size(); ++i)
       qDebug() << files.at(i) ;

   return app.exec();
}
QTimer, QBasicTimer, QObject::timerEvent(QTimerEvent * event)
- Timer
- QTimer. The example is from VoidRealms in Youtube.
// main.cpp
#include <QtCore/QCoreApplication>
#include "mytimer.h"
int main(int argc, char *argv[])
{
    QCoreApplication a(argc, argv);
    MyTimer mTimer;
    return a.exec();
}

// mytimer.cpp
#include "mytimer.h"
#include <QtCore>
#include <QDebug>
MyTimer::MyTimer()
{
    timer = new QTimer(this);
    connect(timer, SIGNAL(timeout()), this, SLOT(MySlot()));
    timer->start(1000);
}

void MyTimer::MySlot()
{
    qDebug() << "Timer executed"; // print out every 1 second
}
Wiggly example
// wigglywidget.cpp
WigglyWidget::WigglyWidget(QWidget *parent)
    : QWidget(parent)
{
    ...
    timer.start(60, this); // every 60 milliseconds
}

void WigglyWidget::paintEvent(QPaintEvent * /* event */)
{

}

void WigglyWidget::timerEvent(QTimerEvent *event)
{
    if (event->timerId() == timer.timerId()) {
        ++step;
        update(); // update the widget
    } else {
	QWidget::timerEvent(event);
    }
}

// dialog.cpp
Dialog::Dialog(QWidget *parent, bool smallScreen)
    : QDialog(parent)
{
    WigglyWidget *wigglyWidget = new WigglyWidget;
    ...
    connect(lineEdit, SIGNAL(textChanged(QString)),
            wigglyWidget, SLOT(setText(QString)));
    ...
}
QRegExp
#include <QApplication>
#include <QString>
#include <QStringList>
#include <QRegExp>
#include <QDebug>
int main(int argc, char *argv[])
{
   QString str;
   str = QString("-o Serum") ;
   QStringList strlist;
   strlist = str.split(" ");
   QRegExp rx("Ser");
   foreach (const QString &str, strlist) {
       qDebug() << "str " << str ;
       qDebug() << "indexIn " << rx.indexIn(str);
        }
   qDebug() << "strlist.indexOf('Serum')" << strlist.indexOf("Serum");

   if (strlist.indexOf("-p") < 0 && strlist.indexOf("--num-threads")) strlist << "-p 5";
   foreach (const QString &str, strlist) {
       qDebug() << str ;
        }
   qDebug() << strlist.join(" ");
}
gives an output
str  "-o"
indexIn  -1
str  "Serum"
indexIn  0
strlist.indexOf('Serum') 1
"-o"
"Serum"
"-p 5"
"-o Serum -p 5"
Query number of threads in CPU
#include <QThread>
....
qDebug() << QThread::idealThreadCount();
Sockets
Some application examples
- Sending images (FQD, Chapter 14)
- Trip planner (C++GUIQt4, Chapter 15)
- (TBQt4, Chapter 11.5)
- (DesignPatters, not covering)
- (AQtPr, not covering)
- Trip palnner
Request sudo password/Authentication
Below are screenshots of the GUI how Ubuntu requests the password from users.
Note the the 3rd icon is available in /usr/share/icons/Humanity/apps/48/stock_keyring.svg (at least Ubuntu 14.04).
In Ubuntu OS, a simple way to create a dialog is by using the Zenity command (pre-installed in Ubuntu). See howtogeek.
Qt Graphics, Display
Qt Graphics with Multiple Displays on Embedded Linux. It discusses eglfs, Wayland and X11.
Qt from git on the Tinkerboard (with Wayland). Ignore X11 and focus on running Qt applications via eglfs with the DRM/KMS backend.
https://wiki.ubuntu.com/DesktopExperienceTeam/ApplicationMenu
New QtLabs PDF module. PDFium the open-source PDF rendering engine which is used for viewing PDFs in Chromium is available.
Serialization
SourceForge
https://sourceforge.net/directory/os:linux/?q=Qt
Qt-Apps.org
http://qt-apps.org/ is a good source to find open source projects based on Qt.
Graphics
- Picture Wall
- 2d transformation (works, but kind of simple ...)
- EasyPaint (Poland langauge)
- Boat scenario (cannot compile)
- Q diagram (cannot compile)
Scientific
- http://qtdebug.com/Paint-RealTime-Curve.html 实时动态曲线 (DIY)
- Unipro UGENE (cannot compile)
- Veusz which depends python2, PyQt (Qt4, SIP) and numpy.
- arrowmatcher (not English)
- QtiPlot (require Python)
- MIFit (require Python)
- Tulip (no .pro file, use 'make')
Sound Application
Qt Widget
- AnalogWidgets It builds on my Beaglebone black after I edit the file <Flags.pri> to remove lines containing "-march=core2" and "-mfpmath=sse". Just run 'qmake' and 'make' and it'll build successfully. The only problem is the BBB's screen is too small so I have to kill it from another way.
- Virtual keyboard
- Image cropper
- QProgressIndicator
- QProg
Qt games
- http://qt-project.org/wiki/Qt_Based_Games
- Breakout game
- 2048-Qt
- JAG - Just Another Game Qt-based 2d Match-Three Game
Webkit Browser
RTOS
Trouble Shooting
Application crashed
On Qt Creator, we will get a message 'The program has unexpectedly finished'.
On a terminal, we will get a message 'Segmentation fault (core dumped)'.
Some hints:
Linker error: undefined reference to vtable for
Rerun qmake command. See http://stackoverflow.com/questions/2555816/qt-linker-error-undefined-reference-to-vtable/3650758#3650758
Note that the Makefile created using qmake is under the source directory while the Makefile created by Qt Creator is under the Debug/Release. So we need to cp the Makefile to the appropriate directory OR rm Makefile before we rebuild the project in Qt Creator.
QWidget no such file or directory
Make sure .pro file includes the line
QT += gui
Undefined reference to vtable
Close the project in Qt-Creator. Open a terminal, cd to the project directory and run
qmake -project
qmake
make
If the main program contains class definitions w/ SIGNAL & SLOT, you may get the same error undefined reference to `vtable for MyWidget'. Follow the instruction in this post.
It looks like moc doesn't generate code for your QObject because you declare it in the .cpp file. The easiest way to fix that is to move the declaration of MyWindow to a header, and add the header to the HEADERS list, in the .pro file:
HEADERS += yourheader.h
Then rerun qmake.
Gtk-CRITICAL **: IA__gtk_widget_style_get: assertion `GTK_IS_WIDGET (widget)' failed
See this post from stackoverflow.com.
Couldn't register with accessibility bus:
Did not receive a reply. Possible causes include: the remote application did not send a reply, the message bus security policy blocked the reply, the reply timeout expired, or the network connection was broken.
One solution is to open a terminal, run the following line
export NO_AT_BRIDGE=1
and finally run the application from the same terminal.
