Udoo
Prime
Hardware
This open source hardware board is powered by Freescale i.MX6 Dual or Quad with 1GB RAM, as well as Atmel SAM3 Cortex M3 MCU (Arduino Due) that provides access to Arduino compatible headers.
- SoC – Freescale i.MX6 ARM Cortex-A9 CPU Dual/Quad Core @ 1GHz + Vivante GPU
- lscpu shows armv7l. The "l" means little endian byte order. The Raspberry Pi 3 and 4 have 64-bit CPUs (ARMv8), but Raspbian, the official OS for the Raspberry Pi, is a 32-bit operating system, so it uses the armv7l architecture.
- MCU (MicroController Unit) – Atmel SAM3X8E ARM Cortex-M3 (same as Arduino Due)
- System Memory – 1GB DDR3
- MicroSD, mini USB and mini USB OTG, 2x USB type A (x2) and USB connector, HDMI & LVDS out, Analog Audio and Mic, Ethernet & Wifi module, GPIO, Camera Connection, 12V power.
Documentation
- Starting manual
- http://www.udoo.org/docs/Arduino_DUE_(Sam3x)/Overview.html
- Mechanical Specs
- Schematics
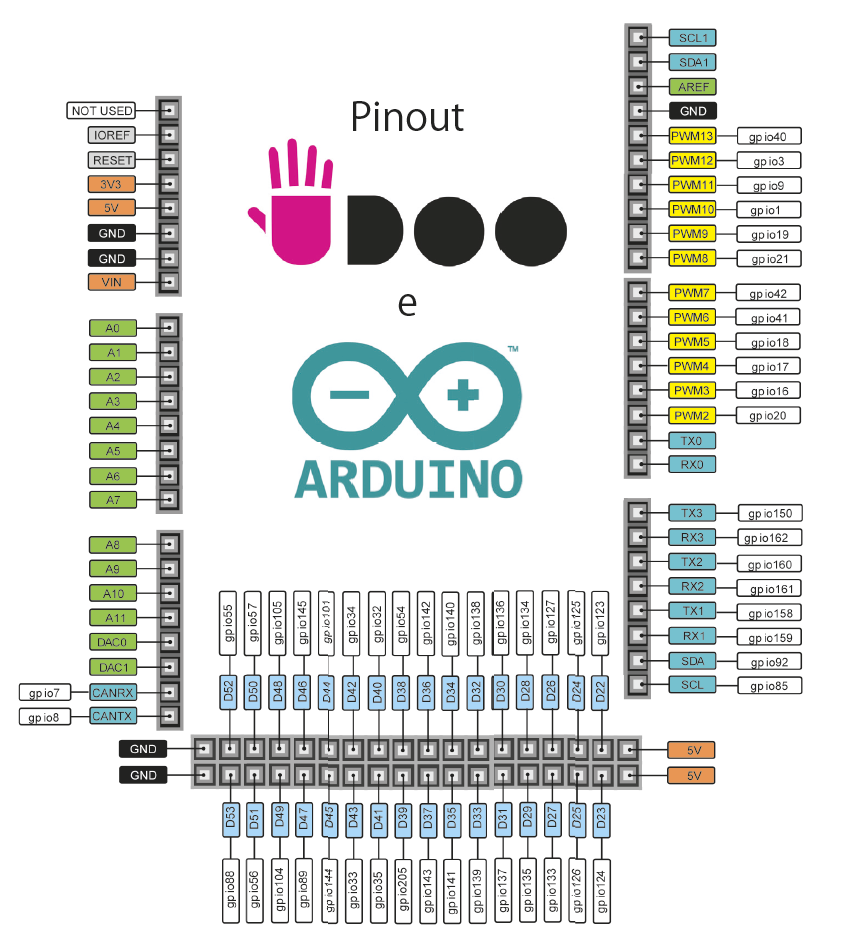
- Pinout explained (pdf)
- Pinout (png) from open-electronics.org.
About SBC and USB ports
- Since SBC does not have a large storage, we tend to plug in a flash drive/microSD card to extend its storage. It is important to use a Linux partition format like ext4 when we format the drive. If we use FAT32 (good for transfer files to/from Windows OS) for example, we may run into an error of 'permission denied' when we run some command like './configure'.
- I found if I plug in an external portable USB drive to UDOO, the whole OS will crash. Probably the portable USB drives use too much power compared to flash drives.
- If I connect my KOBO reader, UDOObuntu does not respond to it. My Chromebox and Raspi2B Mate 15 do not have this problem.
Jumps, microUSB, extbat
- http://www.udoo.org/docs/Android/UDOO_Switch_Between_Adb_Debug_And_ADK_Connection
- http://udoo.org/download/files/Documents/UDOO_Starting_Manual_beta0.4_11_28_2013.pdf
- http://elinux.org/UDOO_usb_debug
- http://elinux.org/UDOO#Jumpers
- http://udoo.org/forum/threads/adding-a-rtc.103/
- http://udoo.org/forum/threads/wrong-connector-on-battery-holder-for-rtc.1270/
       +------------------------------------+
       |                                    |
       |                                    |
       |                                    |
       |                                    |
ExtBat |                                    |
       |-+                                  |
 RST   | | J18                              |
       |-+                                  |
 pwd   | | J22                              |
       |-+                 DC-in            |
       |                                    |
       |       J24 J2 J16                   |
       |    CN6  CN3                        |
       |    +--+ +--+                       |
       |    |  | |  |                       |
       +------------------------------------+
Jumpers
- J2: it powers up otg bus (needs to be plugged to work with Android ADB)
- J16: it resets Arduino.
- J18: if plugged, it allows the microusb connector cn3 to communicate with the main processor - imx6; unplugged, cn3 communicates with Arduino.
- J22: it erases the Arduino sketch.
Wifi module - Ralink 5370
The module is attached is Udoo through a screw. See

UDOO x86
(Advanced) Intel Celeron N3160. Braswell (1.60GHz with 2.24GHz burst) (64-bit) quad-core; 6W TDP.
Raspberry Pi 3 vs. UDOO X86 Advanced vs. Raspberry Pi Zero vs. ODROID-XU4
Celeron N3160 (Advanced) vs Pentium N3710 (Ultra) cpu-world and cpu-monkey
A comparable product is Up Squared which is based on Intel Apollo Lake Celeron N3350 or Pentium N4200.
The arduino is Arduino 101.
First installation May 2017
Documentation
https://www.udoo.org/docs-x86/
Update BIOS
- https://www.udoo.org/docs-x86/Advanced_Topics/UEFI_update.html
- https://www.udoo.org/forum/threads/wanted-step-by-step-instructions-on-installing-ubuntu-to-sd-card.6911/#post-26313 Fix SD card cannot be written.
- (2019 Nov) Update from 1.02 (04/21/2017) to 1.06 (01/07/2019). The zip file does not have another folder. So before unzip it, create another folder. Note: Windows 10 does not work. I did it on Ubuntu 19.10 (have to install the OS first on UDoo). Copy the bios file (0B020000.106) to Linux/x64 folder and run the command sudo ./bios_updater_x64.sh 0B020000.106. The output will show the original bios version and the new bios version. This instruction still works if we did some appropriate changes.
- In the Boot Manager,
- For Ubuntu I need to use boot through Legacy Hard Drive category. The device (eMMC) name is DF4032 (32GB, SanDisk too). On Ubuntu OS, it is /dev/mmcblk0. It seems the Ubuntu installer will detect the current OS and provides several choices of how to install the new OS. I found a bug in Ubuntu 19.10 installer where it cannot let me to enter some information if I want to overwrite the existing Ubuntu 19.10.
- For Windows 10 I need to boot through EFI Boot Devices. My device name is SanDisk X110 M.2 2260 256GB.
- The order of "Legacy Hard Drive" and "EFI Boot Devices" changes according to the device you selected last time to boot.
- My old Patriot USB drive has a problem of not being detected. Sony USB drive works fine.

M.2 SATA SSD
is 2260. See M.2 SSD Standards, Official Accessories.
Android, Windows Dual boot
I have installed Android-x86 to eMMC and Windows to M2SSD. For some reason, UDOO x86 always boots to Android by default unless I click ESC ESC ... to turn on the boot manager. One way to hide the Android OS is to go to SCD and in the BOOT menu, change Boot Type from 'Dual Boot Type' to 'UEFI Boot Type'. After that, Android will not appear and Windows will be the only OS to boot from.
UDoo x86 II
https://www.udoo.org/udoo-x86/
The arduino is Arduino Leonardo.
Display
Screenshot
The lcd has a 9 inch touchscreen from SainSmart. The UDOO dual is running UDOObuntu 2.0 beta 2.


Change display resolution
As you can see the font size is too small (the resolution is 1080). So I need to use the xrandr command to change the resolution.
xrandr             # show all possible resolutions, the maximum is 8192x8192 and minimum is 240x240.
                   # the current available resolutions ranges from 640x480p up to 1920x1080p.
xrandr -s 1280x720 # the phy resol 1024x600 does not work since it is not one of the choices
Note that the 'DISP3 BG' output seems to be related to Freescale. See for example here. Google xrandr disp3 freescale.
The change works only for this session. After logout/reboot, the screen resolution goes to its default.
A permanent solution is on
- https://wiki.ubuntu.com/X/Config/Resolution
- http://askubuntu.com/questions/63681/how-can-i-make-xrandr-customization-permanent
Add new resolutions
The available resolutions does not include 800x480 which was used in other devices like the official Raspberry Pi touch display. The close one is 720x480 which makes font looks wider than it should be.
To add this resolution, see my Linux page.
More Resource
https://www.facebook.com/udooboard
Community
Benchmark
- https://wiki.archlinux.org/index.php/Benchmarking
- GPU and CPU stress test
- http://www.udoo.org/udoo-supports-full-opengl-hardware-acceleration/
- http://www.udoo.org/forum/udoo-cpu-performance-comparison-t672.html
- http://www.udoo.org/forum/udoo-mx6-overclocked-2ghz-t596.html
udooer@udoo:~$ sysbench --test=cpu --num-threads=1 --cpu-max-prime=2000 run
sysbench 0.4.12:  multi-threaded system evaluation benchmark

Running the test with following options:
Number of threads: 1

Doing CPU performance benchmark

Threads started!
Done.

Maximum prime number checked in CPU test: 2000


Test execution summary:
    total time:                          23.7552s
    total number of events:              10000
    total time taken by event execution: 23.7448
    per-request statistics:
         min:                                  2.36ms
         avg:                                  2.37ms
         max:                                  6.99ms
         approx.  95 percentile:               2.39ms

Threads fairness:
    events (avg/stddev):           10000.0000/0.00
    execution time (avg/stddev):   23.7448/0.00

udooer@udoo:~$ sysbench --test=cpu --num-threads=2 --cpu-max-prime=2000 run
sysbench 0.4.12:  multi-threaded system evaluation benchmark

Running the test with following options:
Number of threads: 2

Doing CPU performance benchmark

Threads started!
Done.

Maximum prime number checked in CPU test: 2000


Test execution summary:
    total time:                          12.3073s
    total number of events:              10000
    total time taken by event execution: 24.5942
    per-request statistics:
         min:                                  2.36ms
         avg:                                  2.46ms
         max:                                 17.47ms
         approx.  95 percentile:               2.41ms

Threads fairness:
    events (avg/stddev):           5000.0000/39.00
    execution time (avg/stddev):   12.2971/0.00

# Similar to the test from RPi
udooer@udoo:~$ sysbench --num-threads=1 --test=cpu --cpu-max-prime=20000 --validate run
sysbench 0.4.12:  multi-threaded system evaluation benchmark

Running the test with following options:
Number of threads: 1
Additional request validation enabled.


Doing CPU performance benchmark

Threads started!
Done.

Maximum prime number checked in CPU test: 20000


Test execution summary:
    total time:                          603.2334s
    total number of events:              10000
    total time taken by event execution: 603.2206
    per-request statistics:
         min:                                 60.26ms
         avg:                                 60.32ms
         max:                                 80.84ms
         approx.  95 percentile:              60.39ms

Threads fairness:
    events (avg/stddev):           10000.0000/0.00
    execution time (avg/stddev):   603.2206/0.00

udooer@udoo:~$ sysbench --num-threads=2 --test=cpu --cpu-max-prime=20000 --validate run
sysbench 0.4.12:  multi-threaded system evaluation benchmark

Running the test with following options:
Number of threads: 2
Additional request validation enabled.


Doing CPU performance benchmark

Threads started!
Done.

Maximum prime number checked in CPU test: 20000


Test execution summary:
    total time:                          301.8977s
    total number of events:              10000
    total time taken by event execution: 603.7691
    per-request statistics:
         min:                                 60.26ms
         avg:                                 60.38ms
         max:                                130.54ms
         approx.  95 percentile:              60.43ms

Threads fairness:
    events (avg/stddev):           5000.0000/0.00
    execution time (avg/stddev):   301.8846/0.01
Download and create uSD card
The download files can be found on sourceforge.net.
Create microSD from image
http://www.udoo.org/getting-started/creating-a-bootable-micro-sd-card-from-image/
sudo umount /dev/sdc*
sudo dd bs=4M if=~/Downloads/UDOObuntu_dual_v2.0beta2.img of=/dev/sdc
# take 6 minutes on a 32GB class 10 uSD card, 8.5MB/s, 2.9GB copied
sudo sync
Follow this post to extend the size of /dev/root to the SD card capacity. Note that the first command is fdisk /dev/mmcblk0 ('f' is lost there). The operations can be done in a live session (i.e. udoo is in action) similar to the Beaglebone case. Another way is to use the Udoo Configuration Tool. However, both methods do not work very well. The first method cannot boot and the second method can only extend up to 15GB. A better way is to use Gparted program (Linux OS) and work on this on another computer. Gparted allows me to fully use 32GB uSD card.
Create microSD from binaries
We first download the binaries from http://www.udoo.org/downloads/#tab2. Then we follow the instruction on elinux.org to download 4 files (file system, U-boot, Kernel and Kernel modules) and then to create the microSD card. This method works for Debian, Ubuntu, Linaro OS.
Create your own Ubuntu FS using Chroot
If we want to create an image based on ubuntu 14.04, we can follow the following posts:
- http://www.udoo.org/forum/ubuntu-lts-t1316-10.html
- http://feilipu.me/2013/11/09/udoo-ubuntu-12-04-guide/
- https://eewiki.net/display/linuxonarm/UDOO (starting from the most basic)
- https://github.com/UDOOboard?tab=repositories
My note of installing Ubuntu 14.04
- the whole process is actually quicker and easier compared to install a SD image
- chroot part seems unnecessary
- htop command shows only 39 MB/874 MB of memory is used (without any gui desktop, see also udoo.org page)
- apt-get install lxde gets lots of errors that eventually making installing lxde desktop impossible for ubuntu 14.04 OS
- gcc version is 4.8.2 for ubuntu 14.04
Compile Android from sources
Back up/Save to microSD card
Suppose my microSD card is on /dev/sdc.
sudo dd bs=1M if=/dev/sdc of=~/Udoo-backup.bin
sudo dd bs=1M if=~/Udoo-backup.bin of=/dev/sdc
u-boot
http://www.linuxjournal.com/content/handy-u-boot-trick
Serial port monitor/USB debug
- http://www.udoo.org/ProjectsAndTutorials/connecting-via-serial-cable/
- http://www.udoo.org/docs/Advanced_Setup/UDOO_Usb_Debug
minicom
On Linux, I can use minicom program to monitor serial port. We can install it by using 'sudo apt-get install minicom'.
Use sudo minicom -s to configure minicom first. Make sure the serial port is correct. For example, use /dev/ttyS0 when we use UDOO and dev/ttyUSB0 when we use external PC. The baud rate is set to 9600 8N1 and that 'Hardware flow control' is set to 'no'. Once we are done with the settings, use 'Save setup as dfl' and minicom will start up with the correct settings next time.
We shall not launch minicom immediately. We shall let Arduino IDE to finish uploading a sketch and then we can launch minicom. We can quit minicom by using Ctrl+A and z and x. If we start minicom before Arduino IDE finishes uploading a sketch, Arduino IDE will not be able to upload successfully; it will show an error 'no device found on /dev/ttyS0'.
See this post where we can use this technique to find out errors in running some system.
The boot process for UDoobuntu v1.1 and Android v4.4.
screen
It seems there is no way to exit minicom (Ctr+A Z not working) once it is used to monitor the boot process. So the screen program is a better choice.
sudo apt-get install screen
screen /dev/ttymxc3 115200

# OR run stty first before calling cat; o.w. cat won't return cursor back
stty -F /dev/ttymxc3 cs8 115200 ignbrk -brkint -icrnl -imaxbel -opost -onlcr \
     -isig -icanon -iexten -echo -echoe -echok -echoctl -echoke noflsh -ixon -crtscts
cat /dev/ttymxc3
To exit it and return to console, hit Ctrl+a k and answer 'y'.
It is interesting that when I issue cat /dev/ttymxc3 to read the temperature sketch (TMP36 sensor) it does not give my any result. But once after I run screen /dev/ttymxc3 115200, the cat command can spit out the output. But for some reason, after I use tail /dev/ttymxc3 and Ctrl+C because I got nothing back, I got the following message after I use cat /dev/ttymxc3. At this time, I got the same message even I open the Serial Monitor in Arduino IDE.
udooer@udoo:~$ cat /dev/ttymxc3
cat: /dev/ttymxc3: Device or resource busy
The solution here works.
$ lsof /dev/ttymxc3   # OR it is better 'ps -ef | grep /dev/ttymxc3' if lsof does not help
COMMAND  PID  USER    FD  TYPE DEVICE SIZE/OFF  NODE NAME
tail  18197   udooer  3r   CHR 207,19      0t0  1111 /dev/ttymxc3
$ kill -9 18197
$ cat /dev/ttymxc3
0.76 volts
25.73 degrees C
78.32 degrees F

...
$ read W < /dev/ttymxc3; read X < /dev/ttymxc3; read Y < /dev/ttymxc3; read Z < /dev/ttymxc3
$ echo $W; echo $X; echo $Y; echo $Z
25.09 degrees C
77.17 degrees F

0.74 volts
The drawback of using screen is I cannot scroll back the output directly. There is a trick to run scrollback; see cyberciti.biz. That is, click Ctrl+a [ (left square bracket) first to enter copy mode and then use Ctrl+u to scroll up or Ctrl +d to scroll down.
Note: for whatever reason, the 'screen' program is terminated.
[screen is terminating]
UDOObuntu
For some reason, the system freezes about 25 minutes (shown on htop screen). Maybe it is because the version is beta.
(Update) The 1.1 stable looks better. Froze after 1 day 12 hrs (shown from a terminal running the htop program). Since v1.1 is based on Ubuntu 12.04, the gcc is quite old (v4.6.3).
UDOOBuntu includes several pre-installed utilities such as vnc server (password is 'ubuntu'), Arduino IDE, OpenCV, ssh-server and Lubuntu Software Manager. To connect to UDOOBuntu from another machine,
xtightvncviewer udoo.local:5900   # pw: udooer
xtightvncviewer xxx.xxx.x.xxx:5901
(Update) The UDOObuntu 2.0 (beta) is more stable. Froze at 12 days. The Logout screen shows UDOObuntu 2.0 beta2 is based on Lubuntu 14.04. It has two partitions.
- Partition 1 is fat16, 32MB. dts folder (6 dtb files) and 4 files (config-`uname -r`, initrd.img-`uname -r`, System.map-`uname -r` and zImage)
- Partition 2 is ext4. It contains regular linux directories (bin, boot, debootstrap, dev, etc, ....) and initrd.img-`uname -r` file.
(Update) UDoobuntu 2.0 RC2 is up 17 days now. I use it basically like a server. Sometimes I'll call 'xtightvncviewer udoo.local:5900' to connect to its desktop since its desktop cannot show up when I use HDMI to DVI connector.
Web Control Panel
Udoobuntu provides a Dashboard to view/change the status in Udoo. Very interesting and helpful. It is a web portal.
By default the port number is 80. You can change the default port to others (e.g. 81) by using the Dashboard or the command line. See Change Web Control Panel port.
Debian Wheezy armHF
The <udoo_dual_debian_wheezy_armhf_v1.1.zip> released on 2014-04-07 is based on debian wheezy 7.4. The gcc version is 4.6.3. The web browser is Iceweasel (supports flash although it is too SLOW). Running sudo apt-get update and sudo apt-get install gcc-4.7 will result in an error.
Armbian*
- https://www.armbian.com/udoo-quad/
- https://docs.armbian.com/User-Guide_Armbian-Config/
- Armbian Quick Start Guide -> How to install to eMMC, NAND, SATA & USB/write img to USB drive and boot from USD drive.
The latest version (Armbian Bookworm CLI or Jammy Desktop) Aug 31 2023 has a problem with keyboard input. The old versions are available on the archive page https://armbian.lv.auroradev.org/archive/udoo/archive/. Bullsye 5.10.60 (CLI) works fine.
My experience on Udoo Duo (not Quad) Aug-2020
- Focal Fossa (Ubuntu 20.04.1) desktop: 2.4GB space, 272MB memory.
- Focal Fossa (Ubuntu 20.04.1) server: 1.0GB space, 80MB memory.
- The network speed is 10MB/s only
- The original root password will be asked to change. A weak password is not accepted. A new user can be created too. It also requires a long password (udoo123 works fine).
$ cat /etc/os-release
NAME="Ubuntu"
VERSION="20.04.1 LTS (Focal Fossa)"
ID=ubuntu
ID_LIKE=debian
PRETTY_NAME="Armbian 20.08 Focal"
VERSION_ID="20.04"
HOME_URL="https://www.ubuntu.com/"
SUPPORT_URL="https://help.ubuntu.com/"
BUG_REPORT_URL="https://bugs.launchpad.net/ubuntu/"
PRIVACY_POLICY_URL="https://www.ubuntu.com/legal/terms-and-policies/privacy-policy"
VERSION_CODENAME=focal
UBUNTU_CODENAME=focal
Note that the htop command can show CPU temp and freq.

Lakka
Android
General Impression
Slow and unstable. Tested on Android 4.4.2 Release Version: 4.4.2-1.0
Install Gapps in Android (new)
- http://udoo.org/forum/threads/install-google-apps.327/page-2 (tells you that you have to Enable USB debugging from Android settings -> Developer Options)
- http://www.udoo.org/docs/Android/How_To_Install_Gapps_On_UDOO_Running_Android.html
Steps:
- Download and extract Android Studio or Android Sdk
- Download gapps-kk-20140105-signed.zip
- Enable USB debugging from UDOO-Android
- Plug microUSB to OTG port (the one closest to HDMI)
- On Linux host
cd Downloads
unzip -d gapps-kk-20140105-signed gapps-kk-20140105-signed.zip
~/Android/Sdk/platform-tools/adb devices
~/Android/Sdk/platform-tools/adb remount
~/Android/Sdk/platform-tools/adb push [your_download_folder]/gapps-kk-20140105-signed/system/. /system/
Install Gapps in Android (old)
- Jelly bean (v4.2 and v4.3) and Kitkat (v4.4)
- How To Install Gapps On UDOO Running Android (official doc)
- [http://www.teamandroid.com/gapps/ (find a matched gapps from a android version). The file <gapps-jb-20130812-signed.zip> works for jelly bean version (i.e. v4.3 and 4.2).
- http://www.udoo.org/forum/install-google-apps-t327-10.html (original post)
The real sdcX number can be found by using 'df -h' command (my computer already has 2 hard disks, so a USB drive goes to /dev/sdc).
sudo umount /dev/sdc*  # Seems to cause a problem later where /dev/sdc5 does not exist

# Unpack the zip in a local temp directory.
mkdir gapps
sudo unzip gapps-jb-20130812-signed.zip -d gapps
cd gapps

sudo mkdir /mnt/sdc5
df -h # find /media/brb/data1 partition

# Mount partition 5
sudo mount /dev/sdc5 /mnt/sdc5

# See what's in /mnt/sdc5 before the operation (optional)
$ ls /mnt/sdc5
anr       app-lib      dalvik-cache  drm         media     resource-cache  user
app       app-private  data          local       misc      ssh
app-asec  backup       dontpanic     lost+found  property  system

# Rsync everything from the “system” folder in the zip file to the mounted partition.
sudo rsync -avu system/* /mnt/sdc5/

# See what's in /mnt/sdc5 after the operation (optional)
$ ls /mnt/sdc5
addon.d   app-lib       data       framework   media           ssh     usr
anr       app-private   dontpanic  lib         misc            system
app       backup        drm        local       property        tts
app-asec  dalvik-cache  etc        lost+found  resource-cache  user
brb@brb-P45T-A:~/Downloads/gapps$

# Unmount SD, put it in the UDOO, and voilà,
sudo umount /mnt/sdc5
Update:
# Before doing rsync
$ ls /mnt/sdc5
app  bin  build.prop  etc  fonts  framework  lib  lost+found  media  usr  vendor  xbin

$ sudo rsync -avu system/* /mnt/sdc5/
sending incremental file list
addon.d/
addon.d/70-gapps.sh
app/
app/ChromeBookmarksSyncAdapter.apk
app/ConfigUpdater.apk
app/GenieWidget.apk
app/Gmail.apk
app/GmsCore.apk
app/GoogleBackupTransport.apk
app/GoogleCalendarSyncAdapter.apk
app/GoogleContactsSyncAdapter.apk
app/GoogleEars.apk
app/GoogleFeedback.apk
app/GoogleLoginService.apk
app/GooglePartnerSetup.apk
app/GooglePlus.apk
app/GoogleServicesFramework.apk
app/GoogleTTS.apk
app/LatinImeDictionaryPack.apk
app/MediaUploader.apk
app/NetworkLocation.apk
app/Phonesky.apk
app/SetupWizard.apk
app/TalkBack.apk
app/VoiceSearchStub.apk
etc/
etc/g.prop
etc/permissions/
etc/permissions/com.google.android.maps.xml
etc/permissions/com.google.android.media.effects.xml
etc/permissions/com.google.widevine.software.drm.xml
etc/permissions/features.xml
etc/preferred-apps/
etc/preferred-apps/google.xml
framework/
framework/com.google.android.maps.jar
framework/com.google.android.media.effects.jar
framework/com.google.widevine.software.drm.jar
lib/
lib/libAppDataSearch.so
lib/libRSSupport.so
lib/libfilterpack_facedetect.so
lib/libfrsdk.so
lib/libgames_rtmp_jni.so
lib/libgcomm_jni.so
lib/libgoogle_recognizer_jni.so
lib/libgoogle_recognizer_jni_l.so
lib/libgtalk_jni.so
lib/libgtalk_stabilize.so
lib/libpatts_engine_jni_api.so
lib/libplus_jni_v8.so
lib/librs.antblur.so
lib/librs.antblur_constant.so
lib/librs.antblur_drama.so
lib/librs.drama.so
lib/librs.film_base.so
lib/librs.fixedframe.so
lib/librs.grey.so
lib/librs.image_wrapper.so
lib/librs.retrolux.so
lib/librsjni.so
lib/libspeexwrapper.so
lib/libvcdecoder_jni.so
lib/libvorbisencoder.so
lib/libwebp_android.so
tts/
tts/lang_pico/
tts/lang_pico/de-DE_gl0_sg.bin
tts/lang_pico/de-DE_ta.bin
tts/lang_pico/es-ES_ta.bin
tts/lang_pico/es-ES_zl0_sg.bin
tts/lang_pico/fr-FR_nk0_sg.bin
tts/lang_pico/fr-FR_ta.bin
tts/lang_pico/it-IT_cm0_sg.bin
tts/lang_pico/it-IT_ta.bin
usr/
usr/srec/
usr/srec/en-US/
usr/srec/en-US/acoustic_model
usr/srec/en-US/c_fst
usr/srec/en-US/clg
usr/srec/en-US/compile_grammar.config
usr/srec/en-US/contacts.abnf
usr/srec/en-US/dict
usr/srec/en-US/dictation.config
usr/srec/en-US/embed_phone_nn_model
usr/srec/en-US/embed_phone_nn_state_sym
usr/srec/en-US/endpointer_dictation.config
usr/srec/en-US/endpointer_voicesearch.config
usr/srec/en-US/ep_acoustic_model
usr/srec/en-US/g2p_fst
usr/srec/en-US/google_hotword.config
usr/srec/en-US/google_hotword_clg
usr/srec/en-US/google_hotword_logistic
usr/srec/en-US/grammar.config
usr/srec/en-US/hmmsyms
usr/srec/en-US/hotword_symbols
usr/srec/en-US/lintrans_model
usr/srec/en-US/metadata
usr/srec/en-US/norm_fst
usr/srec/en-US/normalizer
usr/srec/en-US/offensive_word_normalizer
usr/srec/en-US/phonelist
usr/srec/en-US/rescoring_lm
usr/srec/en-US/symbols

sent 127,944,934 bytes  received 1,855 bytes  255,893,578.00 bytes/sec
total size is 142,001,100  speedup is 1.11

# After doing rsync
$ ls /mnt/sdc5
addon.d  app  bin  build.prop  etc  fonts  framework  lib  lost+found  media  tts  usr  vendor  xbin
Disk partition for an Android system
The following image shows the partitions in microSD card with an Android OS (4.2.2?) installed.

and the partitions of a brand new microSD card

Arduino Programming
- http://www.udoo.org/ProjectsAndTutorials/get-the-arduino-ide-ready-to-program-udoo/
- http://www.elinux.org/UDOO_programming_the_embedded_Arduino_microcontroller
From Udoo itself
(Update 7/26/2016) the following 2 steps is not necessary on UDOObuntu 2.0. Arduino IDE automatically selects UDOO QDL (Arduino Due) on /dev/ttymxc3. The temperature example based on TMP36 keeps alive even I reboot UDOO.
I can use dmesg | grep ttymxc3 to double check the device is attached.
Use sudo ln -sf /dev/ttymxc3 /dev/ttyS0 each time we boot the Ubuntu (or add it to the local.rc file to ensure it occurs on each boot) . See the forum discussion.
Simple LED sketch works well.
The Ethernet webServer sketch does not work. Why?
On an External computer
First I unplug J18 jumper, remove microSD card, and connect microUSB to CN6 in UDOO.
Download the official Arduino IDE 1.5.4.
I try to use dmesg | grep cp210x to check the device. The obstacle is the device is not found in Arduino IDE (No device found on ttyUSB0). If I try to follow 'Serial Driver' part to download and run 'make' , I will get an error
Linux_3.x.x_VCP_Driver_Source/cp210x.c:164:12: Error: 'usb_serial_probe' undeclared here (not in a function)
Linux_3.x.x_VCP_Driver_Source/cp210x.c:165:16: Error :  'usb_serial_disconnect' undeclared here (not in a function)
Android
Warning!
- In general, it is kind of unusable for the Android Kitkat OS.
- I got a white screen (and 3 buttons on the bottom) when I launched the Play Store app (after I successfully installed it by following the instruction).
- When I open the built-in browser, it shows 'Automatic Google signin'. Then it cannot finish the sign in process.
Switch_between_adb_Debug_and_ADK_connection
http://elinux.org/UDOO_Switch_between_adb_Debug_and_ADK_connection
If we want to switch to DEBUG mode (microUSB in CN3), we first connect UDOO to my computer through CN6, then open type sudo minicom -w. Now in the UDOO system, type
echo 0 > /sys/class/gpio/gpio203/value
echo 0 > /sys/class/gpio/gpio128/value
At this time, we can disconnect the microUSB from CN6 and plug it into CN3. The host machine will find a MASS device (mtp://[usb:003,004]/). We can now give the following command
~/Android/Sdk/platform-tools/adb devices
Though the DUOO is discovered, it is unauthorized. We need to connect UDOO to a monitor and click a checkbox to allow it to become the DEBUG mode.
At this time, we can run the following commands
~/Android/Sdk/platform-tools/adb remount
cd Downloads
unzip gapps-kk-20140105-signed.zip -d gapps-kk-20140105-signed
~/Android/Sdk/platform-tools/adb push gapps-kk-20140105-signed/system/. /system/
At this time, we can see the Play Store is installed. Reboot (click the reset button) to ensure.
Interaction between Linux and Arduino on Udoo using a serial port
The serial port /dev/ttymxc3 is used in UDOO.
There are two methods. I cannot write using the first method (see the script below). For the 2nd method, only one way direction works (tested Python and C).
For some reason, running the following command does not write the data to the file.
sudo echo 1 > /dev/ttymxc3; cat /dev/ttymxc3  # NOTHING ??
ls -l /dev/ttymxc3 # timestamp is changed however
- http://www.udoo.org/tutorial/udoo-serial-libraries-examples/. This includes using Arduino plus one of C, Python, Java and PHP languages. Comparing these 4 languages, Python code seems to be the shortest. In Python case, the pyserial module is used. The module depends on the 'pip' program.
sudo apt-get install python-pip
It is interesting to the python-serial module has been used in Raspberry Pi + Arduino too.
Misc
After installing UDOObuntu
LXDE
Take a look at the Lubuntu wikipedia page to see what applications are suitable to use in a system like Udoo. Udoobuntu use LXDE desktop environment as Lubuntu.
Chromium browser, WebGL and OpenGL
Chromium is heavy (use too several hundred MB memory). NetSurf is light and responsive. Ephany looks more heavy and its responds are slower.
To use Chromium to run hardware accelerated WebGL, get the framework to use OpenGL ES 2.0 on NW.js. Then use the following flag to run chromium,
--use-gl==egl
This will help to run some games devloped with WebGL.
Decoding video and audio is a different thing. Check out libffmpegsumo.so in the Chromium installation directory. Still some videos cannot be decoded or the decoding is slow. It all depends on the GPU driver. So Chromium can have more codecs.
See this and this announcements of UDOObuntu 2 which includes GPU accelerated Kernel 3.14.28 from Freescale and a 3D patched version of Chromium, allowing to use technologies like WebGL.
See http://www.laptopmag.com/articles/enable-hardware-acceleration-in-chrome-10-firefox-4 for a discussion. The Aquarium WebGL demo/testing page is interesting (use/heat up CPU). On my PC I got 22 fps but the UDOO got only 6:( To launch Chromium, UDOObuntu uses chromium-egl. Use https://get.webgl.org/ to check if the browser supports WebGL. Some WebGL test website even crash my PC firefox.
Running glxgears command shows 130-240 fps on UDOO and only 50 fps on my PC. The gears rotates more smoothly on UDOO. On my Odroid (not support OpenGL), I got about 60 fps. On the new Rasp Pi 2 image (2/9/2016), we will get about 60 fps.
To show if the graphics card supports OpenGL or not, run glxinfo | grep render. I got the following output on UDOO
direct rendering: Yes
OpenGL renderer string: Vivante GC880
and the following on my GeForce 9400 GT
direct rendering: Yes
    GLX_MESA_multithread_makecurrent, GLX_MESA_query_renderer,
OpenGL renderer string: Gallium 0.4 on NV96
    GL_MESA_texture_signed_rgba, GL_NV_conditional_render, GL_NV_depth_clamp,
    GL_NV_blend_square, GL_NV_conditional_render, GL_NV_depth_clamp,
Use .local domain to access
udoobuntu 2 beta2 (based on Ubuntu 14.04.3 LTS) has pre-installed avahi-daemon (ps -ef | grep avahi), so we can access Udoo by
ssh [email protected]
Autostart in Lubuntu
http://askubuntu.com/questions/159008/how-to-add-startup-applications-in-lubuntu
hostapd Udoobuntu
Google: Ralink 5370 master mode
- http://udoo.org/forum/threads/udoobuntu-2-with-kernel-3-14.2453/ (July 2015)
- http://www.udoo.org/forum/threads/solved-wifi-hostap.3499/ (Mar 2016). The suggestion of using softAP helps to create hostapd. However, the connected devices still don't have the internet. To fix that, I use the Beaglebone#Internet_over_USB method. The only problem is android device can connect to it (still sometimes get an authentication problem error) but Kindle ebook device cannot connect to the hotspot.
sudo iptables -A POSTROUTING -t nat -j MASQUERADE
echo 1 | sudo tee /proc/sys/net/ipv4/ip_forward > /dev/null
sudo iptables -t nat -L
- https://nims11.wordpress.com/2013/05/22/using-hostapd-with-dnsmasq-to-create-virtual-wifi-access-point-in-linux/ Good information
- https://www.maketecheasier.com/set-up-raspberry-pi-as-wireless-access-point/
- https://www.cyberciti.biz/faq/debian-ubuntu-linux-setting-wireless-access-point/
- http://elinux.org/RPI-Wireless-Hotspot
Package source
udooer@udoo:~$ cat /etc/apt/sources.list
deb http://ports.ubuntu.com/ubuntu-ports/ trusty main universe multiverse
deb http://ports.ubuntu.com/ubuntu-ports/ trusty-updates main universe multiverse
deb http://ports.ubuntu.com/ubuntu-ports/ trusty-security main universe multiverse

# deb-src http://ports.ubuntu.com/ubuntu-ports/ trusty main universe multiverse
# deb-src http://ports.ubuntu.com/ubuntu-ports/ trusty-updates main universe multiverse
# deb-src http://ports.ubuntu.com/ubuntu-ports/ trusty-security main universe multiverse
Play mp3 through (green) audio output
See the forum http://www.udoo.org/forum/threads/audio-output.2045/#post-12412
In my case I need to update my UDOObuntu from beta1 to beta2 (because beta1 only shows hdmi) and then
aplay -l    # vt1613 shows on card 0, hdmi shows on card 1.

sudo apt-get update
sudo apt-get install mpg321
mpg123 -a hw:0.0 -r 48000 XXX.mp3 # ignore "-r 48000" looks fine although the post says vt1613 supports only 48kHz.
Lack of a media player hardware decoding/acceleration
For example the omxplayer in the Raspberry Pi.
Still not available on Udoobuntu 2 beta 3.
Flash video
It is better to not expect (too much) to play any flash videos on an ARM-based linux system. Android is an idea choice to play flash videos on an ARM-based operating system.
http://udoo.org/forum/viewtopic.php?f=17&t=137
sudo apt-get install gnash
sudo apt-get install browser-plugin-gnash
sudo apt-get install firefox
sudo apt-get install gnome-system-tools
Display Size
http://udoo.org/forum/viewtopic.php?f=6&t=119
Internet and Ethernet
If I plug the ethernet cable to a desktop which equips with a USB to ethernet adapter and it was configured to share internet to other computers, then the IP address I obtained is 10.42.0.84.
VNC/remote desktop connection
UDOObuntu 2.0 has VNC ready (/usr/bin/Xvnc based on TightVNC-1.3.9, Xvnc -version). Do not need to specify port 5901. It uses port 5900. See
- http://www.udoo.org/udoobuntu-2-beta-2-is-here/.
- http://udoo.org/forum/threads/gnome-grey-screen.2821/
The default VNC password is udooer. To change it type the following
sudo vncpasswd /etc/vncpasswd
The ps -ef command shows the geometry is 1366x768. Any way to resize it either from the server side or the client side?
After a while (install other software?) the Xvnc does not work anymore. I keep getting the following error.
Error found when loading /home/udooer/.xprofile

RandR extension missing
Client
sudo apt-get install xtightvncviewer
x11vnc
(tested on UDoobuntu 2 beta1 for Udoo dual) For some reason, tightvnc does not work. The x11vnc method works.
http://www.udoo.org/forum/threads/x11vnc.846/#post-5752
sudo apt-get install x11vnc
x11vnc -storepasswd
enter a login password twice and save
cd .config
mkdir autostart
cd autostart
edit $HOME/.config/autostart/x11vnc.desktop
[Desktop Entry]
Encoding=UTF-8
Type=Application
Name=x11vnc
Comment=
Exec=x11vnc -forever -usepw -httpport 5900
StartupNotify=false
Terminal=false
Hidden=false
save and restart and you should be able to vnc on port 5900
The client needs to run xvncviewer XXX.XXX.XXX.XXX:0 or xvncviewer XXX.XXX.XXX.XXX to connect to UDOO. I have to admit I first use UDOO desktop Network -> x11vnc to play around its GUI dialog. But then after the connection works the first time, I can reboot UDOO and the setting still works.
Note that on my 1920x1080 (16:9) monitor, it seems to better to use the following setup in Udoo in order to get a good screen resolution for the remote desktop. It will get the whole remote desktop on my local monitor w/ good font size.
x11vnc -forever -usepw -httpport 5900 -geometry 1820x1024
For some reason, the vnc connection was disconnected randomly when I tested it from my Ubuntu 14.04.
tightvnc
http://udoo.org/forum/viewtopic.php?f=6&t=110
This tutorial teaches how to add tightvncserver to rc.local file so it is available on booting.
# Install tightvncserver
sudo apt-get install tightvncserver
To run it,
vncserver :1 -geometry 1820x1024 -depth 24
To kill it,
vncserver -kill :1
To run it at startup,
sudo nano /etc/rc.local
# Add the following line before 'exit 0' line.
vncserver :1 -geometry 1820x1024 -depth 24
For some reason, the x11 is grey screen (UDoobuntu 2 beta1 for Udoo dual + Ubuntu 14.04 client). There are some discussion over here. In summary I am searching to run tightvnc on Lubuntu desktop. This is the final solution. On the UDoobuntu 2 beta 1, make sure the file .vnc/xstartup looks like
#!/bin/sh

xrdb $HOME/.Xresources
xsetroot -solid grey -cursor_name left_ptr
# x-terminal-emulator -geometry 80x24+10+10 -ls -title "$VNCDESKTOP Desktop" &
# x-window-manager &
# Fix to make GNOME work
# export XKL_XMODMAP_DISABLE=1
# /etc/X11/Xsession
autocutsel -fork
lxsession -s Lubuntu -e LXDE
For the client, we can run xvncviewer 10.42.0.84:1 or using Remmina Remote Desktop Client program built in Ubuntu OS.

View Ubuntu 12.04 Desktop on Android (Galaxy tab 8.9) by using bVNC Free - Secure VNC Viewer app.
NoMachine
NoMachine even supports Linux i386/AMD64/ARMv6/ARMv7. It is reported faster than VNC.
Speed comparison via C program
http://udoo.org/forum/viewtopic.php?f=2&t=470
Clonezilla image of Ubuntu 13.10 with ROS
http://udoo.org/forum/viewtopic.php?f=2&t=147&start=10
Node.js + GPIO
http://udoo.org/forum/viewtopic.php?f=8&t=391
http://udoo.org/forum/viewtopic.php?f=8&t=431 (Installation of Node.js)
Set up Qt
- http://udoo.org/forum/viewtopic.php?f=8&t=247 (OLD post)
- http://www.udoo.org/qt-3d-with-opengl-es-2-0/ (Working)
- http://www.udoo.org/ProjectsAndTutorials/how-to-build-qt5-for-udoo/ build Qt5
For Qt4, the configure command from BBB works.
For Qt Creator version 2.5.2, it took about 3-4 hours to make.
Building Qt4.8.6 and Qt Creator 2.5.2 takes 3.7GB space.
Change time zone
sudo dpkg-reconfigure tzdata
more /etc/timezone
# US/Eastern
sudo service cron stop
sudo service cron start
Check imx CPU temperature
- http://www.udoo.org/forum/threads/several-issues-hot-cpu-high-cpu-load-with-arduino-ide.2092/#post-11575
- http://elinux.org/Jetson/Thermal
- http://superuser.com/questions/157461/temperature-monitoring-on-dell-precision-m4500-under-linux-sensors-detect-doesn
Print the current temperature in thousandths of degrees Celsius
udooer@udoo:~$ cat /sys/devices/virtual/thermal/thermal_zone*/type
imx_thermal_zone
udooer@udoo:~$ cat /sys/devices/virtual/thermal/thermal_zone0/temp # 1 chrome tab, 1 terminal
52244
Another way is to use the sensors command.
udooer@udoo:~$ sudo apt-get install lm-sensors
udooer@udoo:~$ sensors
imx_thermal_zone-virtual-0
Adapter: Virtual device
temp1:        +37.2°C  (crit = +95.0°C)
Initially when Udoo started, the temperature is 37.2°C. 5 minutes later, the temperature is 45.0°C.
Wii remote/balance board
With its bluetooth dongle, I can connect Wii remote and balance board with UDOO(buntu) 2. See the Raspberry page.
Slideshow from bing/google search
- Google: http://theslideshow.net/ 64 images maximum
- Bing: After image search, click '...More' and pick ►SlideShow.
Slideshow from flickr
Use flickrit service. It's HTML5 w/o using any flash.
Just enter width, hight, some keywords and (typing) security words. It will generate a snippet of code to put in your HTML file.
Note that the generated code has a bug. We need to change
src='//flickrit.com/...'
to
src='http://flickrit.com/...'
Also we can insert some basic html code around the snippet
<!DOCTYPE html>
<html>
<head>
  <title>Flickr slideshow</title>
</head>
<body>
<iframe id='iframe' src='' </iframe>
</body>
</html>